Showing posts with label altered matchbox. Show all posts

Wednesday, November 26, 2014

Santa's Workshop

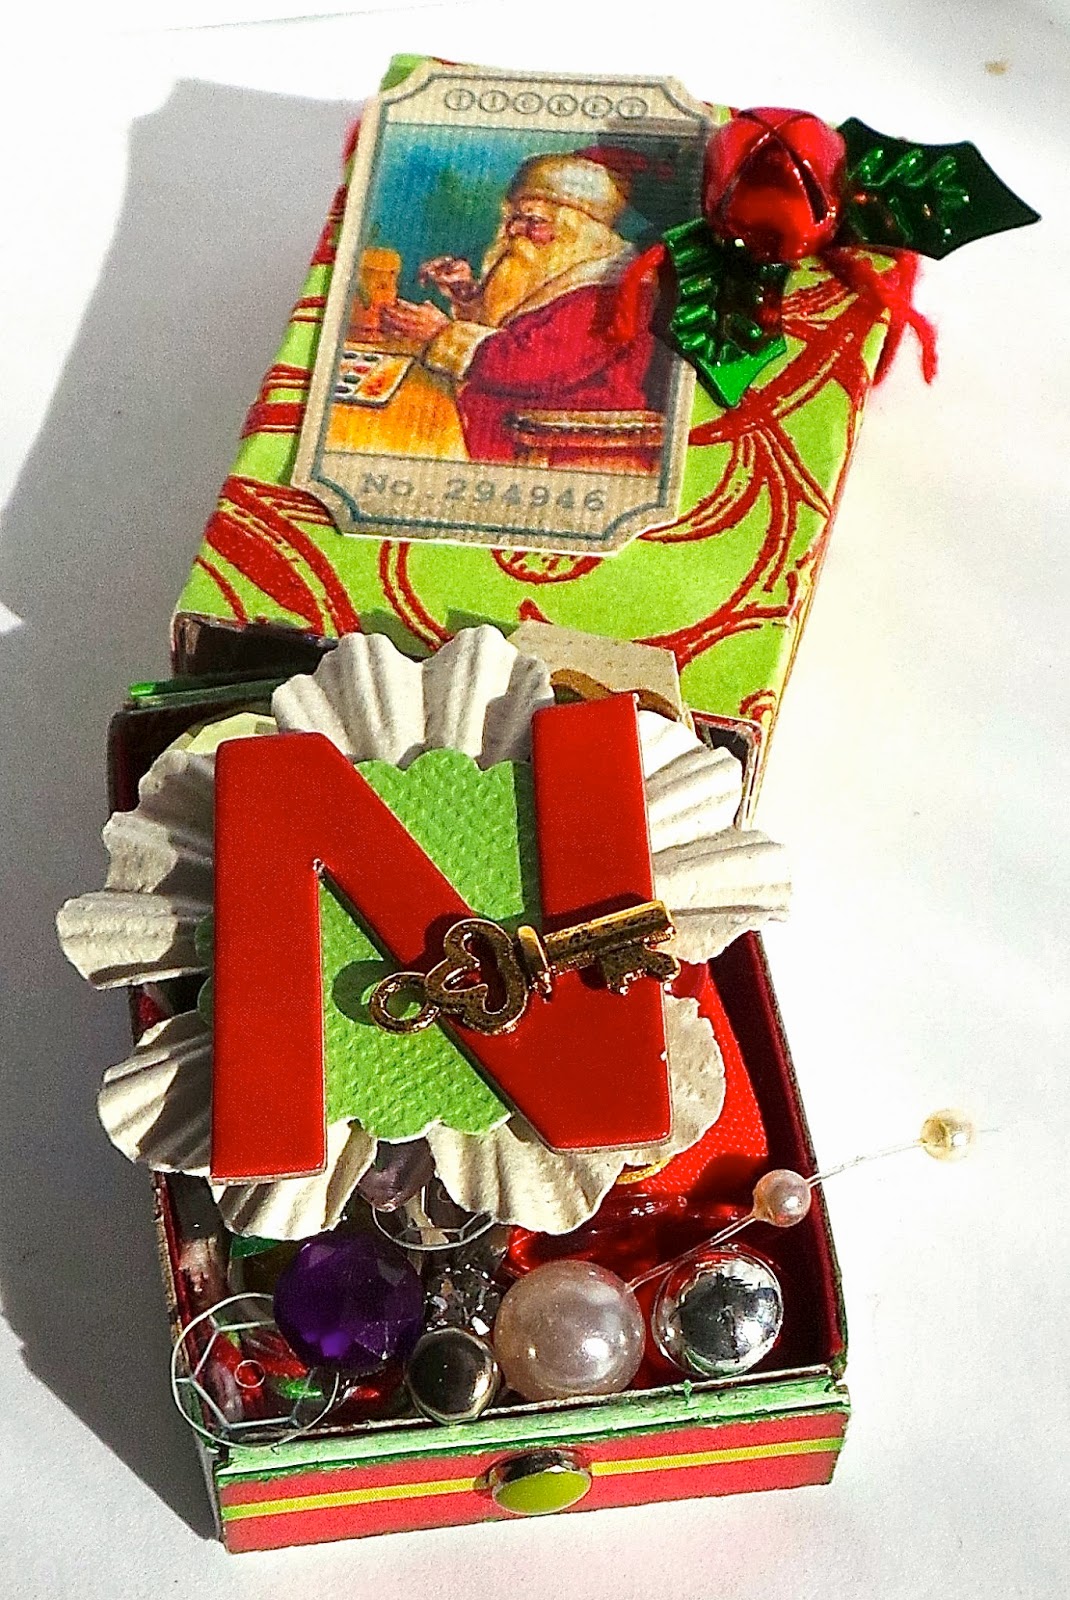
Hi everyone! I'm here to share a project I created for a swap I am in over on Swap-bot. For this swap we had to alter a 32 count matchbox with a Christmas theme and fill it with goodies.


I used the Cindy Lou Swirl Glitter Cardstock to cover inside and out the surfaces of the matchbox.


I also used one of the Santa tickets from the  Merry Christmas Digital Collage Ticket Sheet from the Cameo Shoppe. All digital images are 75% off through the 28th of November. Now would be a great time to stock up on images for upcoming projects.


This is all of the little bits and pieces of goodies I stuffed into this little matchbox.


It's hard to believe I was able to stuff all of that into this little bitty matchbox but I did…here's the proof :-) I hope my swap partner likes with I put together for her. :-)
If you have any questions please let me know.


Supplies Used:
Robin's Nest: Cindy Lou Swirl Glitter Cardstock, Cameo Shoppe: Merry Christmas Digital Collage Ticket Sheet, 32 count matchbox, Brad, jingle bell, dew drops, ribbon, paper flower, sequins, punches

Thanks for stopping by, hope your Wednesday is awesome and enjoy creating!


Tuesday, September 10, 2013

Halloween Greeting Mini Matchbox

Hi everyone! I'm back with a really quick post today. I want to share this little 32 count matchbox I altered with some left over Robin's Nest Halloween (Transylvania) collection that is 20% off this whole month. I also used a Halloween image from the Cameo Shoppe which I fussy cut the image out and added stickler to it to add a little sparkle. :-)


These matchboxes are really quick and easy to alter and can be used for a Halloween treat or you can add bits and pieces of fun Halloween crafty goodness to give to a friend.


You would be surprised what you can fit into one of these matchboxes. Buttons, bling, ribbon, fiber, charms, images, candy, etc. 


Supplies Used:
Robin's Nest: Sunflower Dew Drops
Sequins
Ribbon
Paper Studio Embossing Folder
Stickles
Empty 32 count matchbox

Thanks for stopping by, hope your Tuesday is awesome and enjoy creating!!!


Sunday, July 28, 2013

Animal Print with a Vintage Twist

Hi everyone!!! I'm back this month to share a Rolodex holder with cards that I created using some awesome Animal Print cardstock that is 20% off over at the Robin's Nest.  Also this month we have teamed up with Gina's Designs to showcase some of their wonderful products too. 
I love to alter Rolodex cards and belong to a few groups over on Swap-bot that are solely dedicated to altering these little works of art. I have a collection of this cards but no holder to put them in. I didn't want the typical holder that you buy out at an office supply place. I wanted to create one but didn't know how or what I would use. After much thought and one failed attempt this is what I came up with.


This is what my Rolodex holder started out as before I altered it. I actually used the "drawer" of the matchbox to create the holder...hold onto the "sleeve" because I might just have a project for next month using that in some fun way...wink wink ;-)


The front of the box measure 1/2 inch down and mark with a pencil. Cut down to the mark on either side of box. 


Fold down and adhere to box.


Next cut 4 chipboard pieces to 3/4x4 1/2 inches and another 4 chipboard pieces  to 1 3/8x4 1/2 inches. I used a Rolodex card and centered the holes by drawing in each piece of chipboard. Then punch a hole in each one. Line up holes in the the 3/4x4 1/2" chipboard and adhere all together. Then do the same with the 1 3/8x4 1/2" chipboard pieces. These will be glued in later on the front and back inside of the box.


 Use a ruler and draw a line at an angle on each side of the box and then cut. 


 Paint the sides of the box in Spa Blue paint both inside and out. Cut a 2 1/2x4 1/2 " piece of     Dino Feet Glitter Cardstockemboss with the Snowball embossing folder and adhere to the inside bottom of the box. Cut a 4 1/2x 4 7/8" piece of Teal Giraffe Cardstock and  punch two holes in the 4 1/2" side of both ends. I used the two pieces of chipboard that I glued all four pieces together as templates for the teal cardstock. Now you are ready to adhere both of the 3/4x4 1/2" and the 1 3/8x4 1/2" to the inside of the box. Use either binder clips or cloths pins to hold the chipboard in place while it dries. Next adhere the teal cardstock (as below) starting by lining up the holes and wrapping the cardstock around the box until the other end is folded over and the holes are lined up. Again use either binder clips or cloths pins to hold everything in place until it dries.  


Next cut with a small hand saw two 2 1/2" pieces from a 3/16" dowel and paint  both with Spa Blue paint and let dry.


Once the dowels are dry insert into the holes in the box. Below is what it should look like. 


Cut a piece of Teal cardstock 3x5" and then score a 1/2" all the way around the holder. This is considered the "skirt" which you can glue trim to. Fold down and cut the "corners" out to were it should look something like this below. Next adhere to the bottom of the holder. Let dry and then glue the spools to each corner of the holder.


Next adhere lace and ric rac to the "skirt" around the holder.


I inked and painted some of the chipboard pieces from Gina's Design. I let them dry. Then I used The Paper Studio A2 Script Embossing Folder to emboss the butterfly and then inked it in Sahara Sand Chalk Ink.


Cut a small piece of Dino Feet Glitter Cardstock to fit the frame. Emboss and then adhere to the back side of the frame. Since I don't have any pop dots available I used some of the "extras" that are around a set of  rubber stamps I had just bought. I cut and adhered to the back of the frame and then glued it to the holder along with the butterfly and dew drops. 


Waalaaa...cute!!!


Now comes the fun part!!! Decorating Rolodex cards!!! You can either buy the blank Rolodex cards at an office supply place or if you are like me you can either use a diecut and use cardstock like I used the Chocolate Glitter Leopard Cardstock. Or cut them and use a Rolodex tab punch which can be bought at a office supply place too. You can make your cards larger than the standard card...the choice is yours. :-)


I fussy cut the lion out of the Red Lion Cardstock and used a Crocus Yellow wash on the lion and then let dry. Add bits of scrap cardstock, stamped sentiment and a dew drop.


There is no right or wrong way to decorate these cards just have fun and get creative!!!


You can cut images off of envelopes like I did the sunflower below.


The elephant I fussy cut from the Blue Glitter Elephant Cardstock and I also used some printables from Garden Carnival Composition Book Digital Kit and
Vintage Circus Party Printables to spruces up the front and back of this Rolodex.


I used Brown on Brown Animal Print Cardstock and added some stamped tags which I hand cut out. I received these in a swap so I'm not sure of the names of the stamps??? 


I used the Dino Feet Glitter Cardstock for this Rolodex card. Another stamp image, scraps of cardstock, a Gina's Design Doily, some alphabet stickers and a birdie image.


Last but not least is a stamp I actually own. This adorable China doll name is Lottie and it is by Pink Persimmon. I added a flower, dew drop, button, Gina's Design Doily, lace, scraps of cardstock and the stamped word beautiful.


Robin's Nest Supplies Used:
Gina's Designs:
Other Supplies Used:
250/300 Count Empty Matchbox
Lace
Ric Rac
Buttons
Twine
3/16 inch Wooden Dowel 
Hole Punch
Sizzix Snowballs Embossing Folder and Clear Card, Telephone and Address Diecut
The Paper Studio A2 Script Embossing Folder
Various Stamped Images and found images
Scraps of scrapbook paper
Prima Flowers
Spare Parts Wooden 1" Spools
Americana Spa Blue Acrylic Paint
Ceramcoat Crocus Yellow Acrylic Paint
Versa Magic Sahara Sand Chalk Ink
Martha Stewart Leaf Bud Chalk Ink 
Ephemera's Vintage Garden Printables:


If you have any questions about the Rolodex holder or cards please feel free to email me and I will do my best to answer them. Don't forget to check the cardstock that is 20% off over at the Robin's Nest and also check out Gina's Designs for a great selection of cardboard shapes and paper doilies.
Thanks for stopping by, hope your day is wonderful and enjoy creating!!!


Sunday, February 24, 2013

The Robin's Nest: Altered Mini Sewing Box Matchbox

Hi everyone!!! What a crazy month it has been!!! I have been trying to get another craft room ready in my soon to be hubby's house. Packing up stuff to take to Goodwill, pulling staples out of the wall, scraping stickers off of the walls and doors and pulling glow in the dark stars off of the ceiling...can you tell the room belonged to one of his daughters??? ;-) I have paint and laminate flooring bought but I still have to "putty up" the tiny holes in the wall, wipe the walls down and rip the carpet up. Oh so much to do but once it is all done it will be well worth it. :-)
First off I would like to share with you there is a 20% off sale going on in the Robin's Nest store on all Tear shaped Dew Drops and we have also teamed up with Mod Podge this month which I will be using Antique Matt Mod Podge on my project that I will be sharing with you.


When I need to sew on a button or stitch up a hem I always seemed to be searching for needle and thread so I decided that for this month project I wanted to create something to store  my needles and thread in.
Below is some of the supplies I used to create my little notions box.

Robin's Nest Supplies Used:
Tear Shape Dew Drops
Texture-Linen
Robin's Nest Straw Velvet Ribbons**
Calamity Jane Glitter Diagonal Cardstock
Distressed Honeycomb Cardstock
Seashore Glitter Cardstock
Moss Green Glitter
Lakeside Dew Drops
Fresh Mowed Grass Dew Drops
Vintage Angel Sticker
Other Supplies Used:
Prima Flowers
Seam Binding
Tim Holtz Label Pulls
Amercana Blue Spa Paint
Stain
Ink
Buttons
Lace


First off I emptied a 250 count matchbox and then painted the inside with Americana Spa Blue.


Then I lightly spritzed the inside and outside of the tray with walnut ink and then with a paper towel I rubbed and blended it in, let it dry and then measure and cut a piece of Calamity Jane Glitter Diagonal Cardstock to fit the inside of the bottom of the tray.


I then cut two pieces of Seashore Glitter Cardstock for the front and back of the tray. I inked all pieces of cardstock and then mod podged to the tray. I let dry and then punch holes in the tray, add label pull, brads and notions label.   


For the outside cover of the matchbox I measured, cut, folded Calamity Jane Glitter Diagonal Cardstock around the box, inked edges of paper and then after the ink dried I mod podge it to the box.


I then cut a piece of Seashore Glitter Cardstock and folded like the diagram that is below. I inked the edges and used a scallop punch on the folded 1/2 inch end.

 
I adhered a 10 inch piece of seam binding to the middle of the matchbox cover and then mod podge the 2 1/2 inch and 1/4 inch cardstock that I folded on top of the cover. Once that dried I cut a smaller piece of scrapbook paper, mod podge to the top of the 2 1/2 flap. Let that dry and then I used the gate sticker from the   Vintage Angel Sticker sheet and place on top of that and mod podge over the top and the 1/2 inch scalloped flat too.
 
 
I used Texture-Linen,  Robin's Nest Straw Velvet Ribbons** and Distressed Honeycomb Cardstock to create all the flowers on the front flap except I did use two Prima flowers. Below is an example of how to make the linen flower.


First I cut a small strip off of one of the squares of linen, twist it and glue one of the ends. Start rolling it into a circle and then apply glue to back of it.


I used the Robin's Nest Straw Velvet Ribbons** to create the dark and light blue flowers. It was really simple to make. First off you sew thread through the bottom edge of the ribbon. Once you have it as long as you want pull the thread to gather it and then tie off. Then shape it the way you want it to look and glue and add dew drops.


Now for the inside flap...I adhered the other 10 inches of seam binding to the inside flap and then cover it with a piece of matching scrapbook paper. I attached on the opposite side a sheet of needles.
 

Side view of my altered matchbox. Love how the tear shape dew drops colors coordinates so well with all the cardstock I used.


The cream colored mini flowers I used Distressed Honeycomb Cardstock which I used one of my flower punches to punch out a few. I used a glimmer mist to wet them, then placed them on a piece of sponge and used a stylus to shape them. Then I let them dry and wha-laaa instant cute flowers. :-)


I decided that I wanted to foof up my spools of thread. I used a small circle punch and punched out several circles from the Moss Green Glitter cardstock and glued to the top of each spool and then I decorated with dew drops, buttons and flowers.


Now my little sewing box is finished and if I need to sew on a button everything is all in one place and ready to go.
I hope this has inspired you to create your own sewing box or if you don't sew...maybe create a little drawer to hold all your scrapbook embellishments...the possibilities are endless. :-)
Remember to stop by the Robin's Nest  store and check out the tear shape dew drops that are on sale and while you are there go ahead and pick up some cardstock and embellishments too. 
Thanks for stopping by and as always enjoying creating!!!