Friday, June 26, 2020

Oh, How I Love Flowers Rolodex Card

Hey everyone! I'm back with another quick project I created for the Easter Swap I was in awhile back. I used a Rolodex Diecut that I had purchased from Stampin' Up! several years ago(retired). But there are Memorydex diecuts that can be used instead and you can find those diecuts HERE and HERE.


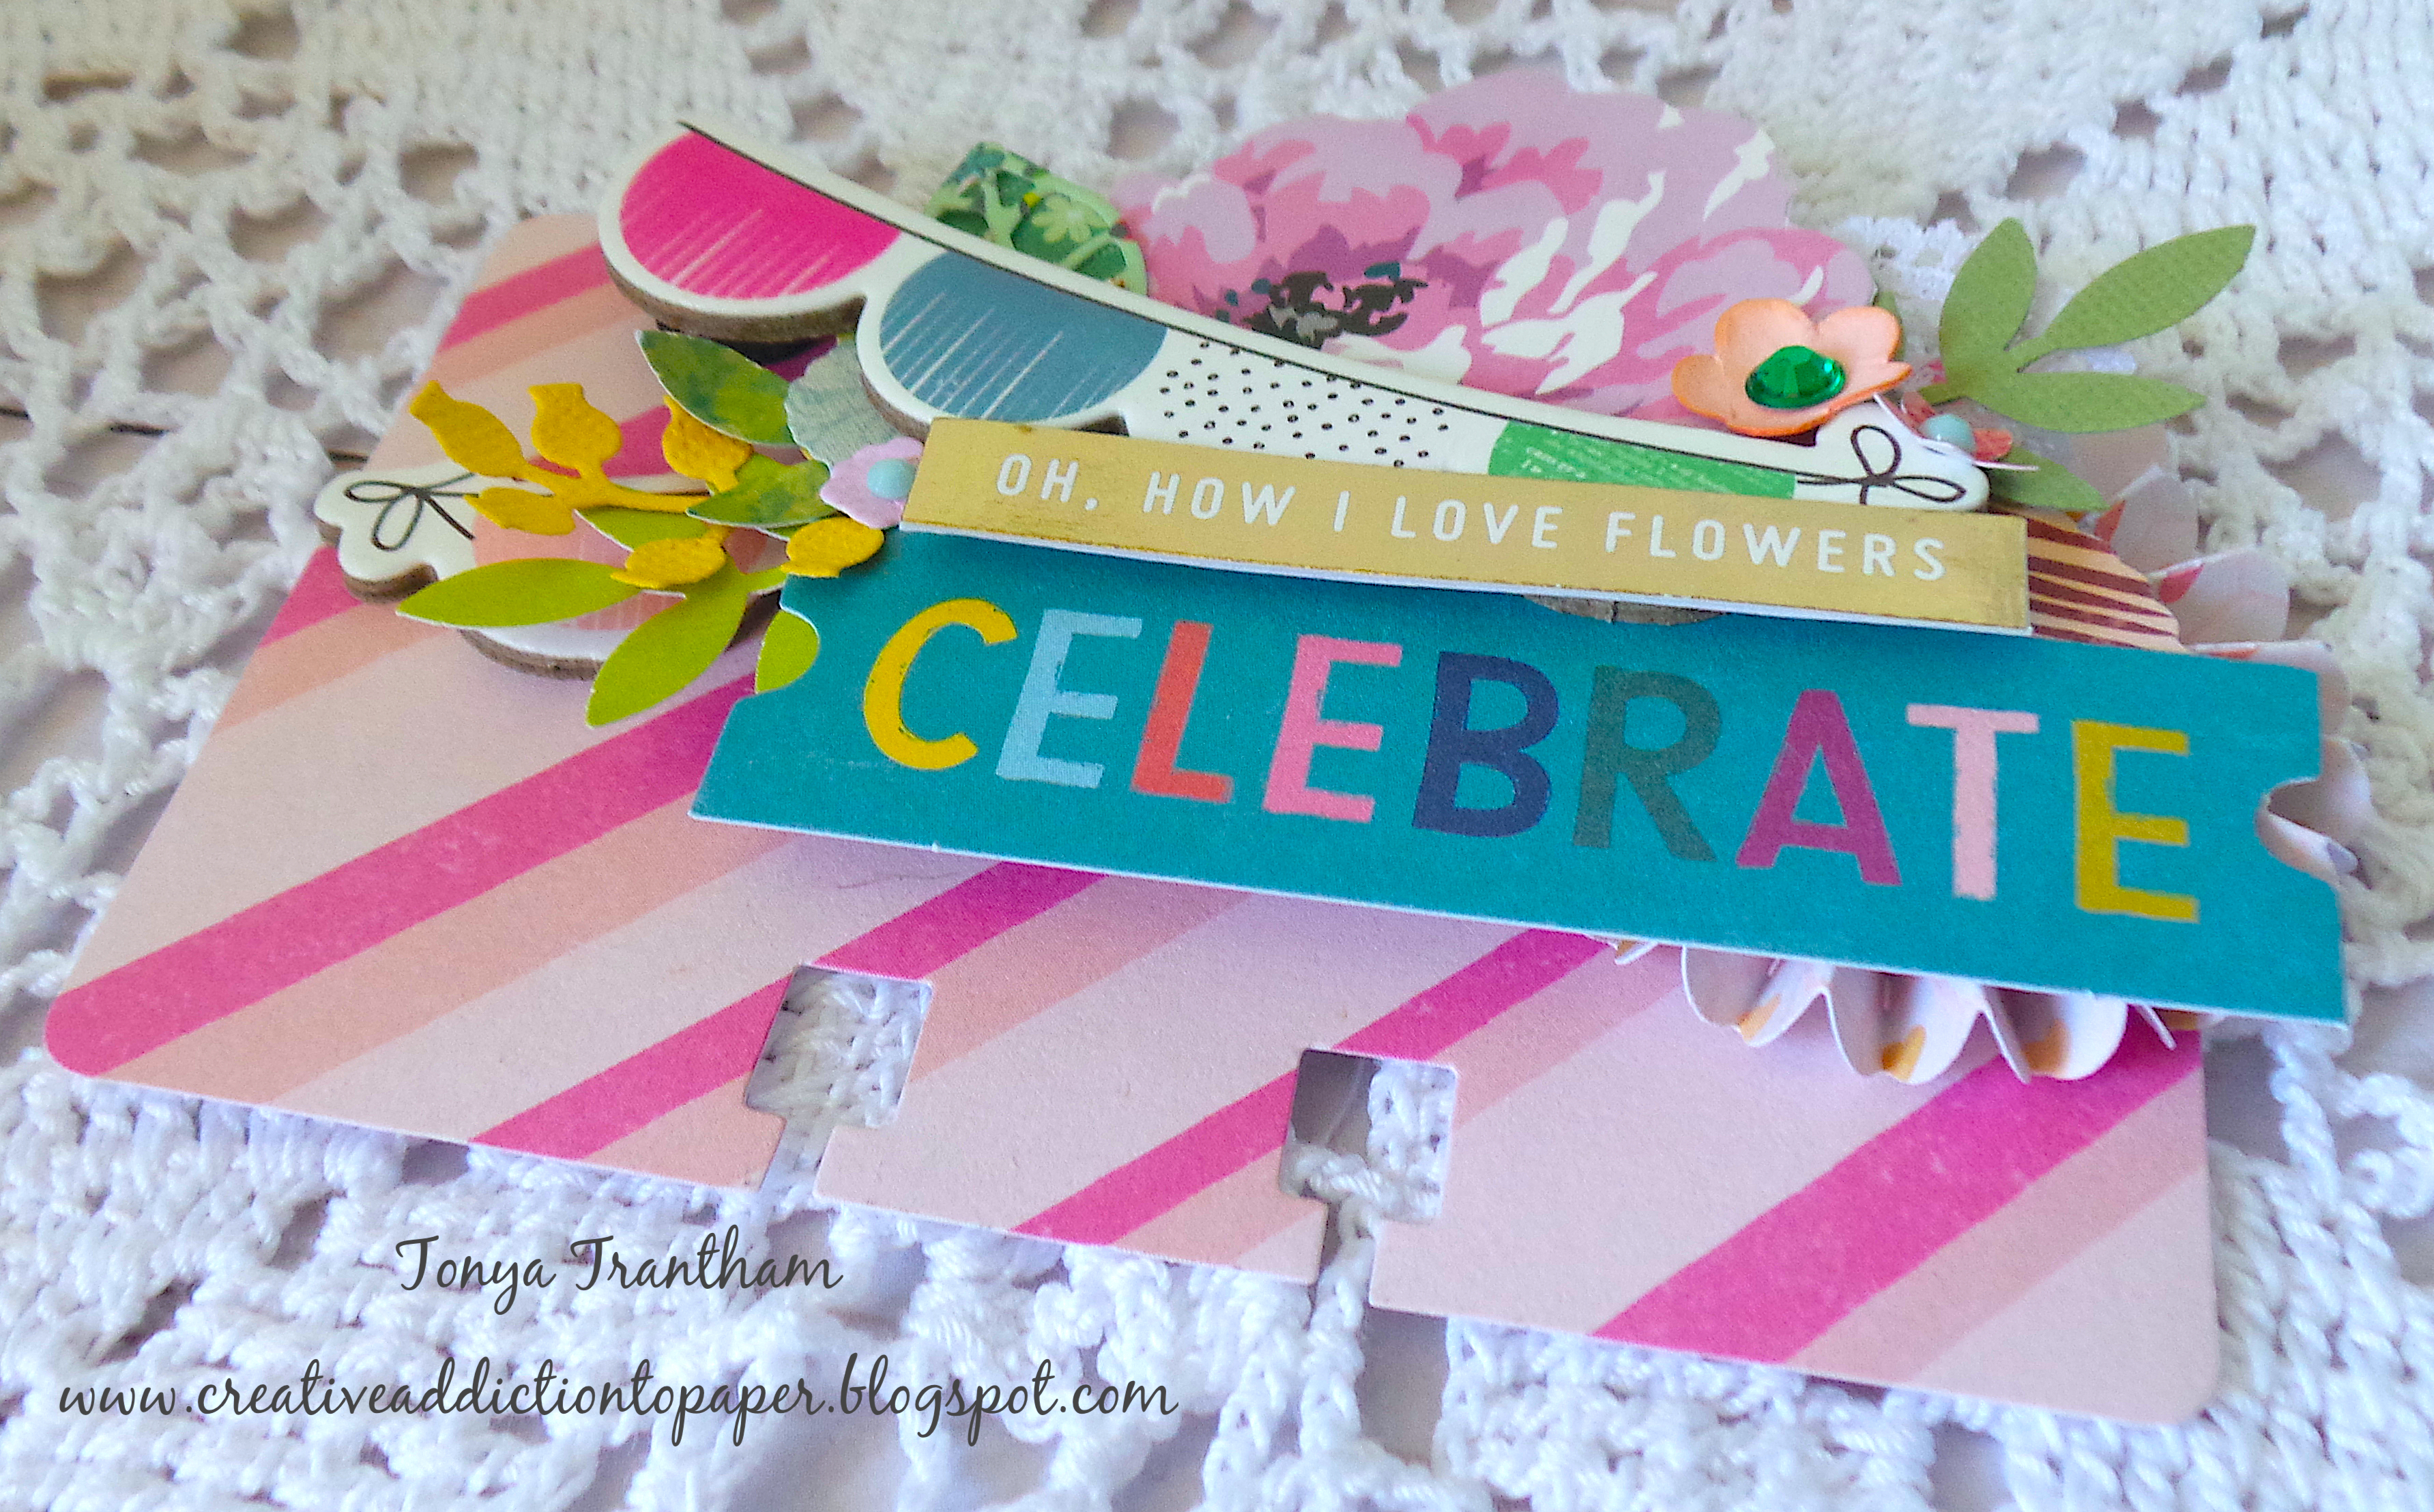
I did a lot of layering with what I had on hand in my stash. I started by adding a Medallion Diecut (retired) to the corner of the rolodex card. I know you can barely see it but it was how I built up the layering on the card. 


I cut a chipboard banner in to and placed next to the medallion diecut and the other half of the banner I placed on top of the medallion. I added Foam Pop Dots to the other end of the banner. I backed a flower sticker with cardstock and fussy cut and added behind the banner. I placed flowers and leaves diecuts from my stash also to the card.


I finished off by adding two sentiments from my stash to complete the rolodex card. As always if you have any questions about this project please let me know.


Supplies

Various Patterned Cardstocks
Beacon Adhesive: Zip Dry Adhesive
Stickers, Chipboard Banner, Various Floral and Leaves Diecuts
Gems 

(Products listed above are Affiliated Links for your convenience)

DISCLAIMERS
This blog is compensated to provide opinion on products, services, websites, and various other topics. Even though the owner(s) of this blog receives compensation for our posts or advertisements. I always give my honest opinions, findings, beliefs, or experiences on those topics or products. The views and opinions expressed on this blog are purely my own. Any product claim, statistic, quote or other representation about a product or service should be verified with each manufacturer, provider, or party in question.This blog contains affiliate links, clicking and shopping through these links helps to support and run Tonya Trantham Designs - Creative Addiction to Paper Blog at no additional cost to you. Today's features are Scrapbook.com Products. 


Thanks for stopping by, hope your Friday is awesome and enjoy creating!


Thursday, June 25, 2020

A Cup of Tea Warms the Soul Tag

Hi everyone! I wanted to hop on the blog today and share a quick tag I created using Pam Bray's Chat Time Rubber Stamps by Emerald Creek. I received this stamp set while I was at Creativation and I was super pumped because Pam is a dear friend of mine and because I finally had my hands on one of her sets of stamps.


I started by placing the larger of the two mugs onto the MISTI Stamp Tool and stamping on a piece of patterned cardstock from the Prima Dulce Collection. I fussy cut the stamped image out and with a Craft Knife cut around the outer edge of the stamped mug to create a slit.


I already had a tag that I had added excess inks from pervious projects to so all I did was emboss it with the Brush Dot Embossing Folder and start adding bits of patterned cardstock I had laying around. Before I adhered the mug to the tag I placed one of the Paper Dolls in the slit.


I decorated the mug with flatback pearls and sequins. I also added flowers and leaves that I had cut from the Floral Garden Diecuts, I shaped the flowers and leaves and adhered loops of thread to the back before gluing to the mug. I also placed the "A Cup of Tea Warms the Soul like a Good Friend" sentiment (I cut it from a scrap piece of G45 cardstock) underneath/next to the mug. 


Next I added a bit of pom pom trim to the bottom of the tag and instead of cut off the excess I left it hanging and I tied a lace bow at the top of the tag. There you have it! I'm so happy with how it turned out and if you would like to see more of Pam's creativity you can stop by her blog HERE. If you would like to purchase Pam's stamps, digital images and embossing powders you can find the shop HERE
As always if you have any questions about this project please let me know.


Supplies

Emerald Creek/Pam Bray Designs: Chat Time Rubber Stamps
Tim Holtz: Paper Dolls
Various Patterned Cardstocks
Pom Pom Trim and Lace
Thread
Beacon Adhesives: Zip Dry Adhesive
Tag
Gems and Sequins

(Products listed above are Affiliated Links for your convenience)

DISCLAIMERS
This blog is compensated to provide opinion on products, services, websites, and various other topics. Even though the owner(s) of this blog receives compensation for our posts or advertisements. I always give my honest opinions, findings, beliefs, or experiences on those topics or products. The views and opinions expressed on this blog are purely my own. Any product claim, statistic, quote or other representation about a product or service should be verified with each manufacturer, provider, or party in question.This blog contains affiliate links, clicking and shopping through these links helps to support and run Tonya Trantham Designs - Creative Addiction to Paper Blog at no additional cost to you. Today's features are Pam Bray Designs, Emerald Creek and Scrapbook.com Products. 


Thanks for stopping by, hope your Thursday is great and enjoy creating!


Tuesday, June 23, 2020

Hey Sunshine Notebook!

Hi everyone! Over on the i-crafter blog today I share this mini notebook that I created using the Hello Sunshine Diecut Set  and the Carly Alphabet Diecuts. For the complete tutorial you can find the blog post HERE.


Supplies 

i-crafter: Hello Sunshine Diecut Set  

i-crafter:  Carly Alphabet Diecuts 

i-crafter: i-Stik Adhesive Sheets

Bloom Street Cardstock Collection

Notebook Paper

Paper Cutter

Diecut Machine

Scissors

Googlie Eyes

Beacon Adhesive: Zip Dry Adhesive

Needle and Thread

Crop A Dile 

Binder Clips

(Products listed above are Affiliated Links for your convenience)

This blog is compensated to provide opinion on products, services, websites, and various other topics. Even though the owner(s) of this blog receives compensation for our posts or advertisements. I always give my honest opinions, findings, beliefs, or experiences on those topics or products. The views and opinions expressed on this blog are purely my own. Any product claim, statistic, quote or other representation about a product or service should be verified with each manufacturer, provider, or party in question.This blog contains affiliate links, clicking and shopping through these links helps to support and run Tonya Trantham Designs - Creative Addiction to Paper Blog at no additional cost to you. Today's features are i-crafter and Scrapbook.com Products. 


Thanks for stopping by, hope your Tuesday is wonderful and enjoy creating!


Wednesday, June 17, 2020

Decoupage Journal Cover DIY

Hey everyone! Today I am playing along with the Designer Crafts Connection's Decoupage Link Party Blog Hop! I'm sharing a simply journal cover I created using the Pocket Notebook Diecut, Botanical Tissue Paper and Mod Podge.


I started by cutting out two Pocket Notebook diecuts covers from Mat Board.


I cut two pieces of the Botanical Tissue Paper larger than the pocket notebook covers. I applied the Mod Podge to the covers with a sponge brush and then carefully placed the tissue paper onto the covers. 


I also slowly worked the air bubbles out and what didn't rub out disappeared with two more coats of Mod Podge.


I adhered both halves of the cover together, added a decorative oval diecut and a chipboard flower sticker to the cover.


I adhered patterned cardstock to the inside covers and spine. I also strung the spine with elastic cording to hold notebooks and closure.
There you have it! I plan on adding junk journal style notebooks to this at a later date so stay tuned. Be sure to hop along with the rest of the DCC team and see how they used decoupage in their projects. You can  the post HERE. Also if you have any questions about this project please let me know.


Supplies

Sizzix/Eileen Hull: Pocket Notebook Diecut
Sponge Brush
Elastic Cording
Patterned Cardstock
Floral Chipboard Sticker and Oval Diecut
Beacon Adhesive: Zip Dry Adhesive

(Products listed above are Affiliated Links for your convenience)

DISCLAIMERS
This blog is compensated to provide opinion on products, services, websites, and various other topics. Even though the owner(s) of this blog receives compensation for our posts or advertisements. I always give my honest opinions, findings, beliefs, or experiences on those topics or products. The views and opinions expressed on this blog are purely my own. Any product claim, statistic, quote or other representation about a product or service should be verified with each manufacturer, provider, or party in question.This blog contains affiliate links, clicking and shopping through these links helps to support and run Tonya Trantham Designs - Creative Addiction to Paper Blog at no additional cost to you. Today's features are Scrapbook.com Products. 


Thanks for stopping by, hope your day is great and enjoy creating!


Monday, June 15, 2020

Bird's of a Feather Flock Together Cork Fabric Notebook

Hi everyone!  Today I'm sharing my Eileen Hull project for the month! This month Eileen Hull's Inspiration Team and Belagio have teamed to do a collaboration. You ask what is Belagio?  Belagio offers cork fabric! I bet the next question is "Where can you find it?" Well, I am getting ready to tell you! 😊  
  • It can be found at Hobby Lobby and they carry packages of cork in 18" x 15" pieces in 9 different patterns in the notions department.
  • Also there are two types of cork fabric, a natural and a natural with gold at most Walmart stores in fabric departments and it's sold by the yard.  
  • As for the entire collection, many quilt and craft shops around the country carry it by the yard and in packaged 18" x 15" pieces.  
  •  Online the Belagio cork fabric is available on Walmart.com and Amazon.com.


I started by applying Adhesive Sheets to both sides of a piece of Mat Board. I placed the Cork fabric onto the front cover and the cardstock onto the inside cover, laid the Notebook Diecut on top of that and run through the Diecut Machine


I placed the Geometrics Art Screen (retired) on the front cover and applied Extra Heavy Gel to part of the cover and let dry. I adhered the chipboard frame and added fussy cut flowers and birds from various pieces of cardstocks along with an enamel dot and button to the cover.


I decorated a mini composition notebook with various cardstock, fussy cut images, a scalloped punch and trim.


I punched two holes in the spine with a Crop A Dil and set the holes with eyelets. I added and tied off elastic cording to the inside of the spine. Next I placed the mini composition notebook between the elastic cording and then covered the cording with a piece of ribbon which I tied off on the outside. I added a charm and more ribbon to the spine to finish off the notebook.
If you are interested in purchasing Belagio cork fabric be sure to check out the Walmart or Amazon websites for a wide assortment of fabrics or you can stop by Hobby Lobby and Walmart stores to make a purchase. Also be sure to stop by Eileen's blog for more inspiration! You can find the latest blog posts HERE and HERE.
As always if you have any questions about this project please let me know.


Supplies

Sizzix/Eileen Hull: Notebook Diecut
ColorBox: Geometric Art Screen (retired)
Eyelets
Beacon Adhesive: Zip Dry Adhesive
Ribbon and Trim
Elastic Cording
Various Cardstocks
Button and Enamel Dot
Charm
 Mini Compositon Notebook 

(Products listed above are Affiliated Links for your convenience)

DISCLAIMERS
This blog is compensated to provide opinion on products, services, websites, and various other topics. Even though the owner(s) of this blog receives compensation for our posts or advertisements. I always give my honest opinions, findings, beliefs, or experiences on those topics or products. The views and opinions expressed on this blog are purely my own. Any product claim, statistic, quote or other representation about a product or service should be verified with each manufacturer, provider, or party in question.This blog contains affiliate links, clicking and shopping through these links helps to support and run Tonya Trantham Designs - Creative Addiction to Paper Blog at no additional cost to you. Today's features are Sizzix, Eileen Hull and Scrapbook.com Products. 


Thanks for stopping by, hope your Tuesday is awesome and enjoy creating!


Sunday, June 14, 2020

Oh Deer! Rolodex Card


Hi everyone! I'm back today with another rolodex card I created for a swap I was in. This rolodex consisted of me using a bunch of leftover scraps and diecuts from previous projects that I had laying around on my desk.


I added a Medallion Diecut to the corner of the rolodex card. I placed Foam Pop Dots to the banners to give depth to the rolodex card and then I started adding leaves and heart punches, lace, ribbon and cheese cloth. I used a deer sticker from Maggie Holmes which I placed on a piece of cardstock and fussy cut before adhering on top of the banners. I added a flower from my stash to the deer.


There you have it! A rolodex made with what I had laying on my desk! As always if you have any questions about this project please let me know.

Supplies

Memorydex Cards HERE and HERE
Beacon Adhesive: Zip Dry Adhesive
Various Patterned Cardstock
Lace
Cheese Cloth
Ribbon
Various Punches
Gem
Maggie Holmes: Bloom Stickers (retired)

(Products listed above are Affiliated Links for your convenience)

DISCLAIMERS
This blog is compensated to provide opinion on products, services, websites, and various other topics. Even though the owner(s) of this blog receives compensation for our posts or advertisements. I always give my honest opinions, findings, beliefs, or experiences on those topics or products. The views and opinions expressed on this blog are purely my own. Any product claim, statistic, quote or other representation about a product or service should be verified with each manufacturer, provider, or party in question.This blog contains affiliate links, clicking and shopping through these links helps to support and run Tonya Trantham Designs - Creative Addiction to Paper Blog at no additional cost to you. Today's features are Scrapbook.com Products. 


Thanks for stopping by, hope your Monday is wonderful and enjoy creating!


Thursday, June 11, 2020

Floral Spring House Rolodex


Hi everyone! I'm back again with a project I created for a swap I was in! For this swap we had to create three rolodex/memorydex cards plus decorate a small basket for Easter...I know Easter was several months ago. 😁 The swap was put on hold for about a month because of Covid19 and once everything started opening back up a new date was set for the swap. Well, by this time I got behind and I am just now getting caught up with my extra curricular projects.


I have an old Rolodex Diecut that I had purchased from Stampin' Up a very long time ago that I used to cut out my rolodex blanks. You can use store bought rolodex cards or here are links to Heidi Swapp's Memorydex Card Diecuts HERE and HERE.


I used Brenda Walton's Country Cottage 3D Diecut, Floral Tapestry Embossing Folder and Eileen Hull's Make It 3D Diecut (all retired) to created the house for the rolodex card. I used Chipboard that I covered in patterned cardstock to created the house and I also backed the rolodex with chipboard as well. I wanted the house diecut to be "thinner" than the original so I cut only the front and back and used the Make It 3D diecuts for the sides and then adhered to the rolodex card base.


I dug into my stash of flowers, leaves and butterfly punches and added those to the roof along with thread, trim and a gem for the center of the flower.


On the corner of the rolodex I adhered more flowers, thread and cheese cloth. And there you have it! The first rolodex of three that I have created. I will be back soon to share the other two rolodex cards. If you have any questions about this project please let me know.


Supplies

Heidi Swap: Memorydex Cards One and Two
Sizzix/Brenda Walton: Country Cottage 3D Diecut (retired)
Sizzix/Brenda Walton: loral Tapestry Embossing Folder (retired)
Sizzix/Eileen Hull: Make It 3D Diecut (retired)
Various Patterned Cardstocks
Beacon Adhesives: Zip Dry Adhesive
Flower, Butterfly and Leaf Spring Punches
Trim
Thread
Gems
Cheese Cloth
Pearl Sprays

(Products listed above are Affiliated Links for your convenience)

DISCLAIMERS
This blog is compensated to provide opinion on products, services, websites, and various other topics. Even though the owner(s) of this blog receives compensation for our posts or advertisements. I always give my honest opinions, findings, beliefs, or experiences on those topics or products. The views and opinions expressed on this blog are purely my own. Any product claim, statistic, quote or other representation about a product or service should be verified with each manufacturer, provider, or party in question.This blog contains affiliate links, clicking and shopping through these links helps to support and run Tonya Trantham Designs - Creative Addiction to Paper Blog at no additional cost to you. Today's features are Scrapbook.com Products. 


Thanks for stopping by, hope your Friday is great and enjoy creating!


Tuesday, June 9, 2020

Meow's it Going? Tunnel Card

Hi everyone! Today over on the i-crafter's blog I share how I created this fun tunnel card using this month's Purrfect Birthday Clear Stamp Set along with the Tunnel Base Card, Swan Diecuts and the Floral Garden Diecuts. For the details you can find the blog post HERE.

MIG4

If you would like to purchase this stamp set along with the diecuts sets I use you can find i-crafter's web site HERE. If you need more inspiration you can find the rest of the design team's posts HERE.

Supplies

i-crafter: i-Burnisher and Pad
Patterned Cardstock
Gems and Buttons
Beacon Adhesive: Zip Dry Adhesive
Blank Ink and Hot Pink Chalk Ink
(Products listed above are Affiliated Links for your convenience)

DISCLAIMERS
This blog is compensated to provide opinion on products, services, websites, and various other topics. Even though the owner(s) of this blog receives compensation for our posts or advertisements. I always give my honest opinions, findings, beliefs, or experiences on those topics or products. The views and opinions expressed on this blog are purely my own. Any product claim, statistic, quote or other representation about a product or service should be verified with each manufacturer, provider, or party in question.This blog contains affiliate links, clicking and shopping through these links helps to support and run Tonya Trantham Designs - Creative Addiction to Paper Blog at no additional cost to you. Today's features are i-crafter and Scrapbook.com Products. 


Thanks for stopping by, hope your Tuesday is wonderful and enjoy creating!