Thursday, August 17, 2017

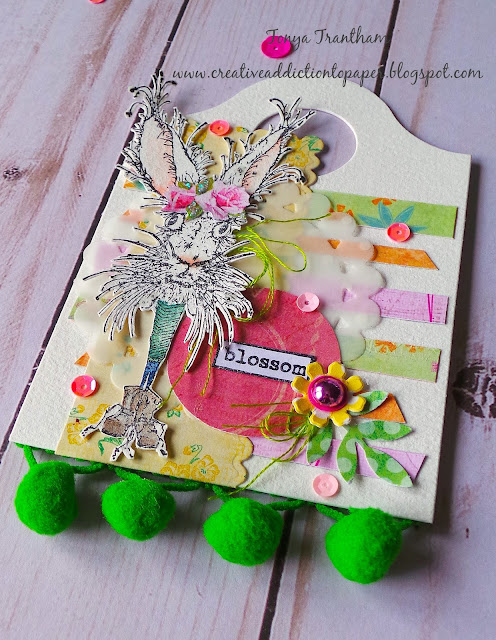
Blossom the Hare Tag

Hi everyone! I am back with another quick tag I created using an assortment of leftover diecuts from previous projects. I started with a diecut from the Caddy Bag as the base for my tag. I also used a Beaded Circle and a Scalloped Rectangle Diecuts from Spellbinders (both are retired diecuts).
I went through my collection of scraps of patterned cardstock and cut six slim strips and adhered to the base of the tag. Next I added the beaded circle, scalloped rectangle and a circle diecuts off center of the tag.


I stamped Herbert Hare Stamp onto a piece of watercolor paper, fussy cut out and watercolored with an assortment of Eileen Hull's ColorBox Ink which can be found HERE I added fussy cut set of roses to the head of the hare and then glued to the corner of the tag.


I stamped the word "blossom" from the Tall Word Collage Set and added it to the circle. I cut a single flower from the Stitchy Flowers & Leaf Diecuts. I shaped, adhered Dew Drop, sequins, thread and I added a small sprig of leaves to the front. I added pom pom trim to finish off the tag.
Also I would like to submit this tag for the following challenges:
Word Art Wednesday: Challenge #296- #297
Stampotique Designers Challenge: Only Animals SDC279


If you haven't purchased Eileen Hull and Friends Journal Treasury ebook be sure to do so before the end of August it is only $11.87 which is 30% off of the $16.99 regular price! I have a journal featured and there are 85 journals from other designers. So LOTS of inspiration packed in one ebook! You can find the link to purchase the ebook HERE. If you have any questions or comments please let me know.


Thanks for stopping by, hope your Thursday is awesome and enjoy creating!


Wednesday, August 16, 2017

Eileen Hull and Friends Journal Treasury eBook Release

Hi everyone! I have some exciting news to share!!! One of my journals that I created with Eileen Hull's Journal Diecut will be in the newest Journal Treasury ebook!
If you like junk journals, planners, art journals, bullet journals, or notebooks of any kind, you will love this book! There are 85 inspirational projects from top notch designers. All have used the Sizzix Journal die by Eileen Hull to create their projects, yet every one is unique and special.
Inside the book, you will find tips and techniques for Journal assembly, supplies to gather, how to make inserts for the book and interesting embellishing ideas.
As you look through the book, you may want additional details on a specific project. Just click on the highlighted link and it will take you to the designer’s blog post listing the supplies and techniques used to create it. If you want to buy the die to make your own Journal, simply click on the highlighted links to order!
Check out the talented makers who have contributed to this treasury- visit their blogs to get to know them- there are sure to be many that you will want to make. Warning: these Journals are addicting. And once you have the die, you can make all you want! Use this book for inspiration and take it any direction you want. Make sure to share it with us in the Eileen Hull Fan Club Facebook group!


Also I would like to share a quick project (to get you inspired 😀)that I created using the Journal Diecut. This journal was so easy to do!


I started by cutting two covers from a hard plastic placemat and I cut another center piece (that has the holes to add elastic strings).


I used the center piece that I had cut to extend the spine of the journal. I lightly sanded  both sides that I would be adding adhesive to. I used Quick Grip adhesive which grabs and holds the plastic in place.


I used elastic and strung my journal and now its ready for notebooks.


This journal would be great for kids in school. Its sturdy enough to be thrown in a back pack and still hold up. If you have any questions about this project or about the ebook please be sure to ask.


Also be sure to purchase your copy of the Journal Treasury by Eileen Hull and Friends! The ebook is on sale the month of August for the low price of $11.87! That is 30% off $16.99. You can find the link HERE for your copy.
If you don't have the Journal Diecut you can find that link HERE.


Also be sure to check out Eileen Hull's blog regularly for LOTS of creativity from her Inspiration Team. 
Thanks for stopping by, hope your Wednesday is awesome and enjoy creating!


Monday, August 14, 2017

Eileen Hull's Heartfelt House Pocket Diecut and Sizzix Maker Challenge

Hi everyone! Are you ready for the Sizzix Maker Challenge featuring Eileen Hull's House Pocket Diecut??? I am!!!


I decided to create a whimsical 3D house. I cut two houses, four eaves from chipboard and two of the "sides" from the Make it 3D Diecut.


I cut another two houses and two 3D sides from cardstock. I inked the edges of the Momenta cardstock before adhering to the chipboard. 


Side note I cut my 3D sides down so I could get my hand inside to hold the tabs down while the adhesive dried and I cut the tabs off of the cardstock since it wouldn't be seen.


Next I cut a base for my house to sit on from a scrap piece of matboard. I used a mix of  watered down Leaf and Frog ColorBox Blends ink which can be found HERE. Once the base was dry I adhered the house on top of it.


I thought I had taken a before photo of the roof but apparently I didn't. I cut a 2" x 7 3/4" piece of matboard measure and folded at 3 7/8". I embossed the roof and used a combination of Tattered Leather and Bronze Glimmer Mists on the roof. I splattered Aloha Green Glimmer Glaze to give the roof the look of moss growing on it. After I adhered the roof to the house I added real bits of dried moss and flowers to the roof.


I cut strips from an old sheet of music and adhered around the base of the house. I added moss and I cut flowers from the Stitchy Flowers and Leaf Diecuts, shaped, put together and added buttons and gems to the center of each.


I added pieces of a bingo card to the front and back of the house. Next I lightly added color to the little boy's cheeks and hair before adhering it and a bird that I cut from the Birds & Butterflies Diecuts to the front of the house. To finish both off I added a crown and party hat.


The back side of the house I cut from cardstock a butterfly from the Bird & Butterflies Diecuts. I adhered it to the house and added a zipper pull to the center of the butterfly along with a bit of flower ribbon.
Do you need more inspiration? Hop on over to Eileen Hull's blog to see what the team has been up to. You can find the blog HERE. Also if you have any questions please let me know.


Also be sure to join the challenge which you can find the link HERE.


I would like to submit this project for the following challenges.


Thanks for stopping by, hope your Monday is awesome and enjoy creating!