Tuesday, September 25, 2018

Eileen Hull: Mushroom Wrapped Journal

Hi everyone! I back today with my Eileen Hull's Inspiration Team project! The challenge for this month was to create a project in a Halloween/Autumn theme. It has been hard to get excited about Fall since the temperatures have been in the upper 80's to lower 90's so I decided to use the new DCWV Okey Dokey Paper Pad and go with a black and white leaves, flowers and mushroom theme...you could say kinda Autumn themed. 😁


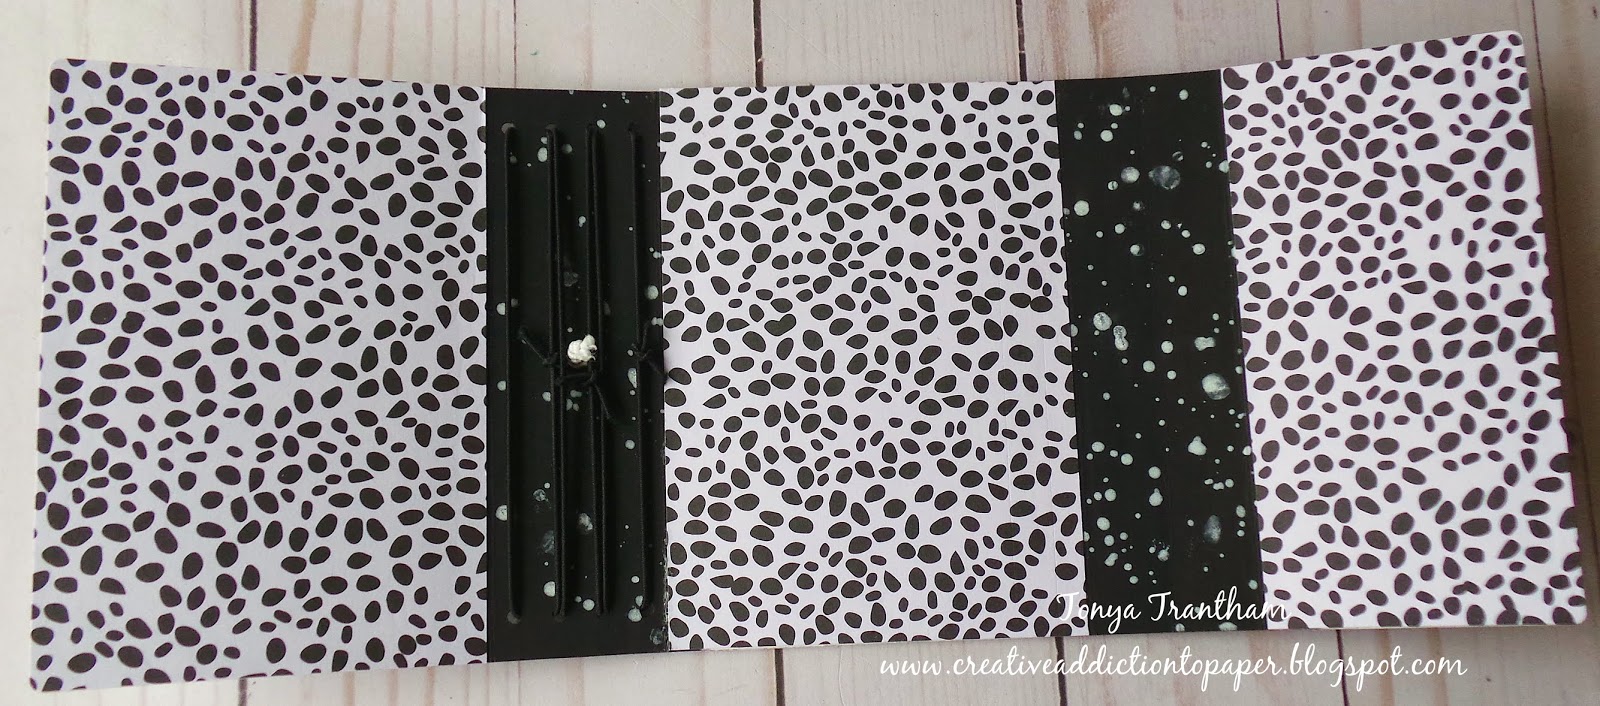
First I cut the Wrapped Journal Diecut from Mat Board and inked the inside and outside spines with ColorBox Blends Ebony Ink. Once it was dry I splattered ColorBox Blends Coconut and Flagstone onto the outside and inside spines.


I cut the inside cover with one of the black and white speckled cardstock from the Okey Dokey Paper Pad and adhered inside.


From the same paper pad I picked out the black and white line drawings of leaves, flowers and mushroom and cut and adhered to the outside cover. From the internet I found a vintage black and white drawing of a mushroom. I printed and fussy cut the mushroom out. I adhered a piece of patterned cardstock to the smaller cover and the mushroom. On the larger cover I applied a piece of Adhesive Sheet to the back of patterned cardstock. I placed the "Journal" Diecut from the Journaling Words Diecuts and  ran through the diecut machine. I peeled the backing off of the adhesive and added the "Journal" diecut to the cover. I poked a small hole in the center of the spine and ran white elastic cording through the hole and tied off to create a closure. I also strung black elastic cording in the spine to hold journaling notebooks.


I cut the stitching out of a mini notebook. You can find these in packs of three at the Dollar Tree. 


I got four booklets with six pages each from the one mini notebook.


From the Okey Dokey Paper Pad I cut covers for each of the notebooks and then stitched all pages and covers together. I also added my initial  and "Journal" diecut to the cover of two of the notebooks.


I also cut dash boards to cover some of the notebooks and some will hold sticky notes.


I plan on adding more to the journal and will share once I finish those projects. 😀 Also be sure to stop by Eileen Hull's blog to see the latest projects the Inspiration Team has created. You can find those post HERE and HERE. As always if you have any questions about this project please let me know.


I would also like to submit this project for the following challenge.

Mini Album Makers Challenge: September


Thanks for stopping by, hope your day wonderful and enjoy creating! 


Monday, September 24, 2018

ClearSnap and Xyron: Celebrate Tag

Hi everyone! Today I am back to share a project I created for a ClearSnap and Xyron collaboration. Whenever I ink up projects and have leftover ink I grab a blank tag and lay/paint it...I hate to waste ink 😁 and when I need a quick project I have a stash of inked tags ready to go.


How I inked this Tag I used a glass tray which had Coral and Dandelion Inks. Water had been added to each ink and I laid the tag into the ink mixture and made sure tag was completely covered with ink. Then I removed and let dry.


The tag I placed inside of the Printer's Ornaments Embossing Folder and ran through the diecut machine. I cut the balloon journal card form the Color Washed Paper Pad. I placed the journal card face up in the Xyron Creative Station Lite and ran through the machine. Peel backing off and add journal card to the tag.


Ink the girl and legs rubber stamps from the Dress Up Stamp and Cut Set with Wicked Black ink. Fussy cut girl body and legs.
Ink an Acrylic Block with Pink Sky Chalk Ink. Load paint brush with water and pink sky ink and paint the girl image's cheeks. Also paint a scrap piece of watercolor paper and let dry. I cleaned the acrylic block and inked with Candied Yam Chalk Ink and I loaded a paint brush with water and Candied Yam ink and paint the girl image's hair.


I cut a 1"x4" piece of cardstock and used the Xyron Tape Runner to adhere to the tag.
Next I placed a piece of cardstock onto the skirt diecut and run through the diecut machine. With the tape runner I adhered the girl image, legs, and skirt to the tag. I cut three banners from various patterned cardstock and adhered with the tape runner to the upper corner of the tag.


I punched a flower from the painted water color paper and a leaf sprig from a scrap of green cardstock. I cut two of the leaves from the sprig and adhered a flower and leaves to the waist of the girl. I added a Glossy Dot to the center of the flower and several loops of thread underneath the flower.

I added the "Celebrate" sticker to the banner and the Party Hat to the girl's head. I finished the tag by tying green seam binding to the top of the tag.


As always if you have a question about this project please let me know. I would also like to submit this project for the following challenge:

Word Art Wednesday Anything Goes: #352-#353


Thanks for stopping by, hope your Monday is wonderfully awesome and enjoy creating!


Friday, September 21, 2018

ClearSnap, Paper House and Michael's: Mini Santa Journal

Hi everyone! This month ClearSnap, Paper House and Michael's have teamed up! We were challenged to use only products that you would find in Michael's Store. Though this paper pad isn't a Christmas theme I came up with a mini Santa journal for my project.


I inked the Jolly Santa Rubber Stamp with Wicked Black Ink and stamp onto a piece of speckled cardstock from the Paper House Color Washed Paper Pad


I inked the Santa stamp again with Wicked Black ink and stamp onto a piece of red cardstock (Color Washed Paper Pad). Only the Santa hat and berries will be needed. Next I fussy cut Santa, hat and berry images out and adhered the hat and berries to the Santa image.


I inked an Acrylic Block with Ice Jade and Aquamarine Chalk Inks, loaded a paint brush with water and paint the holly leaves with Ice Jade ink. Next I added shading to the holly leaves with the Aquamarine Chalk Ink. I cleaned the acrylic block and inked with Arctic Deep and Sea Crystal Chalk Inks and painted Santa's eyes with both inks. I also added Pink Sky Chalk Ink to the acrylic block and paint Santa's cheeks.


I applied Clear Glitter Glue randomly to Santa's beard and holly leaves and finished by adding mini light green gems to the Santa image.


I cut a 6"x9" piece of stripped cardstock (Paper House Color washed Paper Pad) and fold into to create a 4 1/2"x6" cover for the journal. I  also cut five pieces of patterned cardstock in various sizes to fit the inside journal cover and folded those in half was well.

I measured 2 inches down on each end of the spine of the cover and mark with a pencil, poked a hole with the Tool 'n One on each marked spot. I centered the pages inside the journal cover, poke holes in each page. I threaded a Needle with Twine and sew all pages inside and tied the twine off on the inside of the journal.

Next cut 2 1/4"x6" piece of patterned cardstock and adhere to the cover along with the Santa image. Cut a gold piece of cardstock 3 5/8"x 1/2" and a patterned piece of cardstock 1 1/4"x3". Cut the end of the 1 1/4"x3" at an angle to create a banner. Adhere both to the bottom corner of the cover. I cut a Seal (Hipster 1 Diecuts) from red cardstock. Next I cut the "d", "e" and "c" letter stickers down and add to the seal diecut.
There you have it! This little journal can be used to take notes, as a planner or photos can be added to it! 

Also I would like to submit this project for the following challenges:
Mini Album Makers Challenge: September
Word Art Wednesday Anything Goes: #352-#353
Crafter's Castle: Challenge #9


Thanks for stopping by, hope your Friday and weekend is wonderful and enjoy creating!


Thursday, September 13, 2018

ClearSnap: God is Everlasting Love Tag

Hi everyone! I'm back again today with another new set of stamps from ClearSnap! This set is called Bible Clear Stamps and they are perfect for Bible journaling, cards or words of encouragement. 


I cut old sheet music to fit the 6.25"x3.125 tag and Mod Podge the whole tag and place the cut sheet music onto the Mod Podged area. Next I inked an art dauber with Creamy Brown Chalk Ink and ink all edges of the tag and adhered a doily off center and glued the excess to the back side of the tag.


I inked the dove stamp with Wicked Black Ink and stamp onto piece of cream cardstock and fussy cut the dove image out. Next I inked a glass tray with Ice Jade and Aquamarine Chalk Inks and added a small amount of water to each ink. I painted the leaves and stem with Ice Jade and highlighted the leaves with Aquamarine.


I inked "God is" and "Everlasting" with Wicked Black Ink and stamp onto a piece of cream cardstock and cut out and ink edges with Creamy Brown Chalk Ink. Next I inked "Love" with Wicked Black Ink and stamp onto a piece of patterned cardstock. Fussy cut the word out and adhered "God is", "Everlasting" and "Love" on top of the doily.


I cut a small strip of patterned cardstock and adhere underneath the "Love" image. Glued the dove to the strip of cardstock and added a gem to the center of the flower.


At the bottom of the tag I adhered pom pom trim and cut an 1 1/2" piece of lace and glue to the bottom corner of the tag and add a button. I finished off by cutting a  6" piece of lace and tie to the top of the tag. As always if you have any questions about this project please let me know.


I would also like to submit this project for the following challenge:
Word Art Wednesday Anything Goes: Challenge #352-#353 


Thanks for stopping by, hope your Thursday is awesome and enjoy each day creating!


Wednesday, September 12, 2018

ClearSnap: Need a Good Cry Kleenex Belly Band

Hi everyone! I want to share a project I created using some of the new stamp sets that ClearSnap has come out with this month! 


I started with the ColorBox: Buttercup Clear Stamp set, some patterned cardstock and a 8.4"x8.4"Kleenex Tissue Pack for this project.


First I cut one 2"x10" patterned cardstock and 2 1/2"x10" orange cardstock and wrapped the 2 1/2"x10" around pack of Kleenex and adhere at the end of the cardstock to create a belly band. I completed the same step for the 2"x10" patterned cardstock.


I cut one Beaded Circle Diecut from the Yellow and Ivory Mini Dot Reverse Cardstock and adhere to the center of the belly band.


I stamped the "You Need a Good Cry" sentiment with Wicked Black Ink onto a piece of cream cardstock and cut the end of cardstock to create a banner. I inked the edges of the banner with Marigold Ink and adhere to the belly band.


I adhered sequins and gems around the Beaded Circle Diecut and punched two seals from patterned cardstock and adhere to the corner of the "You Need a Good Cry" sentiment.


Next I punched a heart from patterned cardstock and glued on top of the seals.I punched a mini flower, leaf sprig from patterned cardstock and cut one leaf off of the sprig and adhere to the back of the flower before gluing to the heart. I finished off by adding a gem to the center of the flower. There you have it! If you have a friend that is down and having a rough time this is a perfect pick me up that hopefully after they have a good cry will bring a smile to their face. As always if you have any questions about this project please let me know.


Thanks for stopping by, hope your Wednesday is awesome and enjoy creating! 


Monday, September 10, 2018

Let's Make Up! Card

Hi everyone! I wanted to share a quick card I created with y'all today. I had a box of 3 1/2"x5" blank cards and envelopes that I had picked up at the Target Dollar Spot. The cards are a solid color and I thought they would be perfect to decorate.


I used an assortment of scraps to decorate this card. I added a floral cardstock mat to the front of the card. I printed off this "make up" girl from Lisa Altered Art on etsy and fussy cut the image out and adhered to the corner of the card.


I punched from patterned cardstock a couple of mini flowers, leaf sprig, butterfly, banners and two type of seal punches and adhered to the upper corner of the card. I also added twine, gems and sequins.


I printed from the computer the "I'm sorry...Lets Make Up!" sentiment. I cut, matted with cardstock and glued to the card base. I love the little girl and the quirky sentiment! 😄 As always if you have any questions about this card please let me know. 

I would like to submit this project for the following challenges:
Word Art Wednesday Challenge: #350-#351
Crafter's Castle: Challenge #9


Thanks for stopping by, hope your Monday is wonderfully awesome and enjoy creating!