Tuesday, November 26, 2019

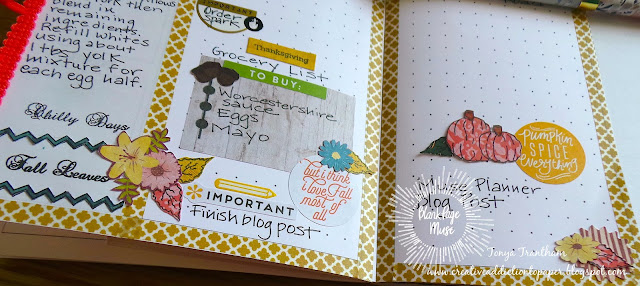
Plan with me Thanksgiving Pages

Hi everyone! Today I am over on Blank Page Muse blog sharing how I created these planner pages using Pam Bray's Planner Stamps. You can find the blog post HERE.
Also if you aren't following Blank Page Muse on their other social medias you can find them at:


Supplies

Blank Page Muse/Pam Bray: Everyday Planner Clear Stamps
White Sheet Paper
Washi Tape
Patterned Cardstock
 Happy Planner and Momenta Planner Stickers
Seal Punch
1407 B6 Planner Notebook 

(Products listed above are Affiliated Links for your convenience)

DISCLAIMERS

This blog is compensated to provide opinion on products, services, websites, and various other topics. Even though the owner(s) of this blog receives compensation for our posts or advertisements. I always give my honest opinions, findings, beliefs, or experiences on those topics or products. The views and opinions expressed on this blog are purely my own. Any product claim, statistic, quote or other representation about a product or service should be verified with each manufacturer, provider, or party in question.This blog contains affiliate links, clicking and shopping through these links helps to support and run Tonya Trantham Designs - Creative Addiction to Paper Blog at no additional cost to you. Today's features are Blank Page Muse Products. 


Thanks for stopping by, hope your Tuesday is awesome and enjoy creating!


Monday, November 25, 2019

Mini Autumn Breezes Journal

Hi everyone! I'm here today to share this mini journal I created for my Eileen Hull's Inspiration Team project. I had actually started this project this past summer but had laid it aside. I wanted to make a mini pocket journal with the "sleeve" from the Stacking Drawer Diecut. I had seen something similar on instagram and thought the "sleeve" diecut to the drawer was the perfect option. 


Before cutting the "sleeve" out I applied an Adhesive Sheet to both sides of a piece of Chip Board and added patterned cardstock before run through the Diecut Machine.


Fast forward to now, the patterned cardstock isn't all that "Autumn like" so I added patterned cardstock from Auburn Lane Collection over the other cardstock on both sides. 


I cut about and inch off one end of the sleeves, measured, marked and punched holes so I could add the Closure Handles (I purchased these at Hobby Lobby).


Next I cut an assortment of patterned cardstock and vellum for the inside pages. That was a total of eight pages per signature with there being three signatures in the journal. 


Here is the list of assorted diecuts I used of Eileen's for the inside pages: Bookmark, Tag and Pocket, Bookplate, Hinges and Label, Floral Arch and Words and the Credit Card Sleeve and Tags (retired) Diecuts. The little pocket diecut I sewed into the center of each signature and then glued close to create the pocket.


Before stitching the pages into the journal I cut a piece of cardstock 1 3/8"x2" and punched holes about 1/4" a part, sewed the pages onto the cardstock and adhered to the inside spine.  


Some of the diecuts I folded cardstock in half and slightly moved into the diecut before running through the diecut machine to create a larger diecut page.


I also cut tags and flowers for the inside pockets. I added a brad to the center of each flower.


The outside of the album I added an assortment of diecuts from Eileen along with store bought diecuts. I created these two frozen Charlotte dolls from a mold and paper clay and I also use the little house diecut from the Christmas House Ornament Diecut


I added thread, sequins and gems as filler to complete the front of the journal.


Be sure to check Eileen Hull's blog for the latest projects from the rest of the Inspiration Team!  You can find those posts HERE, HERE and HERE.


As always if you have any questions about this project please let me know.


Supplies

Sizzix/Eileen Hull: Stacking Drawer Diecut
Sizzix/Eileen Hull: Bookmark, Tag and Pocket Diecuts
Sizzix/Eileen Hull: Bookplate, Hinges and Label Diecuts
Sizzix/Eileen Hull: Floral Arch and Words Diecuts
Sizzix/Eileen Hull: Christmas House Ornament Diecut
Sizzix/Eileen Hull: Credit Card Sleeve and Tags Diecuts (retired)
Sizzix/Eileen Hull: Christmas House Ornament Diecut
Adhesive Sheet
Chip Board
Diecut Machine
Auburn Lane Collection
Paper Cutter
Scissors
Crop-A-Dile
Beacon Adhesive: Zip Dry Adhesive
Thread
Sequins
Gems

(Products listed above are Affiliated Links for your convenience)

DISCLAIMERS

This blog is compensated to provide opinion on products, services, websites, and various other topics. Even though the owner(s) of this blog receives compensation for our posts or advertisements. I always give my honest opinions, findings, beliefs, or experiences on those topics or products. The views and opinions expressed on this blog are purely my own. Any product claim, statistic, quote or other representation about a product or service should be verified with each manufacturer, provider, or party in question.This blog contains affiliate links, clicking and shopping through these links helps to support and run Tonya Trantham Designs - Creative Addiction to Paper Blog at no additional cost to you. Today's features are Eileen Hull,Sizzix and Scrapbook.com Products. 


Thanks for stopping by, hope your Monday is wonderful and enjoy creating!


Thursday, November 14, 2019

Mini Snowflake Journal

Hi everyone! I'm back this week with my second project of the month for Momenta and I thought since Christmas is oh so close I would create a micro journal with a leftover needle book diecut that I had cut out in leather. Also have you been by Hobby Lobby and seen all of Momenta's newest Christmas/Holiday diecuts and embossing folders?!?!? If not you need to make a special trip just to get some of these fabulous diecuts and embossing folders!


As I stated I had a leftover needle book diecut that I had cut from leather and I decided I wanted to try and use part of the Let it Snow embossing folder and the snowflake diecut to emboss the leather. I spritzed the areas that I was going to emboss/add diecut with water and placed the bottom edge of the journal and the belly band into the embossing folder (emboss snowflakes only) and run through the Diecut Machine. I completed the same steps for the snowflake diecut too. For people that don't have access to leather or would like to created this journal out of cardstock the size is 5"x3 5/8".


In the spine I added a total of four eyelets with the Crop-A-Dil. I ran the Hot Pink Elastic through the eyelet holes and the belly band and tied off.


Then I cut a piece of patterned cardstock from the Peony Paper Pad to 3 1/8"x4" and several piece of notebook paper slightly smaller than the cover. I punched two holes in the spine and sewed the notebook paper inside of the cover.


I punched out a Scalloped Circle from the same paper pad and adhered to the front of the notebook and cut a snowflake diecut out and added to the scalloped circle along with a sequin and gem.


I also cut four star diecuts out and adhered them back to back at the ends of the twine that I had tied off inside of the notebook and added a gem to the center of each one.


 I hope you have enjoyed this project as much as I enjoyed creating it! If you have any questions please let me know.


Also if you're not following Momenta on their social networks you can find them on Facebook, Instagram, twitter, YouTube and Pinterest.


Supplies

Momenta: Diecut Machine
Momenta: Peony Paper Pad
Momenta: Let it Snow Embossing Folder with Diecuts
Beacon Adhesive: Zip Dry Adhesive
Eileen Hull: Needle Book Diecut (retired)
Eyelets
Gems
Sequin
Notebook Paper
Twine

(Products listed above are Affiliated Links for your convenience)


DISCLAIMERS
This blog is compensated to provide opinion on products, services, websites, and various other topics. Even though the owner(s) of this blog receives compensation for our posts or advertisements. I always give my honest opinions, findings, beliefs, or experiences on those topics or products. The views and opinions expressed on this blog are purely my own. Any product claim, statistic, quote or other representation about a product or service should be verified with each manufacturer, provider, or party in question.This blog contains affiliate links, clicking and shopping through these links helps to support and run Tonya Trantham Designs - Creative Addiction to Paper Blog at no additional cost to you. Today's features are Momenta Products. 


 Thanks for stopping by, hope your Thursday is wonderful and enjoy creating!


Saturday, November 2, 2019

Cheers! Box

Hi everyone! I'm back today with my project for Momenta! Since I have several upcoming birthdays I decided I would created a gift box.


I started by taking a part a small box that I had on hand. I folded in one section and place in the embossing folder from the Happy Birthday Stamp and Emboss Set and run through the Freestyle Die Cutting and Embossing Machine. I completed the same steps for the other side of the box. 


I glued the box back together and inked over the embossed areas with an assortment of chalk inks.


I cut and adhered a piece of patterned cardstock from the Watercolor Metallic Paper Pad to fit the lid of the box.


I stamped the sentiment "Cheers!" from the Happy Birthday Stamp and Emboss Set and placed one of the Nested Oval Borders Metal Diecuts over the sentiment and cut out with the diecut machine.


I cut another oval diecut out from another piece of patterned cardstock from the same paper pad and glued to the back of the sentiment. I also stamped a party hat onto a piece of White Cardstock and fussy cut out. 


I added Foam Pop Dots to the back of the diecut and placed on top of the lid. 


I added to the party hat and a flower and leaf punch (from my stash) sequins and a gems before gluing to the sentiment. If you have any questions about this project please let me know. Also if you aren't following Momenta you can find them on FacebookInstagram, Twitter, Pinterest and YouTube.


Supplies

Small Box
Wicked Black Ink 
Raspberry Premium Dye Ink
Assortment of Chalk Inks
Sequins
Gems
Beacon Adhesive: Zip Dry Adhesive

(Products listed above are Affiliated Links for your convenience)

DISCLAIMERS
This blog is compensated to provide opinion on products, services, websites, and various other topics. Even though the owner(s) of this blog receives compensation for our posts or advertisements. I always give my honest opinions, findings, beliefs, or experiences on those topics or products. The views and opinions expressed on this blog are purely my own. Any product claim, statistic, quote or other representation about a product or service should be verified with each manufacturer, provider, or party in question.This blog contains affiliate links, clicking and shopping through these links helps to support and run Tonya Trantham Designs - Creative Addiction to Paper Blog at no additional cost to you. Today's features are Momenta Products. 


Thanks for stopping by, hope your Saturday is awesome and enjoy creating!