Friday, June 30, 2017

Bloom Tea Cup

Hi everyone! I am back again with another quick project for Eileen Hull and Stampotique collaboration this month! I cut the 3D Tea Cup die from Matboard and embossed with the Daisy Wreath Embossing Folder.


I forgot to photograph the tea cup while I was inking...oops! 😕 But I used Eileen's ColorBox  Hydrangea Blends which can be found in a set in her shop on etsy HERE. First I added a dab on ink on a tray and watered down and then painted onto the individual pieces. Once dry I lightly inked over the pieces again with the blend to make the embossing stand out. Once that was completed I put together according to the direction on the packaging.


Next I stamped the Kassa's Bloom onto a piece of watercolor paper. From the same Colorbox Blends Set that the Hydrangea Blend came from I watered down the Tutu and Wildberry Blends and watercolored the flower. Also I used the Melon Blend and Nutmeg Blends which you can find those HERE and HERE.


Next I fussy cut the flower out and added a combo of Stickles and Icicle Glimmer Glaze to the flower and let dry. I cut out and Glimmer Misted a leaf from the Leaves, Spring Diecut.


I adhered the flower and leaf to the front of the tea cup along with thread and twine. 


If you have missed any of the past projects this month you can find Eileen's Inspiration Team's projects HERE, HERE and HERE. Stampotique Design Team's project can be found HERE, HERE and HERE.
As always if you have any questions about this project please let me know.


 I would also like to submit this project for the following challenges:
Word Art Wednesday: Challenge #288-#289
Stampotique Designers Challenge: SDC275


Thanks for stopping by, hope your Friday is wonderful and enjoy creating!


Thursday, June 29, 2017

Canvas Corp: Floral Guide Journal Midori Style

Hi everyone! Today I have a project I created up on Canvas Corp's blog and here is a teaser for you! 😀 Did you think that all envelopes were good for was to address, stick a stamp on and throw in the mailbox? Well, I am here with yet another way to create a journal this time using 12"x12" Kraft Envelopes and five of the 7 Gypsies  8.5"x11" Starter Journals. Hop over to Canvas Corp's blog for the how to's and more photos of this project. You can find the blog post HERE.


Thanks for stopping by, hope your Thursday is awesome and enjoy creating!


Monday, June 26, 2017

Nerdy Cat Box

Hi everyone! This month Eileen Hull's Inspiration Team and Stampotique's Design Team have teamed up to show how to create some simply stunning projects combining diecuts and stamps. Since I LOVE anything cats my first project had to be something with the Nerd Cat Stamp.


I cut from watercolor paper two sets of the Caddy Bag Diecuts. The two diecuts that looks like tags (with a hole in the top) will be used in another project.
I folded the both the diecuts and one of the diecuts I cut the sides off since there is no need for them.


I stamped the cat image twice and colored in the glasses, nose and the inside of the ears on the orange patterned cardstock. Next I fussy cut the image of the cat out and on the pink image of the cat all I cut out was the shirt which I adhered to the full cat image.


I embossed the box with the Waffle Embossing Folder and then adhered the diecut that I had cut the sides off to the side of the other diecut. Be sure the flap is going in the other direction since this will be how you open and close the box.


Next I glued the box together and added thin ribbon to both sides of the box. 


I added an assortment of bright and happy patterned cardstock to the top of the box along with thread and a snippet of Pom Pom trim. I dressed up the cat with mini pearl buttons, mini flower and googly eyes.


I cut and water colored a couple Romance Flower Diecut and once dry I crinkled them up and added a Dew Drop to the center. I cut two of the smaller flowers from the Stitchy Flowers and Leaf Diecut, shaped and added dew drops to the centers. The last thing I cut was the smaller leaves from the Spring Leaves Die which I glimmer misted and once dry I shaped. Now I was finally ready to adhere everything to the top of the box!


It is prefect size to either add candy, washi tape or whatever you want to and give as a gift! As always if you have any questions about this project please let me know.


To see this month's Inspiration Teams projects you can find the posts HERE and HERE and Stampotique Designs Teams projects you can find the posts HERE, HERE and HERE.


I would also that submit this project for the following challenges:
Word Art Wednesday: Challenge #288-289
Stampotique Designers Challenge: #SDC 275


Thanks for stopping by, hope your Monday is fabulous and enjoy creating!


Saturday, June 17, 2017

The Robin's Nest: Enjoy the Ride

Hi everyone! I am excited to say that I'm back as a guest designer for the Robin's Nest
For more photos and how to's on my project you can find the blog post HERE.


Thanks for stopping by, hope your Saturday is awesome and enjoy creating!


Friday, June 9, 2017

Fabric Micro Passport Planner

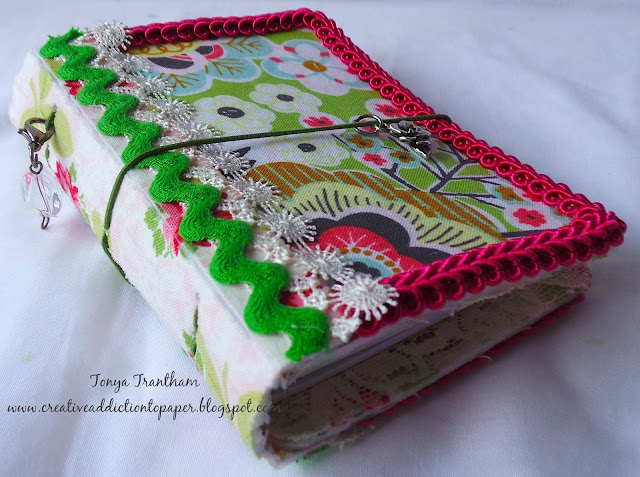
Hi everyone! I am here to share a micro planner I created using the Passport Diecut from Eileen Hull.


I wanted to make a planner out of fabric but I didn't want it to be floppy so my solution was to use fusible webbing. First I cut the fabric and fusible webbing bigger than the actual diecut which you will need a total of four fabric and two fusible webbings cut off the covers and two fabrics and one webbing for the spine. 


Next I ironed the both pieces of the fabric to either side of the fusible webbing...there are directions on how to do that with fusible webbing when you purchase it...and once it is cool run it through the diecut machine to cut the covers and spine. It is ten times easier to do it this way that cut each individually and then try to iron it all together. Ask me how I know? I have already done this on one of my projects that will be shared later on. 😁 
I used Fabri-Tac Adhesive to adhered the covers and spine together according to the directions on the Passport Diecut and then I strung elastic cording through the holes in the spine and tied off according to the directions of the Journal Diecut. Since there was no way to keep the planner closed I punched a hole in the spine and added elastic cording.


The inside covers I adhered lace to create a pocket to hold journaling cards and washi tape. The tags that the washi tape are wrapped around tab closures from the Journal Diecut. I used the diecut packaging to cut these tabs and I embossed them with the Eyelet Lace Embossing Folder.


Did you know that you can use 4"x6" journal cards in your planner? I didn't! All you have to do is fold them in half and either staple or sewing them together to created a mini album! If you aren't bothered with excess paper sticking out of the edge you can leave as is or cut off the excess and round the corners. I also added washi tape to the outside and inside so I wouldn't accidentally catch my finger on the staple.


Also I added a divider to hold sticky notes on. I used the leftover piece of a file folder...you know the ones that you can purchase at Target...it is perfect since it is sturdy.


I added two micro notebooks that I had purchased from Michael's and now the inside of the planner is complete.


The outside of the planner I trimmed the front and back with lace, trim and Ric Rac. I also added charms to the closure and spine to finish it off. As always if you have any questions about this project please let me know.

Also I would like to submit this planner for the following challenges:
Word Art Wednesday: Challenge #285-287


Thanks for stopping by, hope your Friday is awesome and enjoy creating!