Showing posts with label Ribbon. Show all posts

Thursday, March 1, 2018

Happy Moments Tag

Hi everyone and Happy first day of March! I am here to share a quick project I created using leftover Tattered Angels Glimmer and Simply Sheer Mists from another project that will be hopefully shared soon. 😉 


This is a great way to use up mists from previous projects. All I did was place the tag onto the glass tray and let the tag soak up the leftover sprays. The following Glimmer and Simply Sheer mists I used are: Rum Punch, Peony, Soft Peach and Gold. I made sure both side were placed in the mist and then I let dry. 


I used Crate Paper's Bloom Paper Collection on this tag and the image of the girl and chicks I purchased a few years ago but I'm not sure the name of the company or the collection?


I added the happy moments cardstock off center along with bits of lace and ribbon to dress up the little girl and chicks.


The back of the tag more cardstock from the same collection was added and of course a tag wouldn't be complete without a doily.


Before cutting the flower arch and flower from the Floral Arch and Words Diecuts I cut a piece of Adhesive Sheet big enough to cover the pieces of cardstocks and then I ran through the diecut machine. All you have to do is peel the backing off and place on your project...easy peasy! I finished off with the other chick diecuts and a small amount of pom pom trim.


 As always if you have any questions please let me know. Also I would like to submit this project for the following challenges:
Simon Says: In My Garden
Word Art Wednesday: Challenge #324-#325


Thanks for stopping by, hope your Thursday is awesome and enjoy creating!


Thursday, December 14, 2017

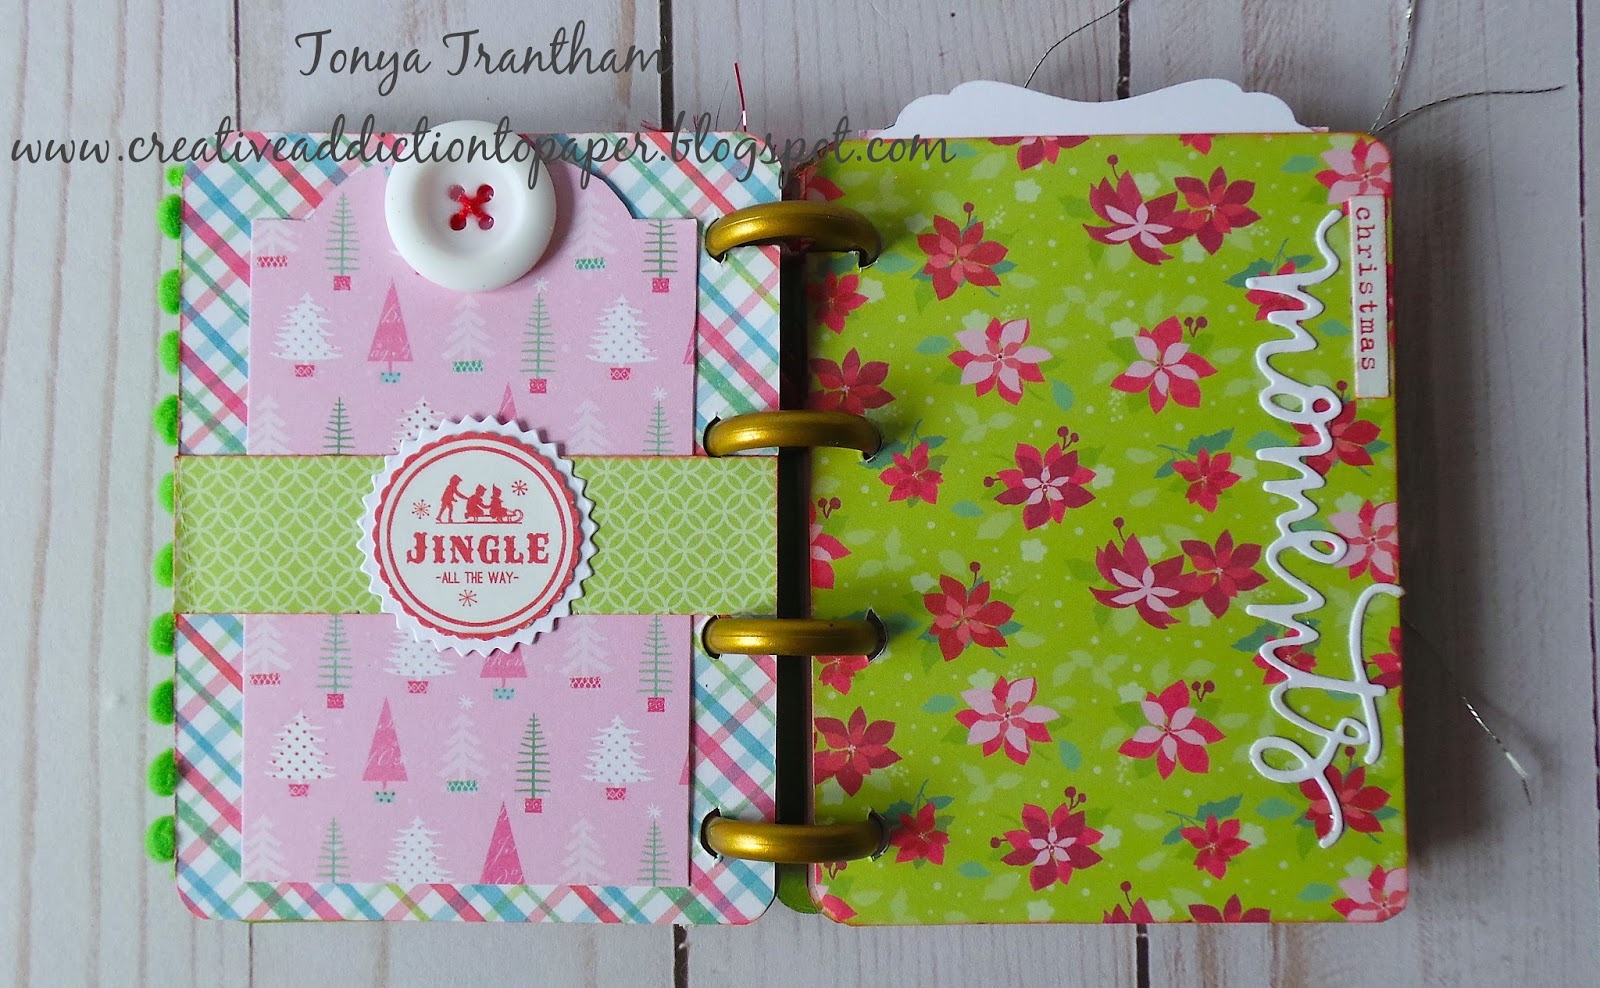
Christmas Time Disc Mini Album

Hi everyone! I am back to share the full reveal of my Christmas Time mini album using Eileen Hull's newest Book Club Diecut Collection! 


I used the Book and Pages, Trinket Book and Frame Diecut to cut the covers, from Mat Board and the inside pages from the Merry and Bright Cardstock Pad. Also I used four Happy Planner Mini Disc for the binding.


I used Moss Glimmer Mist on the outside and inside of the both covers and once dry I added patterned cardstock, a scalloped circle from the Bookplate, Hinges and Label Collection and the number 25 was cut from the Billboard diecut. I finished off with three square gems and fiber, ribbon and twine on one of the disc.


The inside cover I adhered a two of the corners of the pocket from the Bookmark, Tag and Pocket Collection to create another pocket to hold a label, which I folded, from the Bookplate, Hinges and Label Collection.


I created a belly band which I added a seal diecut to the band and added a label diecut as a tag which can be used as a journaling card or for mini photos. On the opposite page I added the word "moments" from the Floral Arch and Words Collection for a simple embellishment.


The top of the page I added a label and dress it up with a sentiment and sequin. I adhered a wooden joy frame to the bottom corner of the page as a pocket to hold a label diecut and a mini tag.


The opposite page I free handed a tree and inked and glued the star from the Bookplate, Hinges and Label Collection to the top of the tree.


The next two pages are simple I created another belly band which I used an old Christmas present label as a tag and a piece of ric rac and a button dressed up the other page.


I adhered a bookmark to the bottom corner of the page to create a pocket.


I added label diecuts and a Christmas present tag to the bookmark and the inside cover I finished off with patterned cardstock and a Santa from my stash.
For more inspiration hop on over to Eileen Hull's blog where to can see what the team has created with this awesome collection of diecuts! You can find those posts HERE, HERE and HERE.
As always if you have any questions about this project please let me know.


Also I would like to submit this project for the following challenges:
Word Art Wednesday: Challenge #312-#313
Mini Album Makers Challenge: December Challenge


Thanks for stopping by, hop your Thursday is awesome and enjoy creating!


Monday, June 26, 2017

Nerdy Cat Box

Hi everyone! This month Eileen Hull's Inspiration Team and Stampotique's Design Team have teamed up to show how to create some simply stunning projects combining diecuts and stamps. Since I LOVE anything cats my first project had to be something with the Nerd Cat Stamp.


I cut from watercolor paper two sets of the Caddy Bag Diecuts. The two diecuts that looks like tags (with a hole in the top) will be used in another project.
I folded the both the diecuts and one of the diecuts I cut the sides off since there is no need for them.


I stamped the cat image twice and colored in the glasses, nose and the inside of the ears on the orange patterned cardstock. Next I fussy cut the image of the cat out and on the pink image of the cat all I cut out was the shirt which I adhered to the full cat image.


I embossed the box with the Waffle Embossing Folder and then adhered the diecut that I had cut the sides off to the side of the other diecut. Be sure the flap is going in the other direction since this will be how you open and close the box.


Next I glued the box together and added thin ribbon to both sides of the box. 


I added an assortment of bright and happy patterned cardstock to the top of the box along with thread and a snippet of Pom Pom trim. I dressed up the cat with mini pearl buttons, mini flower and googly eyes.


I cut and water colored a couple Romance Flower Diecut and once dry I crinkled them up and added a Dew Drop to the center. I cut two of the smaller flowers from the Stitchy Flowers and Leaf Diecut, shaped and added dew drops to the centers. The last thing I cut was the smaller leaves from the Spring Leaves Die which I glimmer misted and once dry I shaped. Now I was finally ready to adhere everything to the top of the box!


It is prefect size to either add candy, washi tape or whatever you want to and give as a gift! As always if you have any questions about this project please let me know.


To see this month's Inspiration Teams projects you can find the posts HERE and HERE and Stampotique Designs Teams projects you can find the posts HERE, HERE and HERE.


I would also that submit this project for the following challenges:
Word Art Wednesday: Challenge #288-289
Stampotique Designers Challenge: #SDC 275


Thanks for stopping by, hope your Monday is fabulous and enjoy creating!


Monday, March 13, 2017

Planner Tassels and Planner Clips

Hi everyone! I am back to share  a couple of quick and easy projects for your planner using Eileen Hull's newest diecuts from the Heartfelt Collection. I created these for Eileen's booth at CHA/Creativation. 
For the planner tassel I cut a couple of flowers from felt using the Stitchy Flower and Leaf Diecuts and twelve 8 inch strips of ribbon and fiber. Next I gathered all the ribbon and fiber and ran it through a small metal ring (the ring I found in the jewelry section of Hobby Lobby), folded in half and made sure it was even before tying off with thread. I adhered the flowers together with a Dew Drop and then glued on top of the thread. I cut a Ball Chain down and ran through the metal ring and then attached to the planner. 


For the planner clips I used Bird and Butterflies Diecuts and a variety of scraps of felt to cut the diecuts out. For both the bird and butterfly I adhered the pieces together and then glued to the top of a large paper clip. For the bird I added sequin, mini flower, dew drop and for the butterfly I added a scrap of lace, button, sequin and dew drop to finish both off.
All of these project took maybe an hour and that was only because I had to hunt for supplies so I would say you could knock several out if you are more organized than me. 😉
Be sure to hop over to Eileen's BLOG and see what the Inspiration Team is up to and as always if you have any questions please let me know.


Thanks for stopping by, hope your Monday is awesome and enjoy creating!


Tuesday, February 21, 2017

Butterfly Angel Journal Part One

Hi everyone! I am here today to share my project this month using Eileen Hull's ColorBox Blends with the Passport Diecut. The Inspiration Team has shown several different ways to use the ColorBox Blends and you can find those post HERE, HERE and HERE.


For my project I cut the Passport Diecut from Mat Board. I have a large piece of glass that I use as a pallet (very easy to clean afterwards) and I applied Tutu and Wildberry Blends and watered both colors down. Next I taped a doily stencil to the front cover of my book and applied both colors. Once it was dry I removed the stencil and then applied Sunshine Blends to my pallet, watered down and applied a wash to the cover.


The back cover I embossed with the Lace Medallions Embossing Folder. I watered down Wildberry and Sunshine blends and painted the cover.


While letting the covers dry I embossed the spine with Waffle Embossing Folder and inked over it with the Leaf Blends.


Before adhering the covers and spine together I added Stickles over the doily image on the front cover and once dry I splattered with Coconut and Nutmeg Blends. Adhered all pieces together and glued Ric Rac to dress up the edge of the spine.


I had made several frozen Charlotte dolls with Makers Mix but hadn't found the right project to use them in so I thought this project would be the right time to add one to the cover of my journal. I watered down the Coconut Blends and painted the first coat over the whole doll.


Once the first coat was dry I watered down Nutmeg Blends and applied randomly to the doll and once that was dry I sealed it with Fast Finish Decoupage.


I added fussy cut roses printables, twine and metallic thread to the front cover. Next I adhered butterfly wings to the back of the doll along with a bookplate to finish off the cover.


I tied three papers per signature to the inside of the journal and finished off the spine with a variety of seam binding, ribbon, lace, etc. Later this week I will be sharing the inside of my journal. So be sure to keep an eye out for that blog post. 😊
As always if you have any questions about this project please let me know.


Also I would like to submit this project for the following challenges:
Word Art Wednesday: Challenge Weeks #270-271
Happy Little Stampers: Anything Goes with Dies Challenge
Simon Says Wednesday Challenge: Fantastic Florals


 Thanks for stopping by, hope your Tuesday is awesome and enjoy creating!


Saturday, November 5, 2016

Butterfly House and a Reindeer Card

Hi everyone! I wanted to hop on the blog and share a couple of projects I created over three years ago for a Stamper's Sampler magazine call. I mailed these off May of 2013 with the hopes of maybe they would be selected for the magazine. I figured after this amount of time it wasn't selected. 
The first project was for the template challenge in the magazine which was butterflies. I started with Eileen Hull's House Gift Card Holder and cut out a house diecut and embossed with one of Tim Holtz's embossing folders (if I find the name of the folder I will update my blog...sorry three years has gone by you know :-( ). The butterfly template I printed off in several different sizes on copy paper, cut out, traced on cardstock, cut those out, stamped and adhered to the front of the house. I did add a pull out with the word "FLY" to the tab.


The second project is a 3"x6" Christmas card I created using Robin's Nest cardstock and Dew Drops. I so love the reindeer stamp I used!


Maybe there is still I chance it will be selected for a future Stamper's Sampler magazine? Who know? :-) But I wanted to share these with you. If you do have any questions about either one of these projects please let me know.


Thanks for stopping by, hope your Saturday is wonderful and enjoy creating!


Wednesday, June 22, 2016

Tsunami Rose Designs: Firmin Riviere Junk Journal

Hi everyone! I am here to share my very first project as a design team member with Tsunami Rose Designs!!!


I used a variety of printables from Tsunami Rose's etsy shop for this journal. Besides the printables being gorgeous they are ALL 50% off until September 1st...meaning everything in the shop is $2.50 including journaling kits!!! :-)


For the base of my junk journal I started with a file folder.  I cut the folder down with the front and back being 5 3/4"x8 5/8" with a 1 1/2" and 2" fold over for tuck spots inside and the spine being 1 1/2" wide.


I adhered leftover cardstock/scrapbook paper to the covers both inside and out along with printables from Collage Cards Set 2 and Ephemera Set 3. I covered the spine with lace. I used a combination of Zip Dry and 3 in 1 adhesives since everything won't come apart and the 3 in 1 "grabs" and dries quickly. Both adhesives are made by Beacon Adhesives.


This is a view of the cover before folded.


And the inside before the flaps are folded down and adhered to create pockets.


I coffee dyed regular copy paper...my first time. It's a lot of work but looks great. :-)


The journal has three signatures with eight papers per signature.


I used the Ephemera Set 3 for these pages. The pull out is actually a small booklet. I folded the printable in half and added coffee dyed notebook paper along with scraps of cardstock, rub ons and some of the printables I fussy cut and added to the pages too. 


I used the Vintage Shipping Tag Collection on these pages along with some other free printables that can be found on the Tsunami Rose Designs blog.


I created pockets out of some of the printables and I added some of the Library Cards 2 Set 3 through out the journal. Also I used a little bag from an order I had received and a coin roll as a page tab.


More free printables from the blog. The one with the kitten I fussy cut and adhered the corners to the tag to create a pocket and then added more printables as tags.


I cut the bottoms off of two of the tags from the Vintage Shipping Tag Collection, the tiny row of roses and fussy cut those out and added to both sides of the decorative gift bag. Then I punched holes in the tags and added fiber to the tops of them.


Even though I used a variety of printables from Tsunami Rose's etsy shop instead of a kit I think the journal has turned out lovely.


There you have it my very chunky junk journal using what I have from my craft room and printables from Tsunami Rose Designs!  If you want to purchase, check out the blog to see what the other designers are up, like her Facebook page or join the Facebook group all of the links are below.


Entire shop 50% off until Sept. 1 : https://www.etsy.com/shop/TsunamiRo...

TsunamiRose FB Fan Page: https://www.facebook.com/tsunamiros...

As always if you have any questions about this junk journal please let me know. Also I will try and do a video or periscope at a later date. I need quiet time and the family isn't cooperating.

Thanks for stopping by, hope your Wednesday is awesome and enjoy creating!