Showing posts with label Stickers. Show all posts

Monday, August 17, 2020

Eileen Hull: This Everyday Life Mini Junk Journal

 Hi everyone! I would like to share that I now have a new blog with Wordpress! Also I'm sharing complete details on how I created this junk journal for Eileen Hull's Inspiration Team this month. You can find the post HERE on my new blog!


Supplies

Sizzix/Eileen Hull: Gift Box Scalloped Edges and Label Diecut

Mat Board

Paper Cutter

Diecut Machine

Beacon Adhesive: Zip Dry Adhesive

Crop-A-Dile

Scissors

Various Patterned Cardstocks, Embellishments, Diecuts and Stickers

Charm, Eyelet and Trim

(Products listed above are Affiliated Links for your convenience)
 
DISCLAIMERS
This blog is compensated to provide opinion on products, services, websites, and various other topics. Even though the owner(s) of this blog receives compensation for our posts or advertisements. I always give my honest opinions, findings, beliefs, or experiences on those topics or products. The views and opinions expressed on this blog are purely my own. Any product claim, statistic, quote or other representation about a product or service should be verified with each manufacturer, provider, or party in question.This blog contains affiliate links, clicking and shopping through these links helps to support and run Tonya Trantham Designs - Creative Addiction to Paper Blog at no additional cost to you. Today's features are Sizzix, Eileen Hull and Scrapbook.com Products. 


Thanks for stopping by (hope you will follow my new blog), hope your day is awesome and enjoy creating!


Friday, June 26, 2020

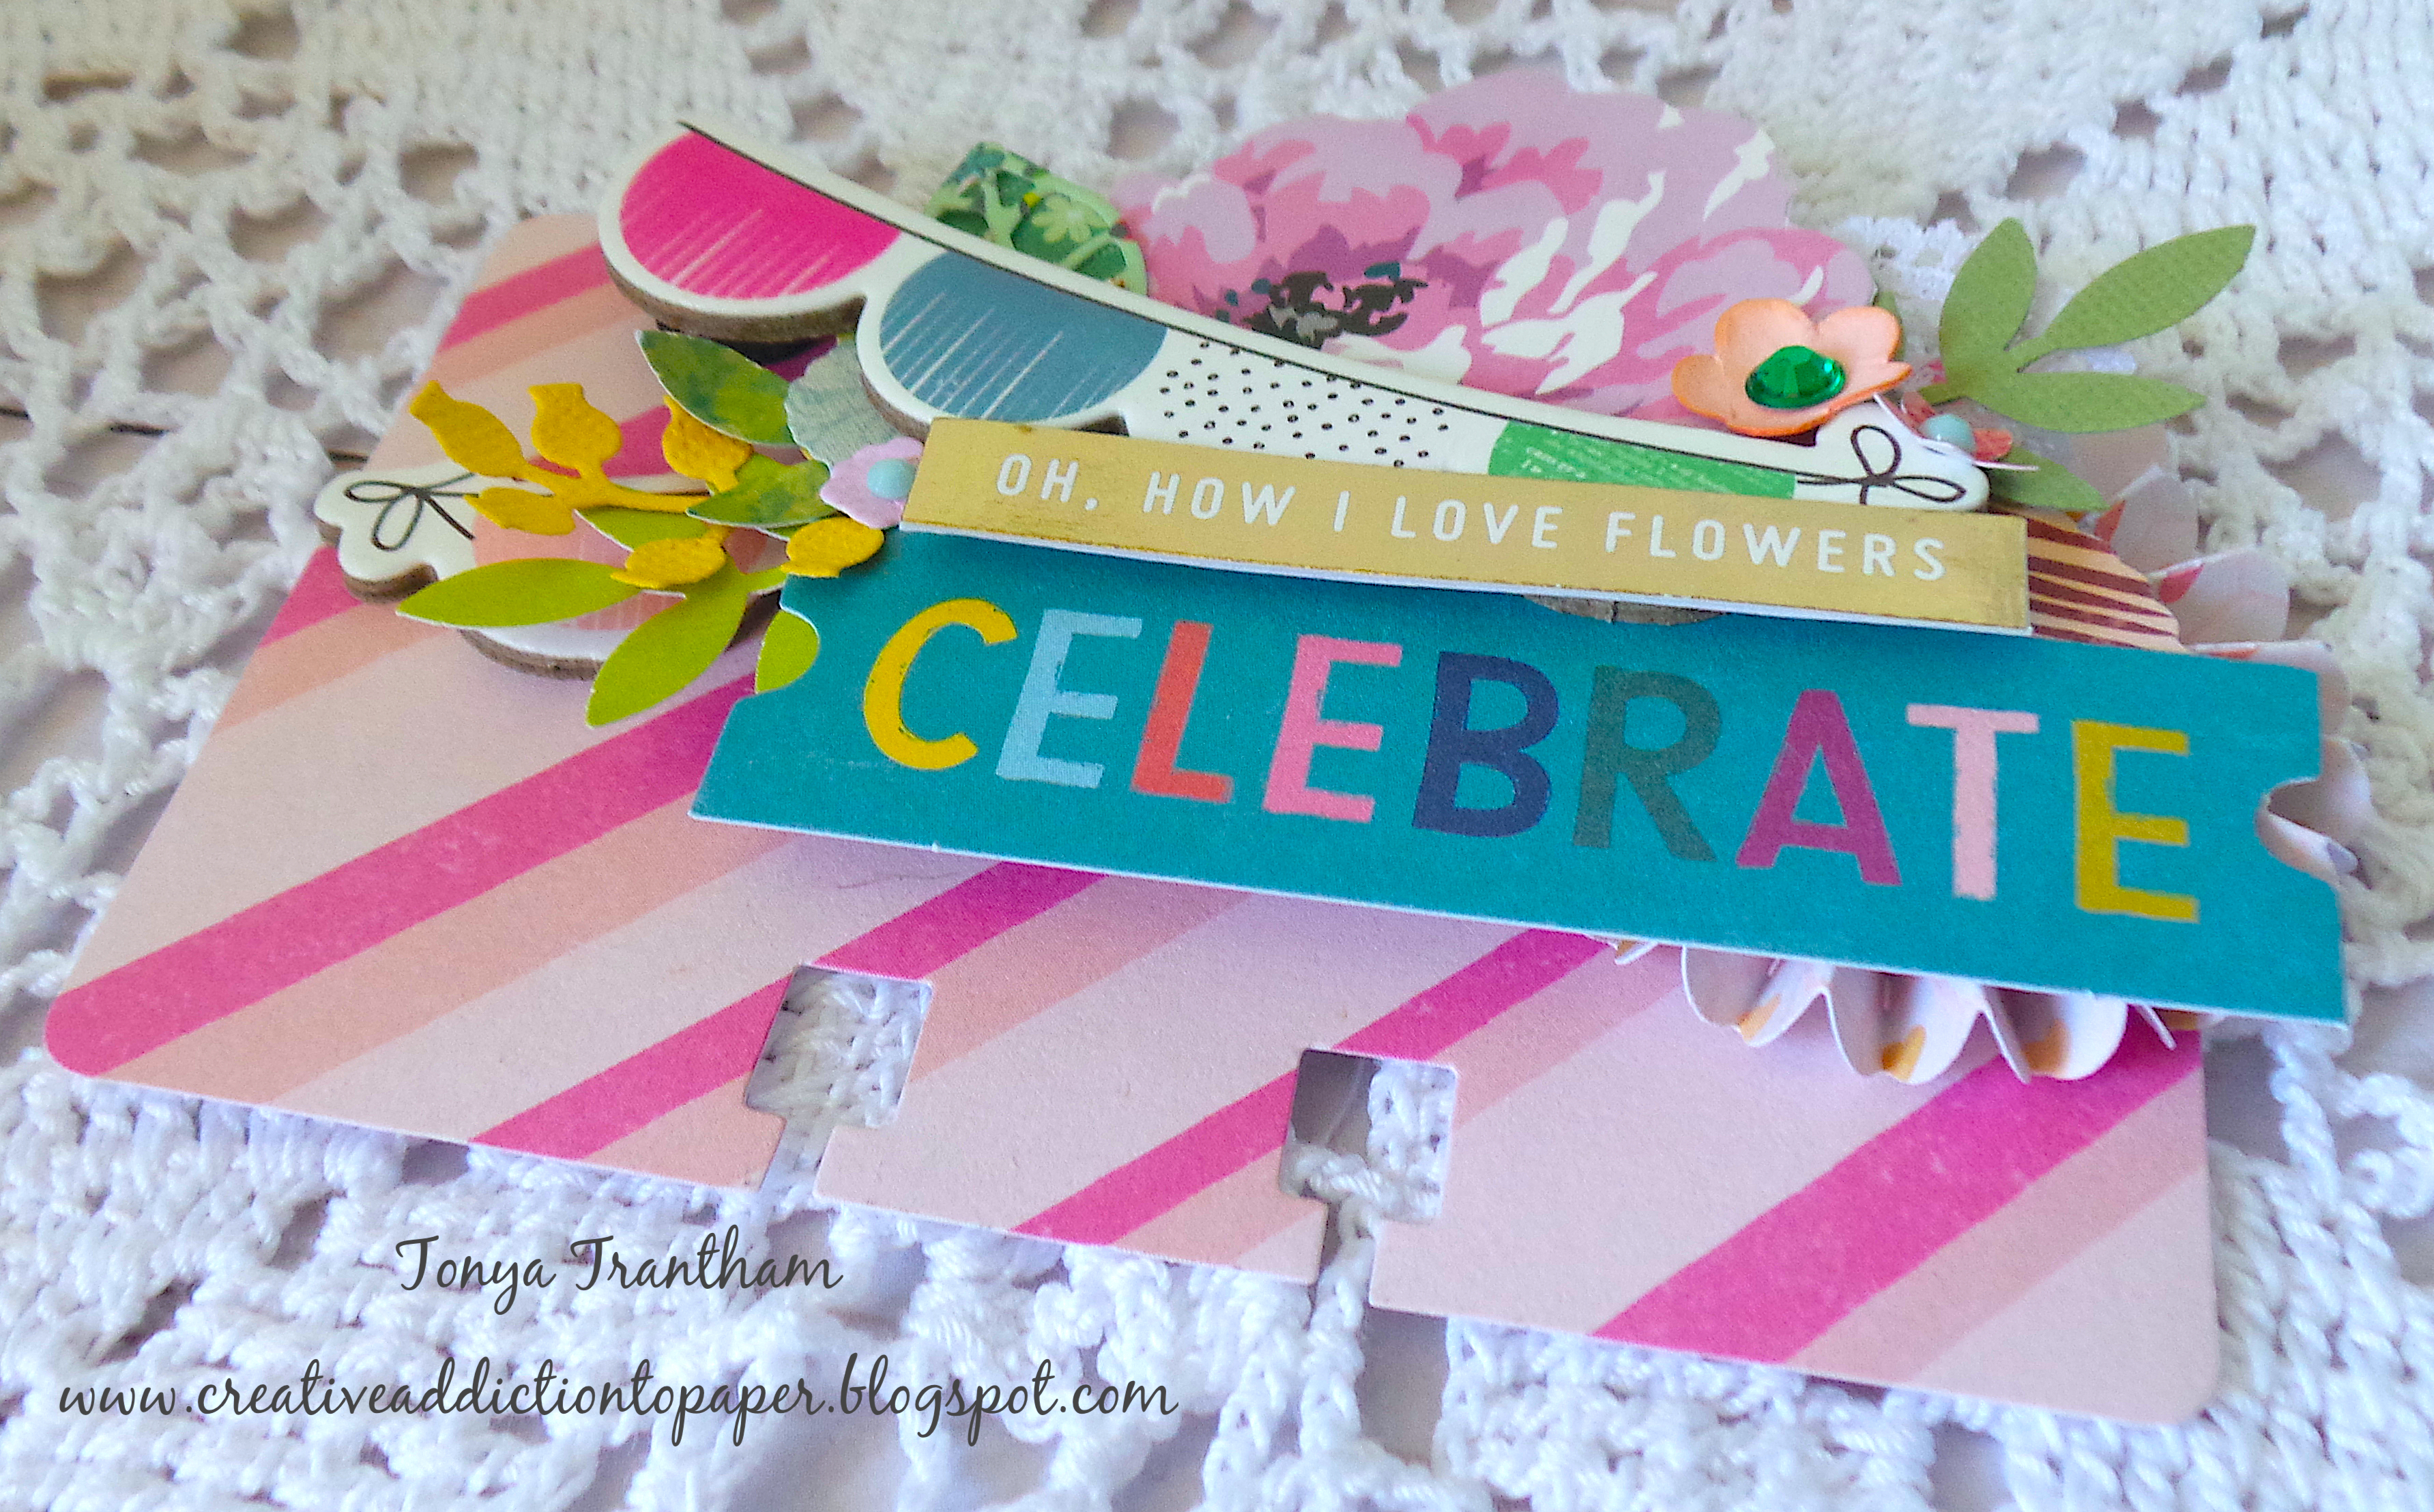
Oh, How I Love Flowers Rolodex Card

Hey everyone! I'm back with another quick project I created for the Easter Swap I was in awhile back. I used a Rolodex Diecut that I had purchased from Stampin' Up! several years ago(retired). But there are Memorydex diecuts that can be used instead and you can find those diecuts HERE and HERE.


I did a lot of layering with what I had on hand in my stash. I started by adding a Medallion Diecut (retired) to the corner of the rolodex card. I know you can barely see it but it was how I built up the layering on the card. 


I cut a chipboard banner in to and placed next to the medallion diecut and the other half of the banner I placed on top of the medallion. I added Foam Pop Dots to the other end of the banner. I backed a flower sticker with cardstock and fussy cut and added behind the banner. I placed flowers and leaves diecuts from my stash also to the card.


I finished off by adding two sentiments from my stash to complete the rolodex card. As always if you have any questions about this project please let me know.


Supplies

Various Patterned Cardstocks
Beacon Adhesive: Zip Dry Adhesive
Stickers, Chipboard Banner, Various Floral and Leaves Diecuts
Gems 

(Products listed above are Affiliated Links for your convenience)

DISCLAIMERS
This blog is compensated to provide opinion on products, services, websites, and various other topics. Even though the owner(s) of this blog receives compensation for our posts or advertisements. I always give my honest opinions, findings, beliefs, or experiences on those topics or products. The views and opinions expressed on this blog are purely my own. Any product claim, statistic, quote or other representation about a product or service should be verified with each manufacturer, provider, or party in question.This blog contains affiliate links, clicking and shopping through these links helps to support and run Tonya Trantham Designs - Creative Addiction to Paper Blog at no additional cost to you. Today's features are Scrapbook.com Products. 


Thanks for stopping by, hope your Friday is awesome and enjoy creating!


Sunday, June 14, 2020

Oh Deer! Rolodex Card


Hi everyone! I'm back today with another rolodex card I created for a swap I was in. This rolodex consisted of me using a bunch of leftover scraps and diecuts from previous projects that I had laying around on my desk.


I added a Medallion Diecut to the corner of the rolodex card. I placed Foam Pop Dots to the banners to give depth to the rolodex card and then I started adding leaves and heart punches, lace, ribbon and cheese cloth. I used a deer sticker from Maggie Holmes which I placed on a piece of cardstock and fussy cut before adhering on top of the banners. I added a flower from my stash to the deer.


There you have it! A rolodex made with what I had laying on my desk! As always if you have any questions about this project please let me know.

Supplies

Memorydex Cards HERE and HERE
Beacon Adhesive: Zip Dry Adhesive
Various Patterned Cardstock
Lace
Cheese Cloth
Ribbon
Various Punches
Gem
Maggie Holmes: Bloom Stickers (retired)

(Products listed above are Affiliated Links for your convenience)

DISCLAIMERS
This blog is compensated to provide opinion on products, services, websites, and various other topics. Even though the owner(s) of this blog receives compensation for our posts or advertisements. I always give my honest opinions, findings, beliefs, or experiences on those topics or products. The views and opinions expressed on this blog are purely my own. Any product claim, statistic, quote or other representation about a product or service should be verified with each manufacturer, provider, or party in question.This blog contains affiliate links, clicking and shopping through these links helps to support and run Tonya Trantham Designs - Creative Addiction to Paper Blog at no additional cost to you. Today's features are Scrapbook.com Products. 


Thanks for stopping by, hope your Monday is wonderful and enjoy creating!


Monday, October 28, 2019

Finding Happiness Pocket Notebook

Hi everyone! I want to share my other journal I created for Eileen Hull for her trip to the UK in September using her newest Pocket Notebook Diecut.


First I gathered up an assortment of Maggie Holmes cardstock Collections to create this journal. Then I applied Adhesive Sheets to the front and back of Matboard before placing cardstock on the front and back of the matboard.


I placed the Pocket Notebook Diecut on top of the matboard and run through the Diecut Machine. I cut two covers out.


I lined up the holes on the spine where only three holes showed both on the top and bottom and adhered together. I cut cardstock to fit both the inside and outside of the spine. I used a Crop A Dile to punch holes and set eyelets in the spine. I also added the elastic cording and tied off inside the spine.


I used the Nestled Borders Rectangles Diecut, stickers, pom pom trim, heart and gem and a couple of flowers and a leaf from Eileen's Flowers and Leaves Journaling Cards Diecuts to decorate the cover of the journal. If you haven't checked out the rest of the Inspiration Team's projects on Eileen's blog you can find those posts: HERE, HERE, HEREHERE and HERE. As always if you have any questions about this project please let me know.


Supplies

Sizzix/Eileen Hull: Pocket Notebook Diecut
Maggie Holmes: Cardstock Collections
Elastic Cording
Pom Pom Trim
Heart Gem
Eyelets
Beacon Adhesive: Zip Dry Adhesive 

(Products listed above are Affiliated Links for your convenience)

DISCLAIMERS
This blog is compensated to provide opinion on products, services, websites, and various other topics. Even though the owner(s) of this blog receives compensation for our posts or advertisements. I always give my honest opinions, findings, beliefs, or experiences on those topics or products. The views and opinions expressed on this blog are purely my own. Any product claim, statistic, quote or other representation about a product or service should be verified with each manufacturer, provider, or party in question.This blog contains affiliate links, clicking and shopping through these links helps to support and run Tonya Trantham Designs - Creative Addiction to Paper Blog at no additional cost to you. Today's features are Scrapbook.com, Sizzix and Eileen Hull Products. 


Thanks for stopping by, hope your Monday is wonderful and enjoy creating!


Saturday, September 7, 2019

Easy Fresh Eggs Wooden Sign

Hi everyone! I am back today with a super easy project I created for Momenta! I have longed for one of those Farm house signs that is popular but I sure didn't want to pay $30 or more. Plus I needed it to fit into an odd space above my stove hood in my kitchen.


I had my dad cut a piece of scrap wood 8"x21 1/2" and I sanded over the board once it was cut to smooth the edges. I started by painting one coat of  White Stencil Paint and once dry I decided it definitely needed another coat of paint since it has a "streaky" look. In total I applied three coats of paint before I was satisfied. 


I used the Black Alphabet Stickers for the lettering of the sign. I picked out "FRESH EGGS' verbiage and all I had to do was make sure I placed the letters in a straight line.


 Once the letters were lined up I removed the backing one letter at a time and stuck to the sign. It couldn't have been any easier. Easy Peasy! If you aren't following Momenta you can find them on these following social media sites!

Facebook
Instagram
twitter
Pinterest


Supplies

Paint Brush
Wooden Sign

(Products listed above are Affiliated Links for your convenience)


Thanks for stopping by, hope your Saturday is awesome and enjoy creating!


Wednesday, December 14, 2016

Angel Rolodex Cards and Mail Art


Hi everyone! I am here to share a really quick project I had created for a swap I was in with a fellow Instagramer Linda. 


We had decided to do an altered Rolodex swap...well in my case I have a Rolodex diecut so I cut my cards from cardstock/scrapbook paper. :-)


I used Christmas Clipart Printables Ephemera Set 11 from Tsunami Rose Designs etsy shop.


I fussy cut the images out and added diecuts/punches, sequins, flat back pearls and a little Stickles to each rolodex card.


I also printed the little girl onto a piece of sticker paper and created my first piece of mail art. I added washi tape and stickers to finish off my envelope. As always if you have any questions please let me know.
Also I would like to submit these rolodex cards for the following challenge:


Thanks for stopping by, hope your Wednesday is awesome and enjoy creating!


Monday, November 30, 2015

Christmas Tree and Snowflake Matchboxes

Hi everyone! It has been awhile since my last post but I have had my sinuses go crazy the last few weeks. When I take meds it pretty much leaves me with a medicine head and all I want to do it lay around and sleep...not good at all. :-( I did have a nice thanksgiving and was able to get out and shop on Black Friday with a friend. I was out at 7ish in the morning and I must say there was hardly anyone out. So there was no dealing with crazy people and I got what I needed and was home by 11:30am. My type of shopping! :-D
Well, I want to share two little matchboxes I created for a swap I was in over on Swap-bot. We had to decorate in a Christmas/Holiday theme and fill with Christmas goodies.


I emptied two 32 count matchboxes and covered with cardstock. This one I had received the "tree" button in a previous swap. I clipped the loop off of the back of the button and after added Ric Rac, button, sequin and dew drop to the sleeve of the matchbox I adhered the tree to the top and then filled the drawer with goodies. Do you see the little gingerbread man ornament I included? :-)


The next matchbox I when with a wintery theme. The beaded snowflake is also from another pervious swap along with the glittery snowflake which I glued together. I added a little pearl dew drop to the top to finish off the snowflake. I printed the Merry Christmas sentiment from the computer, cut out and made a banner out of it. I glued a sequin and silver dew drop on top of the banner after adhering trim to the edges of the sleeve of the matchbox.


I filled this one with mini jiggle bells, sequin trees, snowflake ornament, brads, dew drops, etc. You would be surprised at how much you can stuff in one of those little matchboxes. 


I love altering these! All I do is gather up my scraps...which is a great way to use them up...and decorate. If you have any questions about these projects please let me know.


Thanks for stopping by, hope your Monday is awesome and enjoy creating!


Tuesday, April 21, 2015

Travel Journal

Hi everyone! I'm here to share a few photos and a quick video of a travel journal I created for a swap I am in over on Junk Journal Junkies Facebook Group. Lori aka Just a Girl From the Bay from YouTube hosted this swap. If you get a chance please stop by her YouTube channel and check out some of her journals she has created...let me say they are stunning!!!


For this swap we had to use a 6"x9" clasp envelope as the base for our journal. It also had to have pockets, tuck spots and tags. I kept the inside pretty simple so whoever winds up with my journal will have plenty of room to add photos and places to journal. 


A close up of the flap.


The spine looked so naked that I added ribbon and fiber to it.


Here is a quick flip through video showing the inside. If you have any questions please let me know.


Thanks for stopping by, hope your day is wonderful and enjoy creating!


Wednesday, March 4, 2015

Vintage Theme Junk Journal

Hi everyone! I'm here to share a junk journal I created for a swap I am in over on Swap-bot. My swap partner LisaLaughs agreed to do a journal no smaller than 4"x6" with three signatures and with each signature having 10 pieces of paper with an open theme. Since Lisa loves pink and anything vintage I tried to incorporate as much of both as I could. 
The cover of the journal is created from a file folder and I used leftover printables, rubber stamping, receipts, paperbag, envelope, paint chips, cardstock and packaging. 


I used Heidi Swapp rubber stamps all the way through the journal.


A lot of the printables I used are free from Ephemera's Vintage Garden and the little girl on the cover is from the Land of Nod Studio. I love printing on textured cardstock because it gives the printables a look of being printed on canvas. :-)


I also created a video to show what was inside and I hope you enjoy. :-)


I would like to submit this junk journal for the following challenges: 
If you have any questions about this journal or anything I used in it please let me know.


Thanks for stopping by, hope your day is awesome and enjoy creating!