Showing posts with label Halloween. Show all posts

Thursday, October 31, 2019

Spooky Pumpkin Treat Baggie


Hi everyone and Happy Halloween! I wanted to hop on and share a quick treat holder I created!


I started by cutting a bag using the Treat Bag Diecut and putting it together according the directions on the packaging.


I cut out three pieces of the madallion diecuts that I had purchased from Coco and Reno and put together. I added that and a scrap skull border to the top portion of the bag.


I fussy cut a jack-o-lantern and adhered that along with three circle punches and a spooky sticker on top of the medallion. I finished off by adding several loops of green metallic thread behind the circle punches. Just add some candy and a clothes pin and it is ready to give to your favorite trick or treater! As always if you have any questions please let me know.


Supplies

Sizzix/Tim Holtz: Treat Bag Diecut
Coco and Reno: Medallion Diecuts
Halloween  and scraps of Cardstock
Metallic Green Thread 
Clothes Pin
Beacon Adhesive: Zip Dry Adhesive 
Various Circle Punches

(Products listed above are Affiliated Links for your convenience)


DISCLAIMERS
This blog is compensated to provide opinion on products, services, websites, and various other topics. Even though the owner(s) of this blog receives compensation for our posts or advertisements. I always give my honest opinions, findings, beliefs, or experiences on those topics or products. The views and opinions expressed on this blog are purely my own. Any product claim, statistic, quote or other representation about a product or service should be verified with each manufacturer, provider, or party in question.This blog contains affiliate links, clicking and shopping through these links helps to support and run Tonya Trantham Designs - Creative Addiction to Paper Blog at no additional cost to you. Today's features are Scrapbook.com Products. 


Thanks for stopping by, hope your Thursday is wonderful and enjoy creating!


Tuesday, October 29, 2019

Before the Pen October Planner Pages Spread

Hi everyone! Today I am over on Blank Page Muse blog sharing my first blog post using stamps by Pam Bray! For all the details and more photos you can find the link to the blog post HERE. Also when ordering use my BPMuseTonya code for 15% off your whole purchase when shopping the Blank Page Muse Shop
Also if you need more inspiration click the following links below. 


Supplies

Blank Page Muse: Everyday Planner Stamps
The 1407 Planners: B6 Size Notebook
Watercolors/Inks
Beacon Adhesive: Zip Dry Adhesive 
Washi Tape
Circle, Mini Tag and Scalloped Circle Punches

(Products listed above are Affiliated Links for your convenience)

DISCLAIMERS
This blog is compensated to provide opinion on products, services, websites, and various other topics. Even though the owner(s) of this blog receives compensation for our posts or advertisements. I always give my honest opinions, findings, beliefs, or experiences on those topics or products. The views and opinions expressed on this blog are purely my own. Any product claim, statistic, quote or other representation about a product or service should be verified with each manufacturer, provider, or party in question.This blog contains affiliate links, clicking and shopping through these links helps to support and run Tonya Trantham Designs - Creative Addiction to Paper Blog at no additional cost to you. Today's features are Blank Page Muse and Scrapbook.com Products. 


Thanks for stopping by, hope your Tuesday is wonderful and enjoy creating!


Saturday, October 5, 2019

Chills and Thrills Momenta Tag

Hi everyone! I am back with a quick and easy Halloween tag I created for Momenta!


I started by cutting a tag from black cardstock from the Metallic Ink Paper Pad. I added a patterned doily and a scrap of an orange diecut from my own stash to the tag. Next I used a scrap of green cardstock (same paper pad) for the 3 and 1 from the Number Cutting Templates  and run through the Freestyle Die Cutting and Embossing Machine. I adhered a 2" Doily to the front of the tag before adhering the "31" on top of the doily. I cut a pumpkin from scraps of cardstock (same paper pad). But before cutting I added Adhesive Sheets to the back to make it easier to put together. I cut a "v" in the end of a scrap of white cardstock before adhering under the 31. Then I added a green mat around the chills and thrills sentiment before adhering to the tag along with the pumpkin.


To add the finishing touches to the tag I pried off the gem from a decorative metal piece from Momenta (retired) and applied clear embossing to the top of it. 


I added Black Magic Molten Dimensions Embossing Powder to the metal piece and set with the Heat Tool. Once it was cool to the touch I added a black gem to the center of the metal piece before adhering on top of the lace and pom pom trim at the bottom of tag. 


And there you have it! If you aren't following Momenta you can find them on Instagram, Twitter and Facebook. As always if you have any questions about this project please let me know.
I would also like to submit this project for the following challenges:

Emerald Creek: ECOCT2019


 Supplies

Momenta:  2" Doily
Beacon Adhesive: Zip Dry Adhesives 
Paper Cutter
Scissors
Heat Tool
Sizzix: Autumn Diecuts
Black Lace
Pom Pom Trim
Black Gems
Doily

(Products listed above are Affiliated Links for your convenience)

DISCLAIMERS
This blog is compensated to provide opinion on products, services, websites, and various other topics. Even though the owner(s) of this blog receives compensation for our posts or advertisements. I always give my honest opinions, findings, beliefs, or experiences on those topics or products. The views and opinions expressed on this blog are purely my own. Any product claim, statistic, quote or other representation about a product or service should be verified with each manufacturer, provider, or party in question.This blog contains affiliate links, clicking and shopping through these links helps to support and run Tonya Trantham Designs - Creative Addiction to Paper Blog at no additional cost to you. Today's features are Momenta Products. 


Thanks for stopping by, hope your Saturday is wonderful and enjoy creating!


Thursday, October 18, 2018

Eileen Hull: A Little Boo Mini Album

Hi everyone! I'm back today sharing this little mini Halloween album I created for Eileen Hull's Inspiration Team! 


I started by flattening and cutting a paper towel roll 5 1/2" in length.


Next I cut one side open and inked the outside and inside of the "spine" with the Purple Chalk Ink from the ColorBox Paintbox Mercantile Chalk.


I adhered Kraft Halloween Cardstock to the front and inside covers of the mini album.


I placed the Scalloped Border Diecut onto the Base Tray (retired) but you can use a Movers and Shapers Shuttle to hold the diecut in place. I placed the closed mini album cover on top of the Scalloped Border Diecut and ran through the diecutting machine.


I gather some scraps of Halloween cardstock from my stash and cut and folded to fit album.


I cut from the following diecuts: Bookplate, Hinges and Label, Bookmark, Tags and PocketCredit Card Sleeve and Tags and Banners and Pennants Diecuts tags, pockets and banners to decorate the pages and the doily. I also added printables and bits of patterned cardstock to the pockets too.


The other side of the pages I added stickers and a bat diecut from my stash.


The cover I adhered a diecut from my stash of extra cut outs.  The little girl I had printed out several of her in different sizes for a past project and I thought she would make a cute addition to the cover. I did cut around her arm so I could slip the jack-o-lateen diecut underneath it. I added googly eyes to the pumpkin and bits of thread. I cut one of the pennants off the banner diecut and created a little hat for the little girl image. I added a Bookplate Diecut with "BOO" stickers and two mini black gems to the bottom of the cover. I took a part a binder clip and added an Owl Charm, some fiber and clipped to the album cover and  finished off with sequin randomly placed. 


I gathered all the pages and stitched inside the album cover.


I couldn't help myself  but I added more tags and embellishments to the pages.


I cut tags from the Credit Card Sleeve and Tags along with some bits of patterned cardstock, punched a hole in the top of each and put all together with a jack-o-lantern brad and then paperclip to the top of one of the pages. I'm now ready to add mini photos  and journaling of the grand babies.


Be sure to hop on over to hop on over to Eileen Hull's blog to see what the rest of the Inspiration Team has been up to! You can find the latest blog post HERE. As always if you have any questions please let me know.


I would also like to submit this project for the following challenges:

Word Art Wednesday Challenge: #356-#357
Crafter's Castle: Challenge #10
Mini Album Makers Challenge: October


Thanks for taking the time to stopping by, hope your Thursday is awesome and enjoy creating!


Thursday, September 28, 2017

The Robin's Nest: 31 Card

Hi everyone! I am super excited to be back as a guest designer for the Robin's Nest today! For the how to's and more photos of my card you can find the blog post HERE


Thanks for stopping by, hope your Thursday is wonderful and enjoy creating!


Wednesday, October 5, 2016

Jute Halloween Pocket Candy Holder

Hi everyone! Has the weather started cooling off where you live? Here, we are in the lower 80's but the nights are starting to fill more Fall like so it won't be long before I'll be wearing layers and complaining about the cold weather. LOL :-)
Well, I am here today to share a Halloween project I created several months ago but wasn't able to share until now.


Eileen Hull's Inspiration Team had teamed up with Crescent this past Summer and we got to play with samples of Jute Matboard (you can find this in full sheets 32"x40" in custom framing shops art stores). For my project I thought the black jute mat board would make a great Halloween project. 


I started by cutting a Flower Pocket diecut from the jute matboard and from patterned cardstock (to line the inside of the pocket).


I cut the Medallions diecut out twice from patterned cardstock and put together according to the directions. I added thread, twine along with button, sequin and a Dew Drop to the medallion before adhering it to the corner of the pocket.


The other corner I added a jack o lantern sticker from my stash and finished off with sequins, flower, dew drop and thread.


I can either add candy (which I have none on hand...lol) or use it to keep all of my Halloween goodies in one place. :-)
If you have any questions about this project please let me know.


Thanks for stopping by, hope your day is awesome and enjoy creating!


Tuesday, September 20, 2016

Witch Candy Box

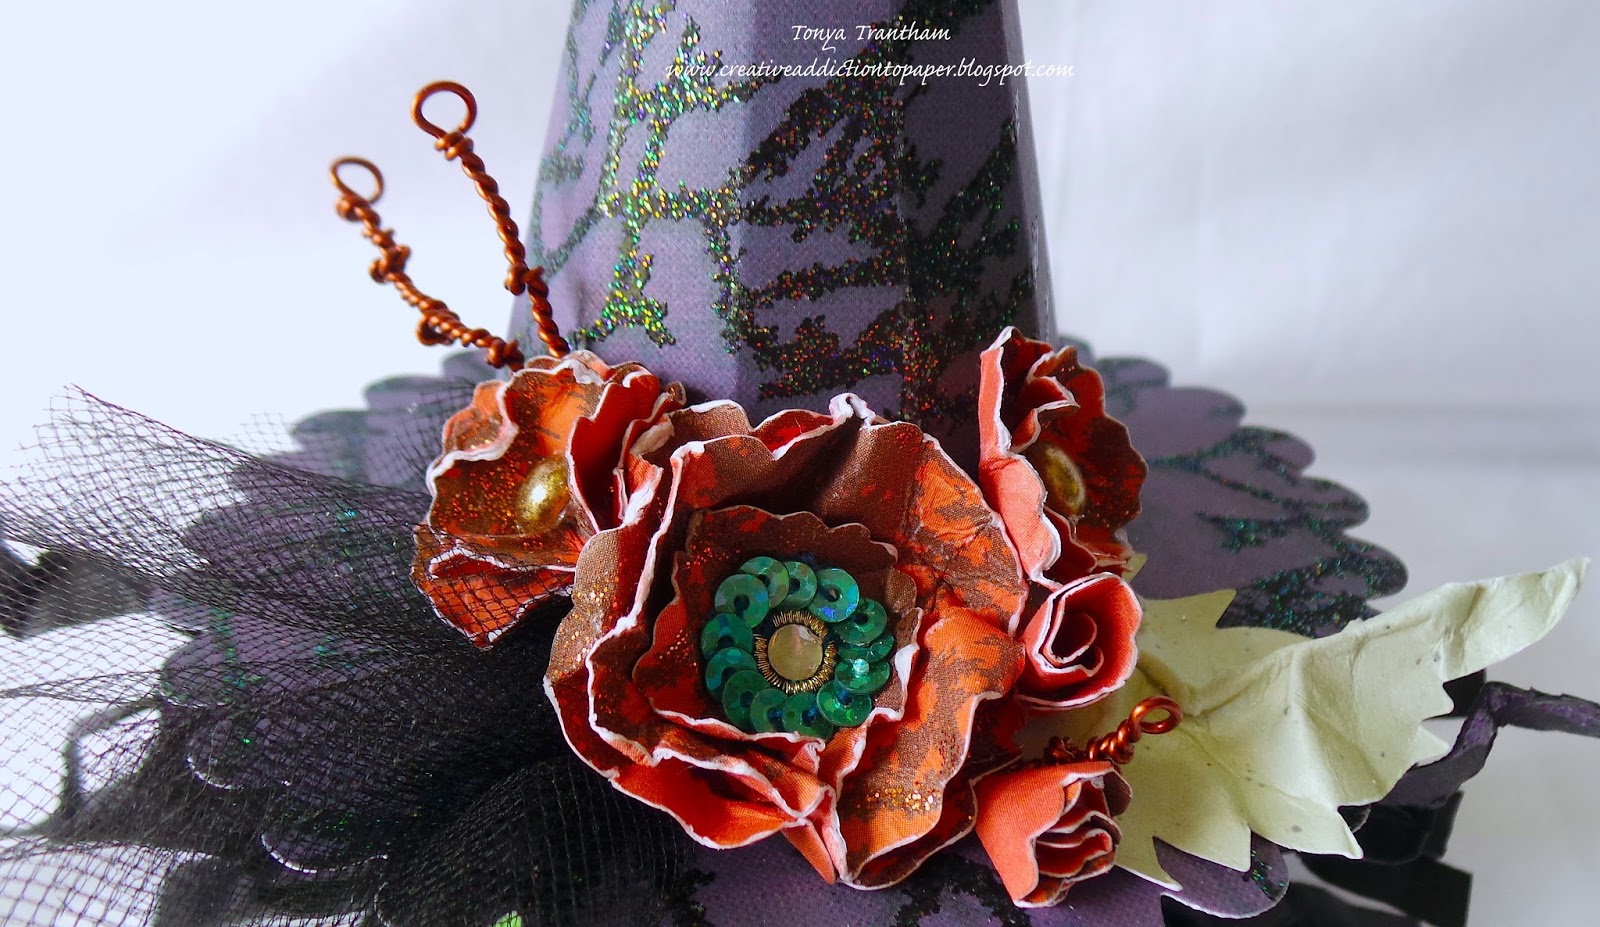
Hi everyone! Today I am here to share my Inspiration Team project this month for Eileen Hull. This month's theme is Halloween and Holidays and I decided to try and create a little witch from the Cookie Box diecut to hold candy in. 


First I cut the cookie box from Mat Board and assembled according to directions.  I used black mat board which is no longer available from Sizzix but you can paint or cover with cardstock.


For the hat I cut from Purple Crackle Glitter Cardstock a Cone diecut ( and assembled) a Scalloped Circle and a 1 1/2"x4" piece of Halloween Stripe Glitter Cardstock (I used the lime green side of the cardstock) for the face.


I centered the cone in the middle of the scalloped circle die  and adhered to the scalloped circle. I cut a two inch wide piece of black tulle and tied around the cone to create a band. Next I cut out several Romance Flowers diecuts from Orange Crackle Glitter Cardstock and lightly wet, crinkled and let dry before putting together. I added a Dew Drop to the center of a few of the flowers.


I cut a Spring Leave diecut from the Moss Green Glitter Cardstock, lightly wet, shaped and let dry. I used the Twist and Style Craft Tool to create some "twigs" and then I adhered everything to the brim of the hat.


Next I cut several 1/4" strips of Black Bats Glitter Cardstock, crinkled and adhered to either side of the witch's face. 


For the face I used white sequins, Men's Dew Drops, a green gem for the eyes and nose. The mouth I punched out a small scalloped circle and then used a circle to punch out a small section that looks like teeth.


There you have it my little witch candy holder. If you have any questions about this project please let me know.


For more inspiration be sure to hop on over to Eileen's blog and check out the other team members projects which can be found HERE and HERE.


Thanks for stopping by, hope your day is wonderful and enjoy creating!