Monday, November 12, 2012

This and That Paperbag Album

The inspiration for this little mini paperbag album comes from a vintage doll head charm from art.i.cake by Amy Labbe that I bought at Michaels. Even though it cost a little bit more than what I would normally spend on charms I knew I had to have it.

 
 I used a 6x6 pad of Echo Park's This and That Graceful paper collection.


The whole mini came together perfectly. I used lace, buttons, ribbon, velvet ric rac, Prima and Making Memories flowers, Crafty Secrets butterfly image, The Robin's Nest Dew Drops, buttons, baker's twine and a Li'l Davis Designs bookplate.


The inside of this mini there is plenty of room to journal and add photos with the two tags that can be pulled out on the inside cover and on the opposite page there is a tag that is folded into thirds which gives you six places (front and back) to add your thoughts or little mementos. 


The doll head stamp that I used for the mini page is by Pink Persimmons and the little butterfly stamp is by Christy Tomlinson and I used part of a paper doily I had in my stash. :-) 


A close up view...I used some of my own blush makeup for her cheeks since I couldn't find my chalk pastels. I think it turned out nice. :-) Plus the little striped yellow and white scrapbook paper is actually a tag that can be pulled out from behind the doll head.


The handmade pocket is made from a old book which I received in a tag swap. I also used a old ticket stub as a tab for one of the tag inserts. 


The last pages with more tags.


A inside closeup of crafty goodness :-)


I hope you have enjoyed this little mini as much as I enjoyed creating it. Thanks for stopping by and looking and enjoy creating!!!


Sunday, November 11, 2012

Altered Coffee Cup Sleeve Mini Halloween Album

I would like to share a mini album I created for The Robin's Nest design team call that I am trying out for. Please stop by their store and see what fun crafty things that you purchase and use in your own crafty projects. Also check out their blog for lots of fun inspiration too.


I had seen on Pinterest and You Tube these super cute mini albums that are made out of coffee cup sleeves that I have been dieing to create. Since my boyfriend, Greg loves to drink coffee I had him saving the sleeves for me.


First off I traced the coffee sleeves onto the pieces of cardstock and scrapbook paper that I have selected.
 
 
I then cut out the shape and adhere it on top of the coffee cup sleeves front and back. Ink all edges of in Versa Magic Sahara Sand Chalk Ink. This gives your pages a soft aged vintage look. Once I punched holes in the side of each sleeve I used Glue Dots Glue Lines to seal the bottom of each sleeve which you can now add a tag or a small memento to each sleeve.
 
 
This is the front cover of my mini I created.


 I used a variety of products that I had leftover and that I had received in swaps to create this fun little album.
 
 
I used a variety of stickers that I had left over to tags, pages and journaling spots.


The page above is too cute to be spooky. :-) 


Thanks for stopping by and I hope this inspires you to alter your own fun mini coffee cup sleeve album!
Enjoy creating!!!


Saturday, November 10, 2012

Whoooo Luvs Ya Baby???

I'm just dropping by for a really quick post since I'm on my way out the door to Knoxville. :-) 
For this project I had been playing around with some of my scraps of paper and came up with this little owl card that I created on my own...no template or pattern whatsoever.


I also used buttons and The Robin's Nest Dew Drops for eyes. I'm so lovin' this little fellow
and plan on playing around with some more paper and see if I can come up with some more feathery friends.


I hope this sparks your creative juices to create your own little feather friend. :-) Thanks for stopping by and enjoy creating!!!

Monday, November 5, 2012

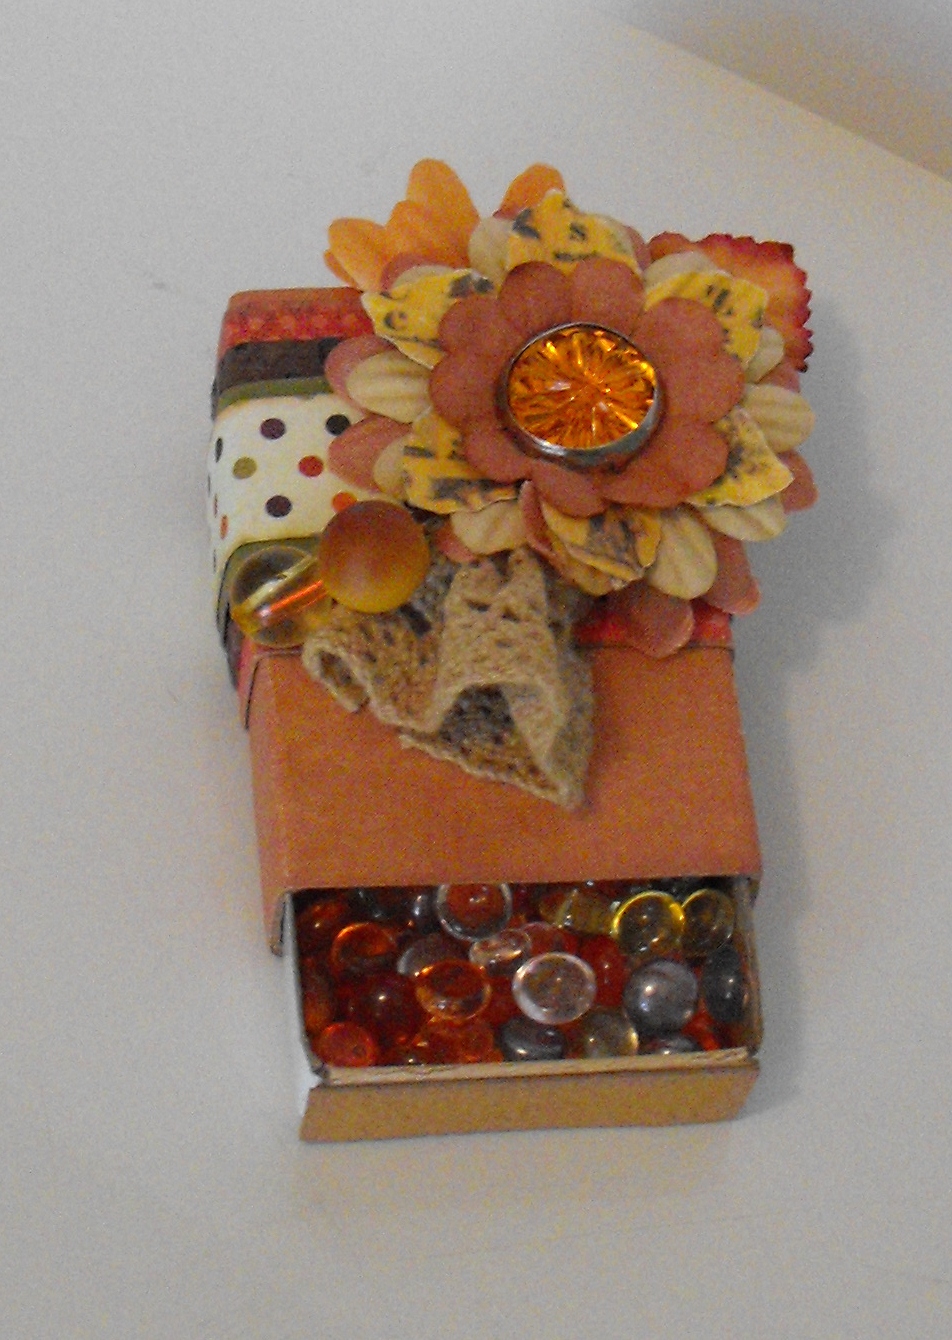
Altered Fall Theme Matchbox

On this crisp cool Fall day I would like to share a quick project I created all in one afternoon. I took a empty 32 count matchbox and covered the outside with some scraps of scrapbook paper. I added some Prima flowers with a brad in the center and a leave to the upper right hand side of the matchbox. I gathered a little bit of lace and added some Fall berries and taa-dah!!! Instant super cute gift!!!

 
Anything tiny can be added to the inside...buttons, brads, beads, lace, ribbon, charms, the list goes on and on.

  
I hope this inspires you to create something :-) Thanks for stopping by and looking!!!

Thursday, October 25, 2012

Let's Party!!!

Feeling really, really, really  good today considering I'm another year old :-) Yep it's my birthday and I would like to share a birthday card I created :-) I had a ton of fun making this little card...lovin' the colors and how happy it makes me feel :-)
The base of the card is 6 1/2 x 6 cardstock which is then folded in half. I then cut various sizes of patterned paper and adhered to the front of the card. I used the Sizzix Bigz Rolodex die and then embossed it with the Cuttlebug Once Upon a Princess Cupcake folder. I did ink all of the edges of paper with Sweet Melon Color Box Classic Pigment Cat's Eye ink.The rubber stamp is from Studio G which I stamped onto a piece of cardstock. I then stamped the image on some light blue and brown cardstock which I fussy cut that out and glued to the main birthday cake image. I colored the flames orange and a red bling to the top. Last but not less I used a Note rub on from Maya Road to make the small tab on the Rolodex card.


I hope this has inspired you to create something fun!!! Thanks for stopping by and looking!!!
Enjoy creating!

Wednesday, October 24, 2012

What's on My Desk?

I would like to share my first project I created for the Crafty Card Gallery design team challenge of "What is on your desk?". For this challenge we couldn't go out and buy any scrapbook paper, embellishments or new stamps. The team had to use what we had on hand or on our desk. Since I have packed up almost all of my craft supplies I had to dig through boxes...I'm still in the middle of getting my dream craft/guest bedroom ready....once that is finished I will share photos :-)
Below is the card I created...


 I used a 7x6 inch piece of My Mind's Eye patterned paper which I folded in half to give me a 3 1/2 x 6 card. Since I always have scraps of cardstock and pattern paper laying around I cut various strips for the front of the card. I inked all of the edges with Versa Magic Dew Drop Chalk Ink  in Aquatic Splash and then adhered to the card front. Next I stamped the Inkadinkado snowman stamp with Versa Magic Dew Drop Chalk Ink in Sahara Sand and then cut the image out. For the snowflake I used chipboard and cut it out using my Sizzix snowflake die. I then inked it with Versa Magic Dew Drop Chalk Ink in Oasis Green. When it was dry I lightly Sprayed Tattered Angles Glimmer Mist in Pearl on the snowflake. Once dry I adhered the snowflake to the front of the card and then glue the snowman image to the corner of the snowflake. The finally touches I used some Prima swirly pearl bling...I'm not sure exactly what it is called but you get my drift and last but not less I added some Robin's Nest Dew Drops in Fresh Mowed Grass to bling up the snowflake.  
 

Please check out the other design teams blogs and see what they had on their desk too when you get a chance.
Thanks for looking and I hope this inspires you to create something fun and enjoy creating!!!

Tuesday, October 23, 2012

Swaps and The Scrappin' Queens

I'm popping in for a very quick post :-). I have been super busy with swaps, crafting and trying out for design team calls. I did submit some of my past projects to Dawn Duntley's Facebook group "The Scrappin' Queens " Artist of the Week call. Well guess what?!?!?!? I got selected...squeaks of excitement and of course I was doing the happy dance too :-) Below is the screen shot of my famous moment. If you get a chance please go over and "like" The Scrappin' Queens page.


I don't do as many swaps as I use to but I couldn't past up Steffo Miller aka "With a Grin" super fun tag swap. I had to send in 20 #6 tags with 10 of one image and 10 of another image stamped in Staz-on ink. I went a little overboard and created little kits. I can't wait to see what I get back!!!


Next I altered a mini Fall themed matchbox for a swap I was in on Swap-bot and filled it with all sorts of fun tidbits of craftiness. The lighting wasn't that good so the colors aren't as viberate as I like. I also used my camera awesome app on my iPhone too.


Thanks for stopping by and I hope this inspires you to create something fun and enjoy creating!!!