Monday, July 31, 2017

Micro Paisley and Pink Planner and Goodies

Hi everyone! I am back with a quick post about a micro planner I created for a swap I was in. I used Eileen Hull's Passport Diecut to create this micro planner for my swap partner Nancy. The swap was a color crush swap and we had to put together a collection of items in our swap partner's favorite colors and Nancy's favorite colors are soft pink and sage green...I had problems finding sage green items. 😞


I created the micro planner from fabric and fusible webbing. If you missed my how to post on how I made the Fabric Travel journal with the Journal Diecut you can find that post HERE.


I added pockets to the inside covers using lace and I added two micro notebooks, a micro scrapbook that I created from 4"x6" journaling cards and a place to hold sticky notes. This gave Nancy plenty of goodies to have a hand when she is on the go. 😀


I found this fun pen and butterfly charm on clearance at Hobby Lobby. It sure added the right touches to finish off the micro planner.


I also put together an assortment of goodies to use with the planner or use in other craft projects.


I had a few canvas make up bags that I bought from Target with the intent of decorating and giving as gifts at Christmas time...which didn't happen. So I decorated one of those to give Nancy more storage for her craft supplies.


I cut fabric flowers from the Stitchy Flowers & Leaf Dieuts, frayed the edges of the flowers and added a button along with cording and lace and adhered to the corner of the bag. 


Here are some of the goodies I included inside of the bag. If you have any questions about this project please let me know.


I would also like to submit this project for the following challenge:
Word Art Wednesday: Challenge #292-#293


Thanks for stopping by, hope your Monday is awesome and enjoy creating!


Friday, July 21, 2017

Shabby Chic Planner and Beach Floral Giveaway Winner Announcement

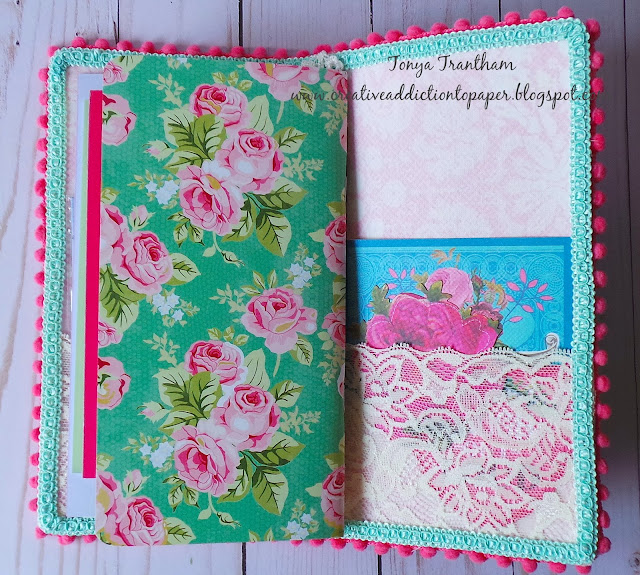
Hi everyone! I am back to share another journal I created with Eileen Hull's Journal Diecut. This journal I actually created before my travel journal but with this one I made mistakes (which I won't point out 😉)and I didn't take how to photos as I was working on it. 😕 So if you missed the how to of my travel journal you can find the post HERE.


This journal is basically the same other than I used Pom Pom trim, a different type of lace and ribbon was used on the spine.


The inside I used a combination of traveler's notebooks from Michael's, Target and Webster's Pages.


I added lace pockets on the inside covers to diecuts and journaling cards.


And there you have it! If you have any questions about this journal please let me know. Also if you want to see the what the Inspiration Team has been up to hop on over to Eileen's BLOG.


Linda Israel is the winner of this little matchbox with goodies! Also I decided to giveaway a second small grab bag of goodies and the winner of that is Beth Byrd! Congratulations ladies and please contact me with your mailing info. 😊


Thanks for stopping by, hope your Friday is wonderful and enjoy creating!


Wednesday, July 19, 2017

Fabric Travel Journal

Hi everyone! I am back with a step by step tutorial of Eileen Hull's Journal DiecutGenerally I get caught up in the process and forget to do photos along the way as I create. 😐 


The fun part of this journal is there is no sewing whatsoever. 😀 First I started by cutting four pieces of fabric (two for the cover and two for the inside cover) and two pieces of fusible webbing  all pieces slightly larger that the journal diecut.


I placed the piece of fabric on top of the fusible webbing and the other fabric on the bottom and ironed firmly on both sides and let cool. The fusible webbing has directions on how to use it when you get it cut. 


I had to take care as to how I ran the fabric through the diecut machine since I didn't want the map on the cover to be upside down.


I used Fabri-Tac adhesive to glue all of the journal together. It "grabs" the fabric quickly so no need to hold and wait for it to dry.


Next I adhered trim around the outside to cover the raw edge of the journal.


Trim finished around the cover of the journal.


I adhered lace to either side of the center holes and where I couldn't see the holes I used an awl to poke holes through the lace.


The inside cover I cut two pieces of stretchy lace and while gluing to the inside I pulled the lace taunt as I went.


I then finished the outer edges with trim.


I used a couple of my 8"x8" stacks of cardstock and some graph paper to create the traveler's notebooks for my journal. The 8"x8" is a perfect size! No measuring or cutting down and all you have to do is fold and punch holes in the spine and sew together. The notebooks have ten papers per signature and I trimmed the excess cardstock that protruded from the notebooks to give  them a more finished look.


I finished the journal by adhering lace to the center and added an elastic band with a charm for the outside closure and strung the inside and added my traveler's notebook and waa-laaa finished!


Be sure to hop on over to Eileen Hull's blog for more inspiration from the design team and as always if you have any questions about this project please let me know.


Thanks for stopping by, hope your Wednesday is awesome and enjoy creating!


Tuesday, July 18, 2017

Blah Blah Journal

Hi everyone! I am here with my Inspiration Team project for Eileen Hull using the new Journal Diecut. I am in LOVE with this diecut! So many ways to use it! Planner, scrapbook and of course journal.


I have a set of file folders with funny/snarky sayings on them and I thought this file folder with "Blah Blah" would be perfect to make a journal out of it. I had to carefully line up the wording and then I taped it down to the diecut before cutting out. Since both sides of the file folder has a design on it and it is made of a sturdy cardstock I just put together according to the directions.  I added colorful patterned cardstock to the corner of the cover and an image that I printed and fussy cut from Tsunami Rose Designs


I adhered lace and sewed a button to the spine.


The inside I added pockets and more fussy cut images from Tsunami Rose Designs. I attached the latch with adhesive and a decorative brad which I covered the prongs with a little washi tape.


I used as my closure a tassel with an attached cord and added elastic cording to the spine so I can add my own handmade journals.


I had a leftover piece of file folder which I turned into a book mark. I started by cutting two of the butterflies from the Birds and Butterflies Diecuts from felt. I added bits of lace, thread and cording to the butterfly before adhering to the top of the book mark. I added pearlized pins for antennas and a button and gem to the body. This is a great way to keep your spot in your journal and its cute too.😊


Of course if you are journaling on the go you need a way to store and take washi tape with you. From my Sizzix diecut packaging I used the Needle Book Diecut and cut a few of the needle books out and embossed with the Fantasy Flowers Embossing Folder. Next I cut several 12 inch pieces of washi tape and wrapped. Easy Peasy! 


I also cut two House/Pocket Stitchlet Diecuts out and folded the "roof" down on each diecut and adhered a butterfly from the Birds and Butterflies Diecuts  on the tip of the "roof". I glued two of the corners down to the outside cover and now I have a place to hold washi tape and journaling cards.
  

Some of the washi tape cards I used a mini clothes pin to hold it in place.


Here is a sneak peek of my journal filled up and ready to be journaled in. Be sure to hop on over to Eileen Hull's blog to see what the other Inspiration Team members have created! You can find those posts HERE and HERE.


 If you have any questions about this project please let me know!


 Thanks for stopping by, hope your Tuesday is awesome and enjoy creating!


Thursday, July 6, 2017

Beach Floral Matchbox Giveaway

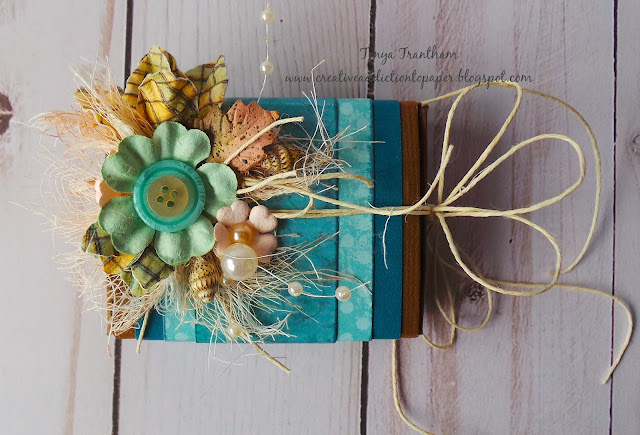
Hi everyone! Do you have unfinished projects lying around? Raise your hand if you do. ✋Well, this is an unfinished matchbox that I cut out and put together the box part of it about six years ago but never finished. I ran across it while straightening my craft room and had a brilliant idea on how to finish it off.


A lot of times I hit the proverbial wall and instead of forcing creativity I put my projects aside and "sleep on it" for a while.


This matchbox diecut I had purchased from Stampin' Up several years ago. I decided to go with a beach floral theme for the outside of the matchbox. I added an assortment of flowers, cheese cloth that I inked up, mini seashells and cording. 


Of course the inside had to have an assortment of beach inspired goodies too.


I  found this vintage image of this boy dressed in a sailor outfit on The Graphic Fairy and knew I  wanted to somehow create a mini journal for the matchbox. 


I stapled five pieces of notebook paper to the inside of the mini journal. 


Now for the fun part! Adding goodies! I raided my stash and added colored items that could be used for the beach/ocean and a mini set of rubber stamps with its own stamping block. 

Giveaway Time!
Would you like to win this little matchbox with all the goodies you see here? Well, I will tell you how can win this!!!

First, follow this blog and comment below that you are a new follower or hey I am already following you and that will get you one entry. 
Bonus enter if you follow me on Instagram...so that is two entries...and you can find me as Mscraftyt.
Now the not so fun stuff this is only for US...sorry 😔 unless you want to pay for the extra postage, custom fees, etc. 
This giveaway is open until the 19th of July and I will announce the winner the 21th of JulyIf you have any questions about this project or the giveaway please let me know.


 I would also like to submit this project for consideration for the following challenges:
Word Art Wednesday: Challenge Weeks #290-#291 


 Thanks for stopping by, hope your Thursday is awesome and enjoy creating!