Showing posts with label Beach. Show all posts

Tuesday, June 24, 2025

Sunny Days A Head Card

 Hi everyone! I want to share a sneak peek of a card I creating using the Amalfi Breeze Etched Dies by Spellbinders. For the complete blog post you can find it HERE


Thanks for stopping by, I hope your Tuesday is awesome and enjoy creating!


Tuesday, July 9, 2019

Beach Babe House

Hi everyone! I am back this week with a new project for Eileen Hull's Inspiration Team! I used Eileen's newest diecut, House Ornament Diecut, from the Chapter 3 Collection and I went with a beach theme for my little house using the Tutti Frutti 6'x6" Paper Pad and the Tutti Frutti Decorative Brads by My Mind's Eye.


I started by cutting out two house diecuts from Mat Board with a Diecut Machine. With a pair of Scissors I cut one of the bottom flaps off since it won't be needed. I adhered the house together according to directions on the packaging.


I added White Frost Metallic Lustre to the smaller Vignette Base and let dry while continuing to work on the beach house.


The little window tag from the house diecut I inked with what was leftover on my Art Dauber and I also cut the cross section out from the window. From the Tutti Frutti 6'x6" Paper Pad I traced and cut out a swimmer on a float and adhered to the back of the window. I made sure the face showed through the window. 


From the same paper pad I cut and adhered patterned paper to the roof but before adhering I inked the edges of the roof with chalk ink. I fussy cut an assortment of flowers and leaves out and adhered to the side of the roof.


I cut three flowers out from the Tag and Pocket Bookmark Diecuts. I slightly crumpled all three flowers and then shaped the edges with a Stylus. I added a brad from the Tutti Frutti Decorative Brads to the flower and adhered a bit of ribbon and yellow thread to the back before gluing to the roof.


I made a small bow with seam binding and covered the center of the bow with a brad from the Tutti Frutti Decorative Brads. I used a small amount of seam binding to tie the roof together and then adhered the bow on top of that. I added a small bow to the window tag and tied that around the seam binding bow. From the computer I printed the sentiment "Beach Babe" which I cut out and adhered to the tag. I fussy cut a small flower and leaves from the paper pad and added to the roof and the corner of the tag. I also added a couple small loops of thread to the corner of the tag.


I cut and adhered patterned paper from the same paper pad to the outside and bottom of the house. I adhered trim to both sides of the roof. I printed the Beach House sentiment and adhered to the front of the house and added blue gems to the top of the roofs on both sides and to either side of the sentiment.


Before adding the swim suit girl from the Tutti Frutti Decorative Brads I changed out the brad and I cut a small flower diecut from the same paper pad using the smallest flower diecut from the Tag and Pocket Bookmark Diecuts and added to the swim suit girl.


I added more fussy cut images from the paper pad to the bottom of the house.

For the life preserver I used a smaller circle punch and punched out the center first and used a larger punch to the punch out the life preserver.


I adhered the base to the bottom of the house and there you have it! Finished! Wouldn't these make great gifts for small Christmas gifts or add a gift card for a house warming gift. So many possibilities!!! Be sure to stop by Eileen Hull's blog and see what the rest of the Inspiration Team has been up to. You can find her blog HERE. As always if you have any questions about this project please let me know.


SUPPLIES

Sizzix/Eileen Hull: House Ornament Diecut
Sizzix/Eileen Hull: Tag and Pocket Bookmark Diecuts
Sizzix: Mat Board
Sizzix: Diecut Machine
Tim Holtz: Vignette Bases
Beacon Adhesive: Zip Dry Adhesive  
Seam Binding
Cording
Yellow Thread
Circle Punches
Gems
Trim
Ribbon

(Products listed above are Affiliated Links for your convenience)


Thanks for stopping by, hope your Tuesday is awesome and enjoy creating!


Monday, January 29, 2018

Beach Disc Junk Journal

Hi everyone! I am here to share my Inspiration Team project I created this month for Eileen Hull. The weather has been so cold in my neck of the woods that my project has a warm weather beach theme to it.


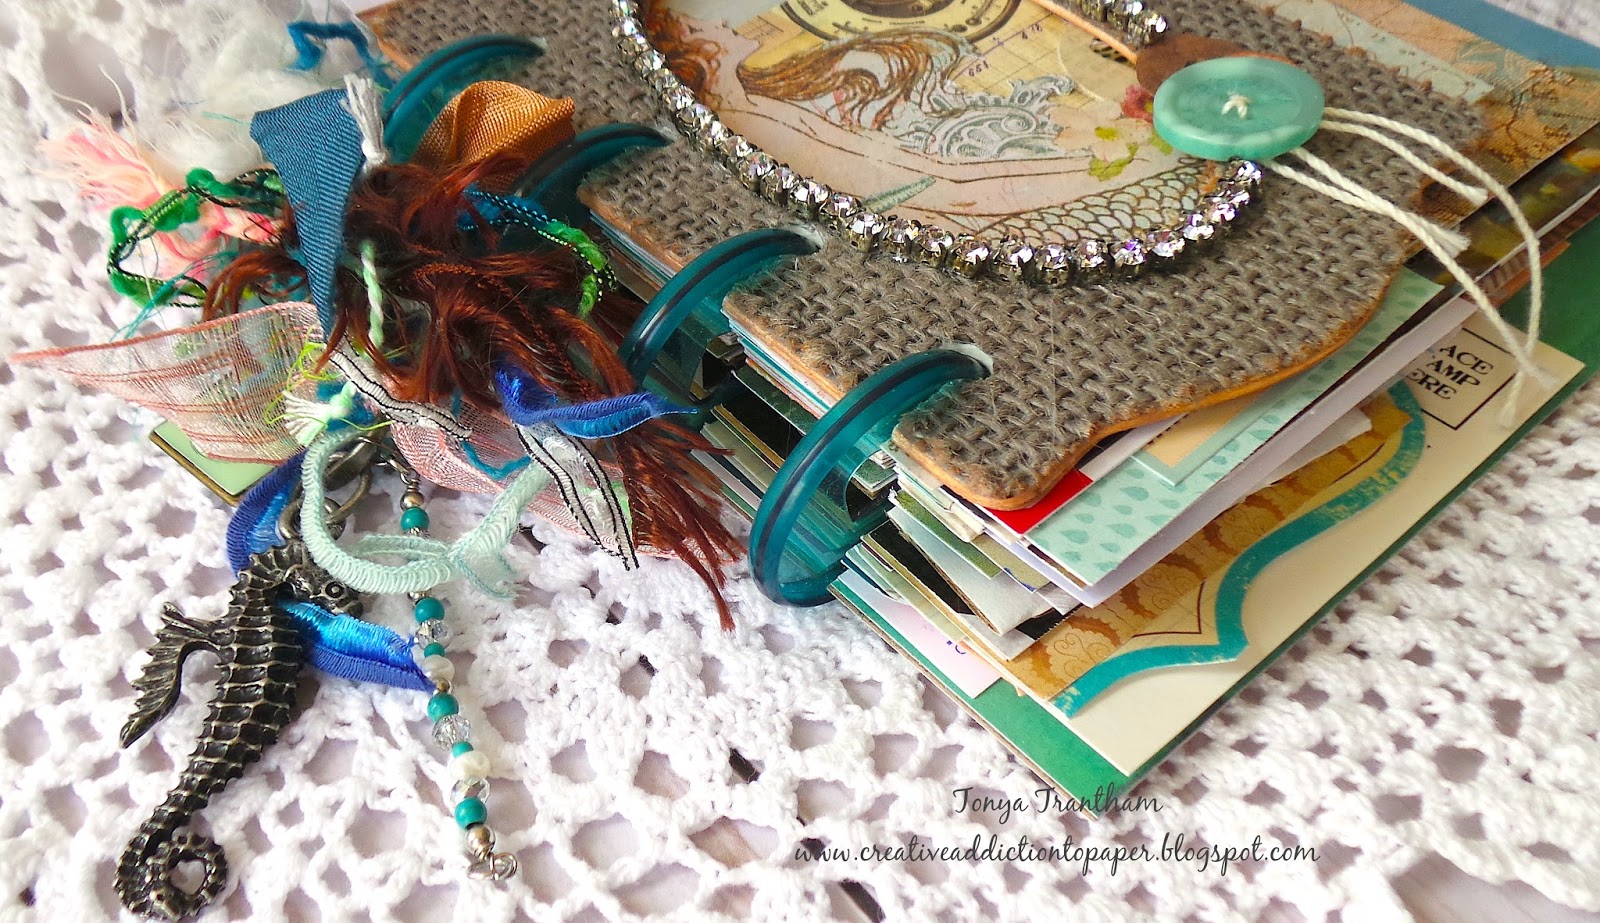
I decided to gather up all of my beach theme cardstock, stickers, embellishments and things I had put back from my trips to the beach along with the Book Binding Movers and Shapers Magnetic Diecut, Base Tray, burlap covered matboard, Book and Pages, Trinket Box and Frame Diecut and Medium Discs to create this journal.


I got so carried away that I didn't photograph a before photo of the cover which I cut from burlap covered matboard using the Book and Pages, Trinket Box and Frame Diecut. I backed the cover with a patterned cardstock and inked the edges.  I fussy cut sand dollars from scrapbook paper and adhered to the bottom corner of the opening of the cover along with a button and added a pearl and gem to the center of each sand dollar.  I adhered gems around the oval of the opening. A side note use a heavy duty adhesive to hold the gems in place. I used Zip Dry Adhesive at first but wasn't holding so I reapplied Fabri-Tac and that seems to be holding them in place.


I love the Book Binding Movers and Shapers Magnetic Diecut! There is so many possible uses for it! My journal has a total of 35 pages, plus the front and back covers. So this is one packed journal and the best part I can take it with me on my vacation already assembled. No, taking a load of cardstock, embellishments, etc. which nine times out of ten I won't fool with that much because...well...you know..I'm on vacation. 😎


I added a business card (Chick A Fil is a favorite place to eat at) and sacks/bags to the journal too.


I love the fact that you can move pages around or add or even take out completely.


I also made pages from a pamphlet I had picked up.


I used a hotel note pad for some pages in my journal too.


I threw in some paint chips in a beach theme.


The map I wanted to include was too large so I cut it down and folded and used a paper clip to keep it from flopping around.


Coffee sleeves work well as pockets to hold tags or receipts.


I added a drink coaster from my favorite restaurant to the journal.


I saved this bag from an order I received. I folded it over to create a flap, added some ric rac and a clip to keep ephemera safe.


Since the discs have a small heart in the center of each one I added an assortment  of fiber, seam binding, ribbon and charms to the top disc on the journal.


There you have it! One junk journal ready to go to the beach with me...hopefully this year...all I'll need is an ink pen, Insta Printer and a small stash of embellishments and I am ready!
Be sure to check out these posts from Eileen's team: HERE, HERE and HERE. As always if you have any questions about this project please let me know.


Also I would like to submit this project for the following challenges:
Word Art Wednesday Anything Goes: Challenge #318-#319
Mini Album Makers Challenge: January Challenge


Thanks for stopping by, hope your Monday is awesome and enjoy creating!


Thursday, July 6, 2017

Beach Floral Matchbox Giveaway

Hi everyone! Do you have unfinished projects lying around? Raise your hand if you do. ✋Well, this is an unfinished matchbox that I cut out and put together the box part of it about six years ago but never finished. I ran across it while straightening my craft room and had a brilliant idea on how to finish it off.


A lot of times I hit the proverbial wall and instead of forcing creativity I put my projects aside and "sleep on it" for a while.


This matchbox diecut I had purchased from Stampin' Up several years ago. I decided to go with a beach floral theme for the outside of the matchbox. I added an assortment of flowers, cheese cloth that I inked up, mini seashells and cording. 


Of course the inside had to have an assortment of beach inspired goodies too.


I  found this vintage image of this boy dressed in a sailor outfit on The Graphic Fairy and knew I  wanted to somehow create a mini journal for the matchbox. 


I stapled five pieces of notebook paper to the inside of the mini journal. 


Now for the fun part! Adding goodies! I raided my stash and added colored items that could be used for the beach/ocean and a mini set of rubber stamps with its own stamping block. 

Giveaway Time!
Would you like to win this little matchbox with all the goodies you see here? Well, I will tell you how can win this!!!

First, follow this blog and comment below that you are a new follower or hey I am already following you and that will get you one entry. 
Bonus enter if you follow me on Instagram...so that is two entries...and you can find me as Mscraftyt.
Now the not so fun stuff this is only for US...sorry 😔 unless you want to pay for the extra postage, custom fees, etc. 
This giveaway is open until the 19th of July and I will announce the winner the 21th of JulyIf you have any questions about this project or the giveaway please let me know.


 I would also like to submit this project for consideration for the following challenges:
Word Art Wednesday: Challenge Weeks #290-#291 


 Thanks for stopping by, hope your Thursday is awesome and enjoy creating!


Thursday, May 14, 2015

Journey Tag

Hi everyone! I am here to share a quick tag that could be used as a gift tag on a present for Father's Day or it could be used in a journal or a beach layout. I had created this a while back and I am just now getting around to sharing.


I cut  1/4" off of this tag to make it 3 1/8"x6" in size and then covered with a sheet of the seahorses from the Maritime 6x6 Paper Pad which is the perfect size for this tag. I inked around the edges and added other papers from the same collection which I distressed and inked too. The "Old Salt" and "Journey" images are from the Maritime Mini Ephemera diecut pack. I fussy cut those from the same diecut and adhered to the tag along with a messy bound bunch of thread.


I fussy cut more images from the paper pad and also added some clear sequins and mini flat back pearls randomly around to give the look of bubbles . 


I cut a 6" piece of Chocolate Waxed Cotton Cord and tied to the top of the tag to finish it off. And there you have it a very simple tag that looks like a lot of time was spent on it but in reality maybe an hour at the most. :-)
If you have any questions please let me know.


Thanks for stopping by, hope your Thursday is wonderful and enjoy creating!


Wednesday, April 29, 2015

Altered Pages: A Day at the Beach Mini Album

Hi everyone! I am here to share a mini journal I created for an upcoming trip to the beach. I wanted something that was small and wouldn't take up much space and that I could use my Instax printer to print off 2"x3" photos. 


For more on how to create this mini please hop on over to the Altered Pages blog and check out my post here!

Thanks for stopping by, hope your Wednesday is wonderful and enjoy creating! 


Sunday, May 25, 2014

A Day at the Beach

Hi everyone! I'm here to share an Altoid tin I altered using the Beach Collection from the Robin's Nest which is 20% off this month. I was at the beach a few weeks ago and let me tell you I didn't want to leave. The weather was perfect…sunny with ocean breezes. My type of weather for sure. :-) So I wanted to create something using the mini seashells I had collected while walking on the beach and this is what I came up with.


For this project you will need an empty and clean Altoids tin.


I sponged gessoed over the whole tin. Let dry and added a second coat.


Next I painted Americana Spa Blue Acrylic Paint around the outer and inside edges of the tin and let dry. Then  I painted over that with Ranger Picket Fence Distress Crackle Paint and let dry. You can speed up the process by using a blow dry. The paint should start cracking once it starts drying which gives it an old weathered look.


I cut from the Water Glitter Swirl cardstock four rectangles a little bit smaller than the tin, rounded, distressed and inked the edges. I adhered the striped side to the outside of the tin and water and wave side I adhered inside the tin.


I cut from the Sizzix Scoreboards XL Die Box Square three "frames", two from Glitter Starfish Cardstock and one from the Vanilla Fleur Glitter Cardstock. I adhered the two to the outside and one to the inside of the tin.
The outside I fussy cut one of the images from Before Bikinis Collage Sheet and the bathing suit girl I found on the internet. Adhered to the tops of the diecuts and then added  sea life images I fussy cut from scrapbook paper, gauze, sequins, dew drops and real seashells. If you don't seashells the Robin's Nest has them in their shop for purchase.


I used some old alphabet stickers I have had forever to create the saying. Then I added sequins, dew drops, twine, gauze, cut outs, mini jar and real seashells to make the beachy little scene. 


I fussy cut another bathing suits girls from the Before Bikinis Collage Sheet and used pop dots to adhere to the inside of the tin.
I fussy cut "waves" from the Water Glitter Swirl Cardstock added Stickles and stacked one in front of the other and glued down to give depth.


I adhered a small seashell, sequin and dew drop to the top of the tin to finish it off. This was an easy project to complete and I have plans to create another one in the near future. 


Supplies Used:

Buttons
Sequins
Gauze
Crystal Stickles
Gesso
Mini Glass bottle
Americana Spa Blue Acrylic Paint
Ranger Picket Fence Distress Crackle Paint
Ocean Chalk Ink
Twine

 Be sure to stop by the  Robin's Nest and check out the Beach Collection that is on sale this month. If you have any questions please let me know. Thanks for stopping by, hope your Sunday is wonderful and enjoy creating!!!