Thursday, March 19, 2015

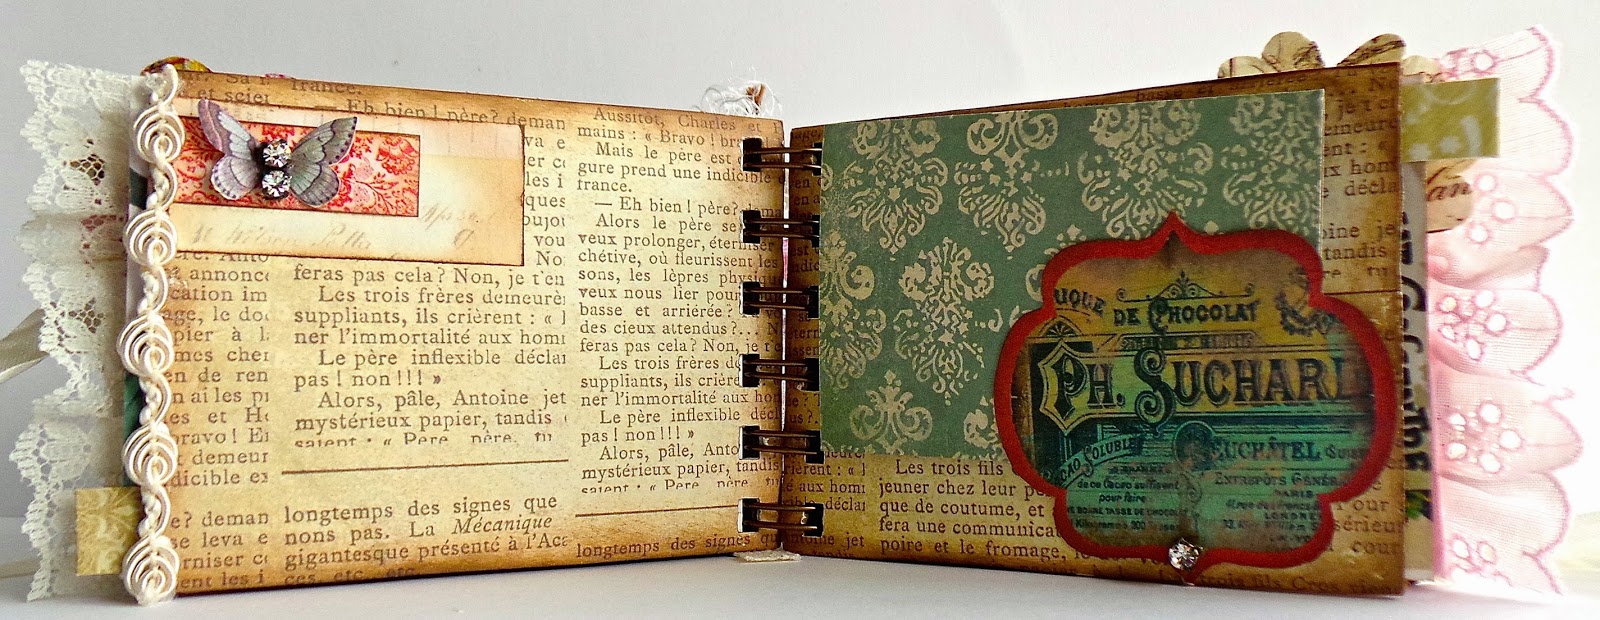
Parisian Toilet Paper Roll Mini Album

Hi everyone! This isn't going to be a very long post as far as talking about each page but if you have any questions about what was used or how it was put together please let me know.  I have LOTS of deadlines going on but I wanted to share a very quick post of a toilet paper roll mini album I created for my swap partner Kris. The swap is over at My Scrap Room and the TP mini had to be done in a Parisian theme with five empty TP rolls, three embellishments per page and a pull out per roll and could be bound anyway we wanted to. I chose to bind mine with the bind it all. I used the My Mind's Eye: Lost and Found Two collection, bits and pieces I had laying around and printables from Dreamz Etc.
I hope you enjoy! :-)


Thanks for stopping by, hope your Thursday is awesome and enjoy creating! 


Tuesday, March 17, 2015

Lets Celebrate!

Hi everyone! I am here to share my project for the Crafty Card Gallery blog and this month's theme is birthday. I finally used my Silhouette Cameo which I have had for over a year...gasp! If I had known it would have been this easy to used I would have used it sooner. 
I used the A2 Box Card Flower file to create this adorable card and let me tell you it was sooooo easy peasy to put together.


I printed Lets Celebrate from the computer and cut the sentiment out, inked the edges and snipped the end to create a banner and then adhered to a pipe cleaner. 


I actually cut another set of flowers out because I wanted "more dimension" to the flowers. The second set of flowers I inked and shaped before adhering on top of the other flower. I added sequins and a flat back pearl to each center.


I love the way this turned out! It is so colorful and fun  and I can't wait to give it as part of a birthday gift. If you have any questions about this project please let me know.


Thanks for stopping by, hope your Tuesday is awesome and enjoy creating!


Tuesday, March 10, 2015

Tattered Tangle Tea Cup

Hi everyone! I'm here to share a project I created for a challenge among the crew over at Canvas Corp. We had to showcase Tattered Tangle Paper from our point of view and this is my take on it. I must admit I struggled with this challenge. Zentangles is something I admire when other artists do it but as far as me...ummmm...no. It's just not my style or so I thought. I was sent the Stripes: Tangles Paper 12x12 sheet along with a few other pieces like three months ago and as the days and then months ticked away I still hadn't come up with anything. The Zantangle stripes weren't speaking to me. I didn't want to do the obvious card or layout I wanted to do something out of the box but what? Well, the diamond shaped pattern of one of the Zentangles I thought might be cool if I could create one of the tea cups I like to make so much but the only problem the stripes weren't that big. I decided to size the tea cup and saucer template down to 5"x7"image and print, cut out and trace onto the desired print which worked out nice. Side note you will have to trace and cut the cup handle out twice and glue together so you will have a pattern on both sides.


Before adhering everything together I spritzed the Tattered Angels Silk Glimmer Mist and the Polka Dot Pink Chalkboard Glimmer Mist on a disposable plastic tray and alternated painting the diamonds in those colors and then let dry. Once I put everything together I glued tissue in the bottom of the teacup and then added the two of the Gypsy Mini Ephemera pieces to the inside of the cup and adhered lace around that to hide the tissue paper. I then added trim, flowers, pearl sprays, thread and cut leaves from scraps of Green & Ivory Dot Reverse and Green & Ivory Ribbon Stripe to finish off the tea cup.
If you have any questions about this project please let me know.


Supplies Used:

Other Supplies: Paper Flowers, Sewing Thread, Sizzix: Sizzles Little Leaves Diecut, Pearl Spray, Lace, tea cup and saucer template

Thanks for stopping by, hope your Tuesday is awesome and enjoy creating!


Sunday, March 8, 2015

Hello Spring!

Hi everyone!  I don't know about you but I am SO over all of this cold weather and I am SO ready for spring and with it the warmer weather, flowers and trees with all their green foliage. All I want to do is stay bundled up with a cover and not move off the couch...lol. Well, I want to share a card I created awhile back for a magazine call but it wasn't selected. The original card had ribbon with the button but after looking at it I decided I just didn't like how it looked and removed the ribbon and added the polk a dot banner and moved the button off center from the Hello Spring sentiment. 


I think the updated version looks better than the ribbon I had original used. Don't you think?


For this card I used some product that would normally be used for Christmas and beach/ocean theme projects but I thought would work perfectly with the design of the card. :-) I started out with a 5"x7" Kraft card as the base for the card. The rabbit is fussy cut from the Farmhouse Market on Ivory Cardstock and then I applied Champagne Glimmer Glaze to the image and once that dried I added a little bit of Crystal Stickles to the tail and I applied some pink chalk to the cheek of the rabbit.


I added all the different layers of cardstock to the top of the card. I used the Spellbinders Bead Circles dies and I printed the sentiment from the computer and I finished off with a button, sequin and a dew drop.
Also I would like to submit this card for the following challenge:
 I hope you like the card and if you have any questions please let me know.


Supplies Used:

Thanks for stopping by, hope your Sunday is wonderful and enjoy creating!


Wednesday, March 4, 2015

Vintage Theme Junk Journal

Hi everyone! I'm here to share a junk journal I created for a swap I am in over on Swap-bot. My swap partner LisaLaughs agreed to do a journal no smaller than 4"x6" with three signatures and with each signature having 10 pieces of paper with an open theme. Since Lisa loves pink and anything vintage I tried to incorporate as much of both as I could. 
The cover of the journal is created from a file folder and I used leftover printables, rubber stamping, receipts, paperbag, envelope, paint chips, cardstock and packaging. 


I used Heidi Swapp rubber stamps all the way through the journal.


A lot of the printables I used are free from Ephemera's Vintage Garden and the little girl on the cover is from the Land of Nod Studio. I love printing on textured cardstock because it gives the printables a look of being printed on canvas. :-)


I also created a video to show what was inside and I hope you enjoy. :-)


I would like to submit this junk journal for the following challenges: 
If you have any questions about this journal or anything I used in it please let me know.


Thanks for stopping by, hope your day is awesome and enjoy creating!


Thursday, February 19, 2015

"Tweet"-ness

Hi everyone! I'm here to share a project I created for Eileen Hull's Art with Heart Project of Love Challenge. I used the Sizzix Scoreboards XL Die Box Square which I cut from the Sizzix Mat Board Pack 6 Cream Sheets.  One of the box sides I cut  off the lid so it could be open. I then cover with Express Yourself Gypsy Moments Cardstock on the outside and on the inside I covered with Express Yourself Gypsy Moments Cardstock. I decorated the front with hearts that was diecut and punched along with a little bird that I fussy cut from the Conservatory Paper Pack. I finished off the front with some cute embellishments, adhered trim around the top of the box and the screw fasteners I added to the bottom of the box.


The files I cut from the Sizzix Framelits Die Set 4pk with Stamps Gypsy Files but I wanted the files longer so I folder the cardstock in half and cut and I then cut papers from both the Conservatory and the Morceaux paper pads and adhered to both sides. I created pockets from the Poses and Reflections Gypsy Moments Cardstock and added embellishments along with Conservatory tags.


Backside of the file tags.


These tags are actually packaging from some 7 Gypsy product. 


The backside of the tags I didn't have to add much just a little bit of paper, Postale Paper Tape and twine.


I wasn't sure how everything was going to turn out when I started but I can honestly say I love the "tweet" little bird and hearts on the front of the box along with all the tags inside the box. :-) If you have any questions about this project or any of the products I used please let me know.


Supply List:
7 Gypsies-Express Yourself Gypsy Moments Cardstock, Postale Paper Tape, Conservatory 6x6 2 sided Paper Variety Pack, Conservatory Round Tags, Morceaux 6x6 Paper Variety Pack, Poses and Reflections Gypsy Moments Cardstock , Canvas Corps-Tan and Ivory French Script Cardstock
Screw Fasteners,Buttons, Prima Flowers, Twine, Pearl Spray, Tulle, Clear Sequins, Seam Binding, Gems, Robin's Nest-Dew Drops


Thanks for stopping by, how your day is awesome and enjoy creating!


Wednesday, February 18, 2015

Party Time

Hi everyone! I'm here to share a card I created for the Crafty Card Gallery blog. This month's theme is chocolate, cookies or sweets.  Well, since I have an embossing folder of cupcakes and I found this cupcake journal card which is from Crate Paper I thought this is the perfect combo. The cardbase measures 4"x5" folded and the cardstock is from Craft Smith Gradients Collection.


I added a red sequin and a red dew drop to the cupcake to finish off this card. I went simple this month because of the fact that I pinched for time and for fear of loosing electricity since we got about an inch of rain which turned to ice but so far so good I still have power. :-)


If you have any questions please let me know.


Thanks for stopping by, hope your Wednesday is awesome and enjoy creating!