Friday, July 19, 2019

Tutti Frutti Business Card Holder

Hi everyone! I am back with another project from Eileen Hull's newest diecut collection the Gift Card Folder and Label 2 Diecut


I placed a piece of Mat Board on top of the diecut and run through the Diecut Machine.


I covered both the inside and outside with cardstock from the My Mind's Eye Tutti Frutti Paper Pad.


I use mostly Zip Dry Adhesive but I chose to use Fabri-Fix to adhere the flaps together. I started with the first two flaps.


I used a cloth pin to keep the flaps together until they dried and then I added adhesive to the last flap and cloth pinned until dry.


The label diecut I covered with the same paper pad I used on the holder and adhered to the bottom of the holder. I cut several flowers and leaves from the Stitchy Flowers and Leaf Diecuts (retired) and Bookmark, Tag and Pocket Framelits out of the same paper pad.


I shaped the flowers and leaves with a Stylus before adhering to the front of the holder. I added a sequin and a gem to the center of the flower. 


On the back side of the holder I added a strip of cardstock to the spool, a bird punched from patterned cardstock and I "wadded" the flowers up and then shaped along with the leaves. I added a brad from the Tutti Frutti Decorative Brads to the center of one of the flowers before adhering all to the backside of the holder.


I completed by adding my business cards to the holder. 😊 Be sure to stopped by Eileen's blog to see what the rest of the Inspiration Team has been up to. You can find the latest blog post HERE. As always if you have questions about this project please let me know.


Supplies

Sizzix/Eileen Hull: Bookmark, Tag and Pocket Framelits 
Sizzix/Eileen Hull: Stitchy Flowers and Leaf Diecuts (retired)
My Mind's Eye: Tutti Frutti Paper Pad
Beacon Adhesive: Zip Dry Adhesive
Beacon Adhesive: Fabri-Fix Adhesive
Bird Punch
Wooden Spool
Sequin
Gem

(Products listed above are Affiliated Links for your convenience)


Thanks for stopping by, hope your Friday is wonderful and enjoy creating!


Thursday, July 18, 2019

Altered Flowers and Butterflies Pillow Gift Box

Hi everyone! I am back today with a project I created for Momenta. 


I received a gift in this Plunder Design pillow box and I thought the floral pattern on the pillow box was pretty except for the logo. So I decided I would cover up the logo by altering the box.


First I double up a length of cording and tied a bow on the end of the pillow box.


I cut a stripe of blue and gold cardstock from the Metallic Ink Paper Pad and adhered around the center of the pillow box.


Next I selected a Green 2" Watercolor Doily and adhered over the stripe of cardstock.


I fussy cut a flower and leaves from the Peony Paper Pad  and glued on top of the doily. 


I had a piece of leftover diecut from the Intricate Floral Cutting Template which I inked the butterflies and flowers before adhering to the corner of the box.


I added several loops of green thread under the butterflies and it is finished! Be sure to hop on over to Momenta for more inspiration! You can find them HERE. As always if you have any questions about this project please let me know.


Supplies

Pillow Box
Cording
Green Thread
Beacon Adhesive: Zip Dry Adhesive 

(Products listed above are Affiliated Links for your convenience)


Thanks for stopping by, hope your Thursday is awesome and enjoy creating!


Friday, July 12, 2019

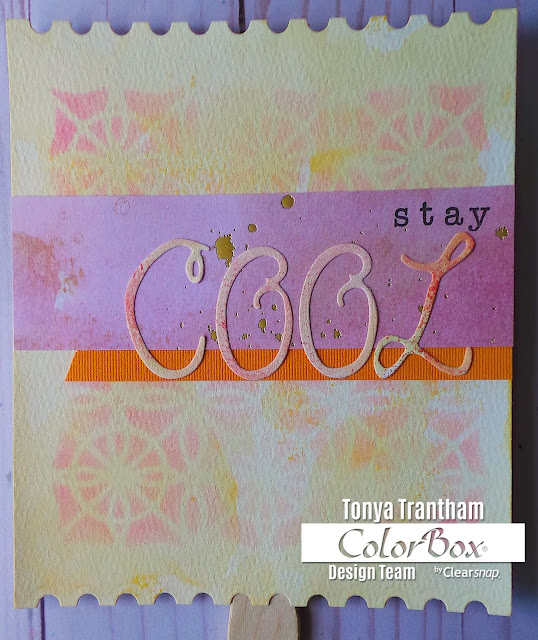
Stay Cool Fan

Hi everyone! I wanted to share a quick fan project I created! The weather has been HOT around here...mid to upper 90's and it's hard to stay cool so I thought I would create this fun fan using some of my ColorBox inks! 


I started by placing a piece of Watercolor Paper on top of the "Postage Stamp" looking diecut from the Creative Book Pages Diecuts. I placed between the cutting plates and run through the Diecut Machine. I cut off 1/2" on each side of diecut with a Paper Cutter. I inked the glass tray with Sunshine Blends 2 Ink  added water to ink mixture, placed the diecut in the ink mixture and once completely covered with ink removed and let dry.


I placed the Geometrics Art Screen on top of the diecut, inked an Art Dauber with Tutu Blends 2 Ink and applied over art screen. Then I removed the art screen and let dry.


Next I inked the following letter rubber stamps "stay" with Wicked Black Archival Dye Ink and stamped onto a piece of patterned cardstock. I cut cardstock to fit the fan and before adhering I cut a small banner from orange cardstock and glued both to fan.


I inked the glass tray with following Blends 2 Inks: Stop, Golden and Sunshine Blends 2 Inks, added water to each ink, laid a scrap of watercolor paper in the ink mixtures. Once the watercolor paper was completely covered I removed and let dry. 


I placed an Adhesive Sheet on the back side of watercolor paper and placed on top of following letter diecuts: C, O (cut 2) and L. Next I placed between cutting plates and run through the diecut machine. I removed the adhesive backing from letter diecuts and placed under the "stay" wording.


I finished by adhering a wooden paddle/stick to the fan. I know it is in no way a substitute for air conditioning but it does help a little to stir a breeze when you are hot and sweaty. Also this would be a fun craft to do with your children too. As always if you have any questions about this project please let me know.


SUPPLIES

ColorBox/Eileen Hull: Sunshine Blends 2 Ink
ColorBox/Eileen Hull: Tutu Blends 2 Ink
ColorBox/Eileen Hull: Stop Blends 2 Ink
ColorBox/Eileen Hull: Golden Blends 2 Ink
ColorBox: Art Daubers
Glass Tray
Sizzix: Funky Brush Sizzlits Diecuts (retired)
May Stamp Pegz: Lowercase Letters Set
Stick/Wooden Paddle
Patterned Cardstock Scraps
Beacon Adhesive: Zip Dry Adhesive

(Products listed above are Affiliated Links for your convenience)


Thanks for stopping by, hope your Friday is wonderful and enjoy creating!


Tuesday, July 9, 2019

Beach Babe House

Hi everyone! I am back this week with a new project for Eileen Hull's Inspiration Team! I used Eileen's newest diecut, House Ornament Diecut, from the Chapter 3 Collection and I went with a beach theme for my little house using the Tutti Frutti 6'x6" Paper Pad and the Tutti Frutti Decorative Brads by My Mind's Eye.


I started by cutting out two house diecuts from Mat Board with a Diecut Machine. With a pair of Scissors I cut one of the bottom flaps off since it won't be needed. I adhered the house together according to directions on the packaging.


I added White Frost Metallic Lustre to the smaller Vignette Base and let dry while continuing to work on the beach house.


The little window tag from the house diecut I inked with what was leftover on my Art Dauber and I also cut the cross section out from the window. From the Tutti Frutti 6'x6" Paper Pad I traced and cut out a swimmer on a float and adhered to the back of the window. I made sure the face showed through the window. 


From the same paper pad I cut and adhered patterned paper to the roof but before adhering I inked the edges of the roof with chalk ink. I fussy cut an assortment of flowers and leaves out and adhered to the side of the roof.


I cut three flowers out from the Tag and Pocket Bookmark Diecuts. I slightly crumpled all three flowers and then shaped the edges with a Stylus. I added a brad from the Tutti Frutti Decorative Brads to the flower and adhered a bit of ribbon and yellow thread to the back before gluing to the roof.


I made a small bow with seam binding and covered the center of the bow with a brad from the Tutti Frutti Decorative Brads. I used a small amount of seam binding to tie the roof together and then adhered the bow on top of that. I added a small bow to the window tag and tied that around the seam binding bow. From the computer I printed the sentiment "Beach Babe" which I cut out and adhered to the tag. I fussy cut a small flower and leaves from the paper pad and added to the roof and the corner of the tag. I also added a couple small loops of thread to the corner of the tag.


I cut and adhered patterned paper from the same paper pad to the outside and bottom of the house. I adhered trim to both sides of the roof. I printed the Beach House sentiment and adhered to the front of the house and added blue gems to the top of the roofs on both sides and to either side of the sentiment.


Before adding the swim suit girl from the Tutti Frutti Decorative Brads I changed out the brad and I cut a small flower diecut from the same paper pad using the smallest flower diecut from the Tag and Pocket Bookmark Diecuts and added to the swim suit girl.


I added more fussy cut images from the paper pad to the bottom of the house.

For the life preserver I used a smaller circle punch and punched out the center first and used a larger punch to the punch out the life preserver.


I adhered the base to the bottom of the house and there you have it! Finished! Wouldn't these make great gifts for small Christmas gifts or add a gift card for a house warming gift. So many possibilities!!! Be sure to stop by Eileen Hull's blog and see what the rest of the Inspiration Team has been up to. You can find her blog HERE. As always if you have any questions about this project please let me know.


SUPPLIES

Sizzix/Eileen Hull: House Ornament Diecut
Sizzix/Eileen Hull: Tag and Pocket Bookmark Diecuts
Sizzix: Mat Board
Sizzix: Diecut Machine
Tim Holtz: Vignette Bases
Beacon Adhesive: Zip Dry Adhesive  
Seam Binding
Cording
Yellow Thread
Circle Punches
Gems
Trim
Ribbon

(Products listed above are Affiliated Links for your convenience)


Thanks for stopping by, hope your Tuesday is awesome and enjoy creating!


Saturday, July 6, 2019

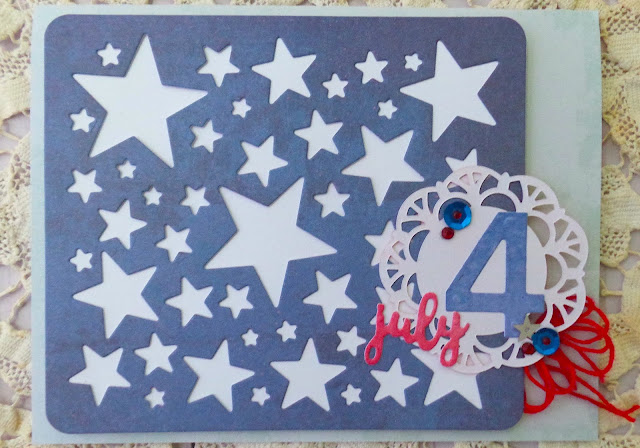
Stars on the 4th of July Card

Hi everyone! If you celebrated Independence Day like me and my family I hope you had a great time. Mine was spent lounging in the pool or on the lounge chair reading with a little eating on the side. 😎 I want to share a 4th of July card I created for Momenta.


I started by cutting and folding a piece of cardstock (retired Momenta 12"x12" Basic Paper Pad Collection) 5 1/2"x4 1/4" to create the base for the card. I selected a piece of blue cardstock from the Gemstones 8"x8" Paper Pad and with the Star Confetti Metal Die Template I cut out one diecut. I adhered a piece of white cardstock to the back of the diecut before adding Foam Pop Dots and placing on the card base.


I used a 2" Watercolor Doily but flipped it over on the back since it was white and adhered to the corner of the diecut. 


From the same blue cardstock I cut the number 4 with the Numbers Cut and Emboss Template and adhered to the doily. I cut the word July from red cardstock from the Metallic Paper Pad using the Months of the Year Cutting Template.


I finished the card by adding sequins, gems and a red twine bow to the card. Be sure to stop by Momenta's website to see the latest projects! You can find their site HERE. As always if you have any questions about this card please let me know.

I would also like to submit this card for the following challenge:
Word Art Wednesday Anything Goes: #394-#395


SUPPLIES

Beacon Adhesive: Zip Dry Adhesive
Sequins
Red Gems
Red Twine

(Products listed above are Affiliated Links for your convenience)


Thanks for stopping by, hope your Saturday is awesome and enjoy creating!