Wednesday, April 30, 2014

The Amazing Flying Boy

Hi everyone! I'm here to share a quick project I created using the Eileen Hull's Sizzix-Scoreboards Food Jar 3D Spoon Diecut. I know it is a little bit quirky but I had a lot of fun creating this little Flying Boy. :-)
I cut the jar twice from matt board and cardstock, inked all edges and then adhered together. Then I lightly inked over the cardstock with Sahara Sands chalk ink to give it that "old vintage look". Next I stuffed tissue paper in the bottom of the jar, cut out rosettes, put together, adhered to the jar and then added gears, sprockets and dew drops to top it off. 


The fly boy I fussy cut and chalked his outfit and then outlined him with a black fine tip pen. I then fussy cut bug wings out and adhered to the boy's back, added two dress pins as antennas to his head and glued him inside the jar.


I printed the verbiage from the computer, cut, inked and adhered to the banner along with an airplane that I fussy cut. I adhered the banner to the stick pin and glued to jar.


Supplies Used:

Sizzix:Eileen Hull: Scoreboards Food Jar 3D Spoon Diecut
Matt Board
Other Sizzix Dies: Brenda Walton's Medallion and Ampersands & Banner
Tim Holtz: Gears and Sprockets
Robin's Nest: Airplane Cardstock, Belgian Chocolate Cardstock, Mens Plaid/Compass Cardstock, Beaches Dew Drops/Tear Drops, Natural Twine, Special Delivery Boy Cardstock
Stick Pin from Art.i.cakes
Lace
Ocean Depth and Sahara Sand Chalk Ink
Airplane from K & Company  
Bugs Wings are from Graphic Fairy Web site
Crystal Stickles
Two Dress Pins

Cassi's Creations: Digital Collage Sheet Vintage Children 2 Fairies 

I hope you enjoyed this little project as much as I enjoyed creating it.
Thanks for stopping by, hope your Wednesday is wonderful and enjoy creating!!!


Sunday, April 27, 2014

"Cat-titude"

Hi everyone! I'm here to share a mini album I created out of coffee filters using the Special Delivery Collection from the Robin's Nest which is 20% off this month and we are cross promoting with EC crafts


The mini I created isn't the typical baby mini album. I made this with my cat, Omega in mind…thus, the title "Cat-titude" meaning cat with attitude. :-)
I started with four coffee filters as the base for my mini album.


I traced the filters onto the Special Delivery Cardstock and the Pink Rose on Green Cardstock and then cut out and inked the edges. Here is a tip…line up your words and stripes before you trace and cut out or you might have your words upside down or your stripes going in a weird way. :-)


Next I used my Bind it All to punch holes in the pages and then cinch the 3/4" O-wire.


This is what the mini will look like once the O-wires are added.


Next I "speckled" the cover and pages with a marker spritzer (I got this several years ago from Stampin Up) and Frayed Burlap Distress Marker to give the pages a bit of "well loved" look.


These two pages I kept pretty simple. I used a chipboard baby bottle from Gina's Design which I painted. The other page I used the backside of the Forest Trees Specialty Paper to matt the photo of Momma cat and kittens.
I actually got to see these kittens be born. I really wished I had taken photos when this happened but at the time I had not planned on keeping any of them. The momma cat, Miss Bonkers had followed me  around all day and wouldn't let me out of her sight. Well,when she finally went into labor and had all of them it was 2:00 in the morning. Omega was the last kitten to be born and was half of the size of the other three kittens. Omega meaning last is how she got her name since she was the last to be born. :-)


I used from the new Lodge Collection the Birch Tree Paper Straws which I inked with and brown chalk ink and then I punched leaves from Wrap Glitter Cardstock, shaped and adhered to the side of the paper straw. I topped it off with a button and dew drop.
The other page I cut from the Lodge Cut Outs Cardstock the trees and inked the edges and adhered to the page…letting some of it hang off the side of the page. I added to the top of the photo The View sticker which is from the Outdoors Stickers set. I punched two leaves and shaped and topped off with a button, sequin and dew drop.


This is one of my favorite photos of Omega way up in a tree just laying there. She always got chased up a tree by my other cat, Cotton.


I cut from the Pink Glitter Cardstock four scalloped ovals from the Spellbinders Grand Scalloped Ovals diecuts and embossed all with the Flowers and Leaves embossing folder from EC crafts. I plan on adding more photos and finishing my journaling to these pullouts later on.


 I cut a matt from the Forest Trees Specialty Paper and adhered a photo of my husband and Omega to it. My hubby was already asleep when Omega got in his lap and went to sleep never waking my hubby. :-) Next I printed and cut out from the Collage and Charm Words Mix Media Altered Art digital sheet "sweet dream" and adhered above. 
The "loved" photo is one from my Instagram account. I used a wooden photo frame that I had received in a swap and added three pearl dew drops from Crimson Mini Dew Drops to top it off. I had a leftover Valentine Hearts cardstock that I cut a scallop diecut from and a scrap leftover from a heart cutout that I adhered to the page.


The back cover of the mini along with ribbon, fiber and charms that I added to the O-wire.


The front was major fun to do. Since I had scraps from past DT projects I used those and a script cutout from the Lodge Cut Outs Cardstock, Forest Trees Specialty Paper, dew drops, bling, decorative frame and doily from Gina's Designs and a sticker of a vintage cat  that I had bought years ago that I thought would look perfect on the front.


Supplies Used:

4 Coffee Filters
Bind it All, 3/4" O-wire
Ribbon
Buttons
Sequin
Punches: Leaf and Small Flower
Sizzix: Scalloped Circle, Little Leaves
Spellbinders: Grand Scalloped Oval Diecuts
Charms
Chocolate Chalk Ink
Robin's Nest: Special Delivery Cardstock, Pink Rose on Green CardstockForest Trees Specialty PaperBirch Tree Paper Straws, Wrap Glitter Cardstock
Lodge Cut Outs CardstockOutdoors StickersCrimson Mini Dew DropsValentine Hearts cardstock, Crimson Mini Dew Drops, Dew DropsPink Glitter Cardstock 
EC Crafts: Flowers and Leaves embossing folder
Gina's Designs: Doily, Baby Bottle, Decorative Frame (front of mini)
Cassi's Creations:  Collage and Charm Words Mix Media Altered Art digital sheet

Well, I hope you enjoyed the mini I shared with you today. Please remember to stop by the Robin's Nest and check out the Special Delivery Collection that is 20% off this month and while you are at it but sure to look at the new Lodge Collection too…super fun collection that you can do a lot of crafty things with. :-) Also be sure to stop by EC crafts and check out the embossing folders, stickers and other fun crafty stuff they have.

Thanks for stopping by, hope your Sunday is wonderful and enjoy creating!!!


Sunday, April 20, 2014

Happy Easter!!!

Hi everyone!!! I'm here to share a egg carton that I altered into what I call an adult version of an Easter basket. I gessoed and painted it a soft pink. I cut and adhered a piece of Bunny Stripe cardstock from the Robin's Nest to the top of the carton. I fussy cut the bunny image which is from Altered Pages and glued in the corner and then proceeded to add all sorts of flowers, dew drops, bling, mini eggs, lace and tulle to the top.


I filled the inside with all sorts of goodies…crafty goodness and chocolate…you can't go wrong with either. :-)


If you have any questions let me know. Thanks for stopping by and I hope your Easter Sunday is full of love and time spent with your loved ones!!!


Saturday, April 19, 2014

Celebrate Big!

Hi everyone! I'm here to share a quick card I created for the Crafty Card Gallery this month. I cut a 4"x5 1/2" base from white cardstock. Used scraps of cardstock and scrapbook paper I had laying around, stamped Celebrate Big on a scrap of white cardstock and inked all edges of before adhering to the top of the card. The diecut I received in a swap over a year ago is from Spellbinders but I'm not sure which set it is from??? 
The last thing I added was some sequins and dew drops to the banner and a tiny flower which sequin and dew drop to the corner of the celebrate sign.


This is a very easy peasy card that you can knock out in only a short amount of time. It can be used for a birthday or retirement celebration.


If you have any questions let me know. Thanks for stopping by, hope Saturday is wonderful and enjoy creating!!!


Friday, April 18, 2014

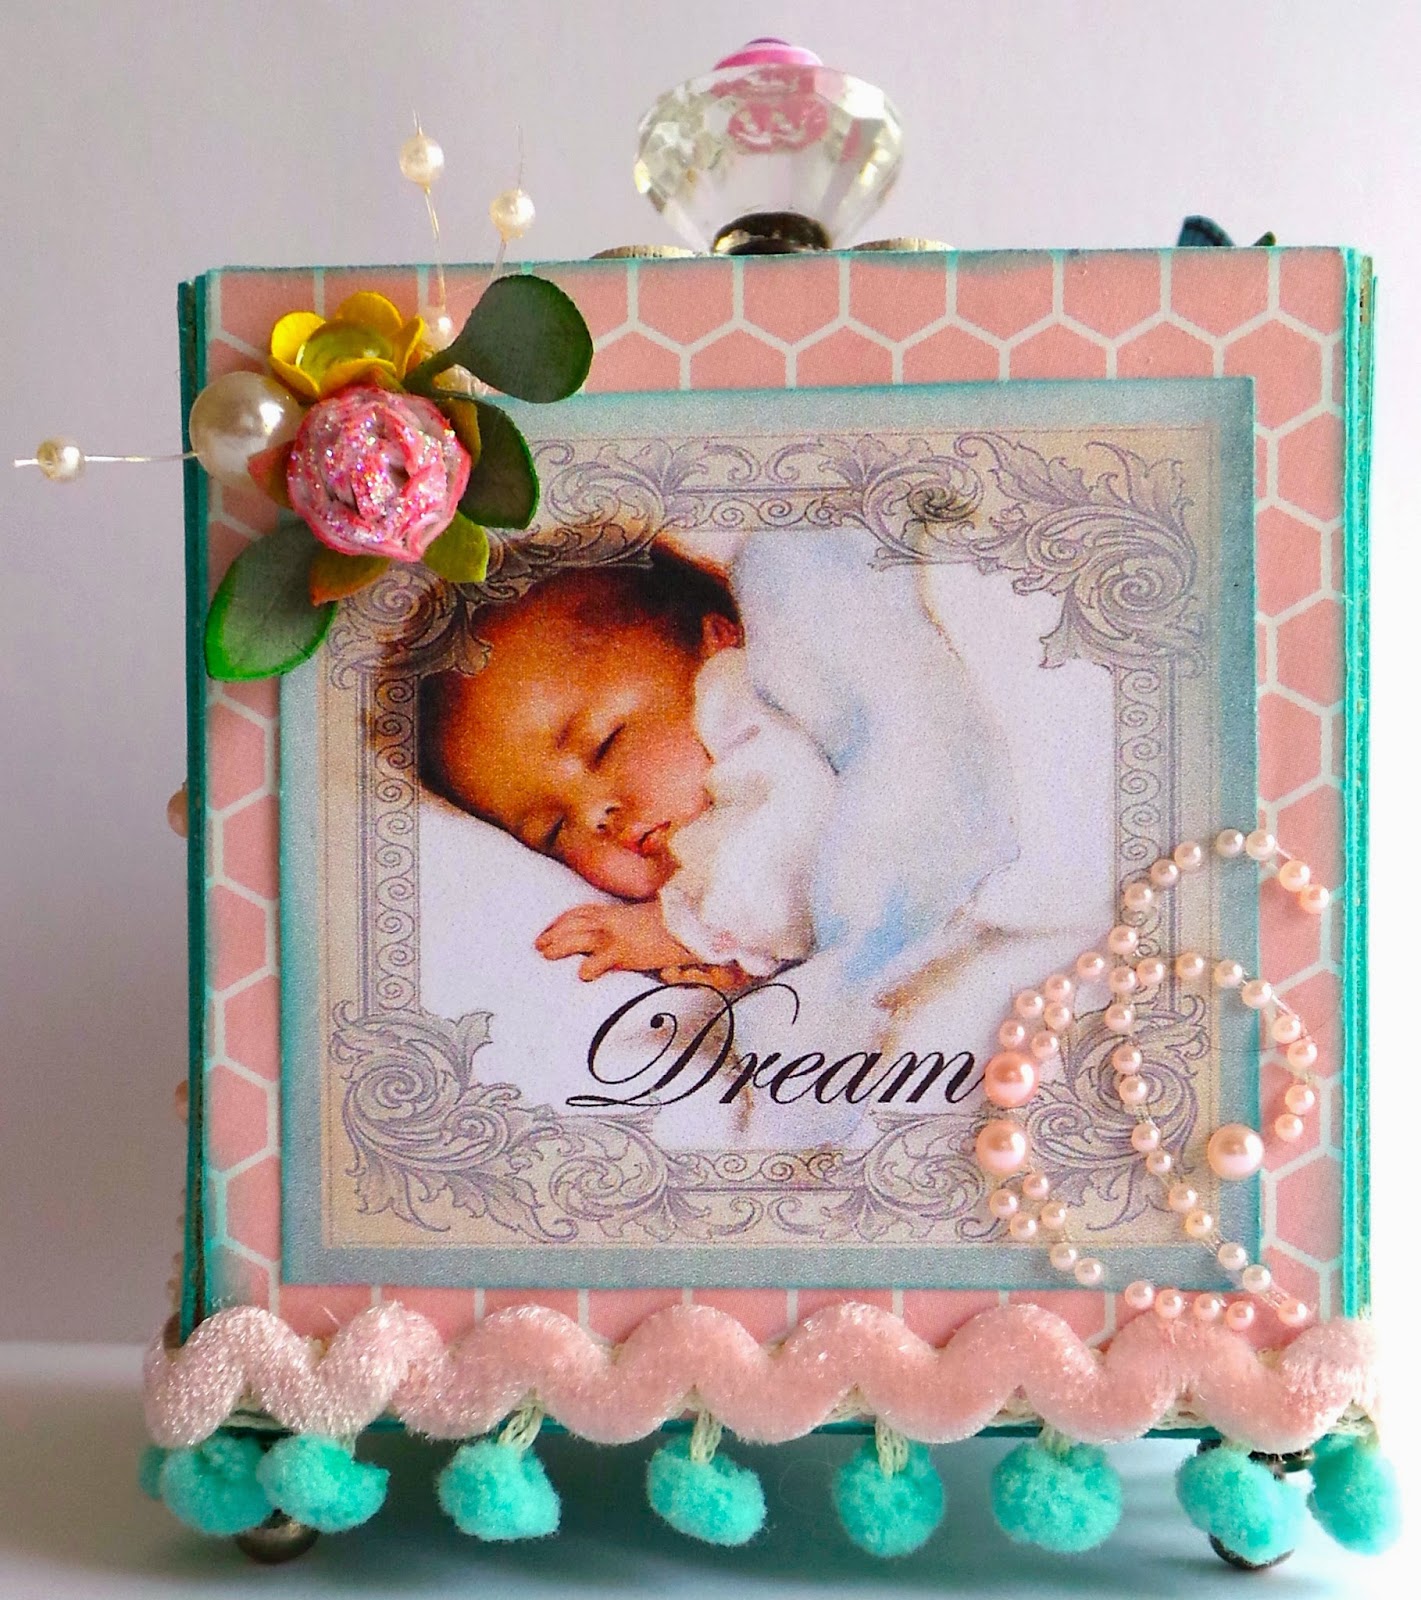
Sing Me a Lullaby

Hi everyone! I know it has been a few weeks since my last post but I've been crafting up a storm and I also managed to slip off for a long weekend in warm and sunny Florida.I got back on Monday with the intent of photographing and finishing up blog posts. Well I have come down some type sinus crud and a swollen gland in my neck. :-( Needless to say I went to the doctor and got medication. Now it needs to take effect so I can get back to my normal self. :-)
Well, I want to share my very first attempt of using the Eileen Hull Square Box XL Scoreboard diecut for the Art with Heart April Showers challenge that is going on over at her blog this month.
First I cut the box from matt board, inked the edges and used the Lil Angelz Kit 1 digital kit from the Dreams Etc Etsy shop as the base to decorate this adorable ATB (artist trading block). I sized down the digital image to fit the block and decorated. :-)


The top of the block I painted a wooden doily and once dry I spritzed it with a combination of Perfect Pearls Mist Mint and Biscotti Sprays and let dry. Next I adhered two buttons and a glass knob to the top of the block. I finished that off with a smaller button, sequin and a dew drop.


I think I am finally getting the hang of how to make these 3D roses…when all else fails go to You Tube and watch how to videos on how to make them…lol ;-) 


I used some Pink Honeycomb scrapbook paper to offset the sleeping baby and little girl in the baby shoe and topped it off with a sprig of flowers and some little pink swirls.


The white flowers I lightly inked with Shabby Pink and then stickled for the perfect vintage look.


 The butterfly I fussy cut, added stickles and antenna which I used jewelry wire that I wrapped with Tim Holtz Elements Tissue Tape, then shaped and adhered to the butterfly.
Also I used the Spare Parts Screw Fasteners as little legs for my block.


This baby block could be used for a baby shower or as a decoration. Too cute!!!
I can honestly say I am hooked on these artist trading block and I already have more ideas swirling around in this head of mine. :-)


Supplies Used:
Mat Board
Other Sizzix Dies:Stampin' Up Sizzlits Little Leaves, Flower, Rose 3-D
Small Flower Punch
Prima: Slip Swirls Pink
Wooden Doily
Tim Holtz Elements Tissue Tape
Folk Art Taffy Acrylic Paint
Perfect Pearls Mist: Mint and Biscotti Sprays
Glass Knob
Spare Parts: Screw Fasteners, Paper Flowers 
Stickles: Crystal and Star Dust
Powder Puff Tahiti Chalking Ink
Color Box: Shabby Pink Chalk Ink
Buttons
Sequin
Robin's Nest Dew Drop
Ric Rac
Pom pom Trim
Digital Images:Dreams Etc: Lil Angelz Kit 1, Butterfly from Graphic Fairy

Be sure to stop by Eileen's blog and check out the other projects. Also there is still time to play in this month's challenge and possibly win a cool prize pack and bragging rights. :-)
If you have any questions let me know. Thanks for stopping by, hope your Friday is awesome and enjoy creating!!!


Sunday, March 30, 2014

Garden Bunny Basket

Hi everyone! First off I would like to welcome you to the Robin's Nest Garden Blog Hop! Second off please make sure to stop by each of the blogs and leave a comment, follow each blog and follow our FB page.  We are giving away a prize on each blog.  It is a $15 butterfly kit full of Robin's Nest butterfly products, perfect for the garden. :-)
Now I would like to share a quick project that is originally something that you would use to start plants in your garden with. When I went to Lowes I found two sizes of peat pots but I went with the larger size I figured it was the prefect size to alter and create an adorable basket.


I had very little Caribbean Blue acrylic paint leftover from another project so I mixed that paint with white and painted the peat pot. I let dry and then I used Antique Mod Podge to seal it.


I punched holes on either side of the pot and I run an iridescent pipe cleaner through each hole to make the handle. I adhered half of a doily and ric rac around the top of the pot. I created a banner and a rosette and glued on top of the doily. Next I fussy cut from the Vintage Easter Greetings  sheet a bunny. I punched a circle from the Moss Green Glitter Cardstock and adhered on top of the banner and rosette.


I cut four flowers from the Pink Glitter Cardstock using the Flower #3 die and I used green scraps of cardstock to cut the leaves out. I used a stylus to give the flower petals and leaves shape. Then I adhered together and added buttons, sequins and a Pearl Dew Drop (Crimson Mini Dew Drops). I glued it to the side of the handle.


That's a pretty easy project, huh??? Now all I have to do is add some more goodies. :-)


Supplies Used:
Caribbean Blue and White acrylic paint
5" Peat Pot
Iridescent pipe cleaner
Antique Mod Podge
Buttons
Sequin
Bottle Cap Hole Punch
Ric Rac
Paper Doily
Sizzix: Rosette, Flower #3 and Stampin' Up Little Leaves
Circle Punch

If you have any questions about this project let me know.
Remember to stop by each blog and leave a comment, follow each design team member's blog and like/follow the Robin's Nest Facebook page for your chance at winning a $15 prize package.
Thanks for stopping by, hope  your day is awesome and enjoy creating!!!


Saturday, March 29, 2014

Easter Bluebird Cup

Hi everyone! I'm here to share a super fun project I created for the Robin's Nest using the Spring Collection which is 20% off this month and we are also cross promoting with Altered Pages too.


I love creating these little tea cups and saucers. They are quick to create and makes a fun gift to give to someone that collects tea sets or it could make the perfect place setting at a party.  All you will need to do is print off the Paper Tea Cup and Saucer onto Spring Flower Glitter Cardstock and then cut out and ink the edges of the saucer before adhere together.I spritzed a doily from Gina's Designs with Tattered Angels Lemon Zest Glimmer Mist once dry I glued it to the saucer and then adhered the cup on top of the that.


I next fussy cut from the Sweet Easter Cards printout the little bluebird. In the bottom of the cup I wadded up a piece of tissue paper and glued inside. Next I adhered the bluebird to the tissue paper.


Next I added Easter grass around the bird to cover the tissue paper.


Now all you have to do is add paper flowers, mini eggs, lace, ric rac and anything else that is Easter related. See super easy and cute to boot!!! :-)


Robin's Nest: Spring Flower Glitter Cardstock, Dew Drops and Purple Flower Glitter Cardstock
Paper Tea Cup and Saucer
Altered Pages: Sweet Easter Cards
Gina's Designs: Cardstock Doily Set 1
Tattered Angels Lemon Zest Glimmer Mist
Sizzix: Rosette Diecut
Brad
Buttons
Ric Rac
Paper Flowers
Flower Punch
Sequins
Lace
Easter Grass

If you have any questions please let me know and remember to stop by the Robin's Nest and check out the Spring Collection and while you are at it stop at by Altered Pages too.

Thanks for stopping by, hope your Saturday is awesome and enjoy creating!!!


P.S. Remember to check out the Robin's Nest blog hop this Monday, March 31st for awesome ideas from all of our designers and some really cool blog candy!!!