Wednesday, October 2, 2019

Have a Merry "Sloth-mas" Gift Box

Hi everyone and welcome to the Pocket Notebook Release Party! This is Eileen Hull’s newest book die with Sizzix. 


On the die, you get all of the pieces you need to make an entire book-the cover, pages, latch and pen loop! The Pocket Notebook measures 6 3/4” x 4 1/2” with a spine that can adjust from of 3/8” to almost 2”! String it with elastic, hemp, ribbon or twine. So many option for this fun die!


Eileen’s Inspiration and Educator teams have combined to show us their amazing Pocket Notebook ideas. Please follow the Blog Hop to see all of the fabulous projects, techniques and videos! There are also two GIVEAWAYS- the Pocket Notebook die and a gift certificate for Eileen’s Etsy store. To enter to win, leave a comment on each of the posts. Winners will be announced on Tuesday, October 8 on Eileen’s Facebook Live show.


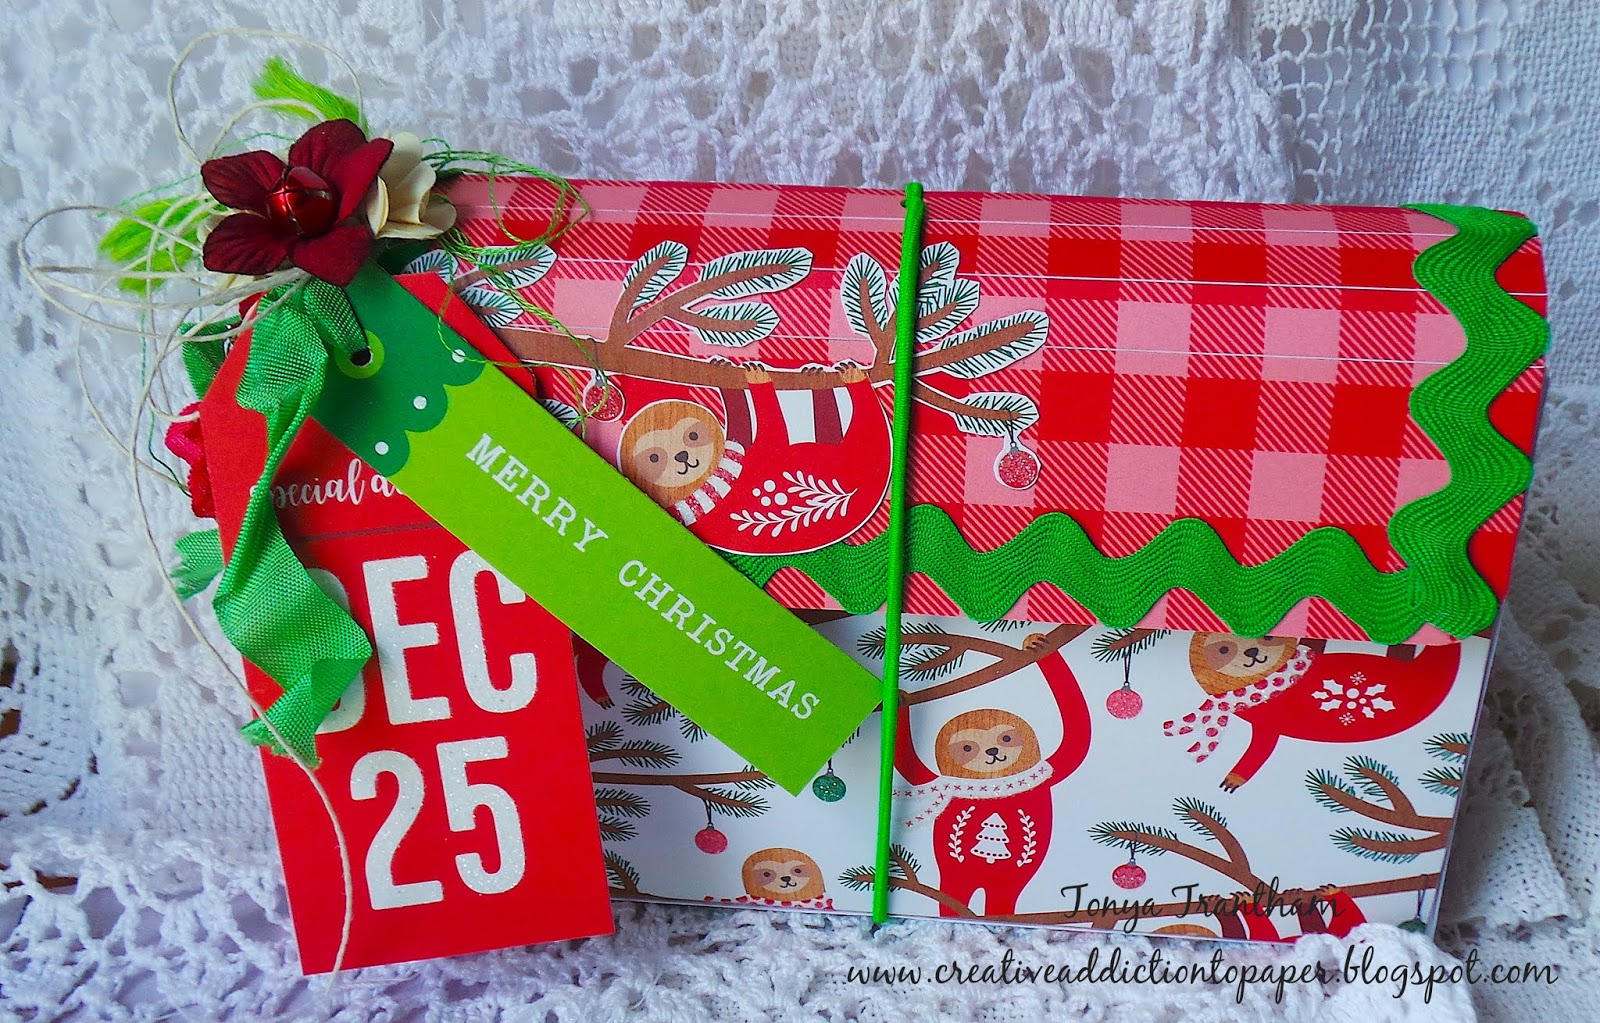
For my project instead of doing the normal notebook I decided I wanted to do something a little different. I chose to make a gift box with an elastic closure. I know this looks a little hard but in reality it is easy peasy to create!


I started by covering both sides of Chipboard with Adhesive Sheets. Once I completed that step I added patterned cardstock from the Cozy and Bright Paper Pad and cut two of the covers from the Pocket Notebook Diecut and the larger "panel"  from the Make It 3D Diecut (retired).


I cut the "panel" in half, four inches each piece, with a Paper Cutter and folded the tabs in.


I adhered both "panels" tabs to the inside cover of the pocket notebook diecut.


Next I adhered the other cover to the other side of the "panel".


I adhered the spine/bottom together and covered the sides with more patterned cardstock (I wanted cleaner edges and to cover the holes in the spine). 


I covered chipboard with adhesive sheets on both sides and applied patterned cardstock to both sides and cut "flaps"/spines from the Pocket Notebook Diecut. One flap is 1 7/8" wide from the fold and I used a corner on the edges of the flap. The second flap is 1 1/2" wide from the fold. I folded/rounded the edges of both spines.


I adhered the 1 1/2" to the back side of the box.


The 1 7/8" spine I lined up will the center hole after applying adhesive.


I added ric rac around the flap of the box.


I added velcro to the inside.


And before adding an Elastic Closure through the center hole on the flap I fussy cut one of the sloths out and adhered to the corner.


I gathered all my Christmasy seam binding, thread, jute, a bell and flowers and added to the corner of the flap.


Also from the same paper pad I cut out two tags and added those to the seam binding.


There you have it! Easy Peasy Christmas gift box using the Pocket Notebook Diecut! I am definitely going to make more of these to have on hand to put my Christmas presents in.

Supplies

Sizzix/Eileen Hull: Pocket Notebook Diecut 
Sizzix/Eileen Hull: Make It 3D Diecut (retired)
Sizzix: Adhesive Sheet
Beacon Adhesive: Zip Dry Adhesive
Ric Rac
Seam Binding
Velcro
Flowers
Bell
Thread, Cording and Green Jute

(Products listed above are Affiliated Links for your convenience)

DISCLAIMERS

This blog is compensated to provide opinion on products, services, websites, and various other topics. Even though the owner(s) of this blog receives compensation for our posts or advertisements. I always give my honest opinions, findings, beliefs, or experiences on those topics or products. The views and opinions expressed on this blog are purely my own. Any product claim, statistic, quote or other representation about a product or service should be verified with each manufacturer, provider, or party in question.This blog contains affiliate links, clicking and shopping through these links helps to support and run Tonya Trantham Designs - Creative Addiction to Paper Blog at no additional cost to you. Today's features are Eileen Hull and Sizzix Products. 


Now for all the fun stuff! As stated earlier in this blog post there will be two giveaways-the new Pocket Notebook Diecut and a gift certificate to Eileen's blog. So be sure to comment and follow. 😊

Tonya Trantham ←YOU'RE HERE

Thanks for hopping along with us today!

Thanks for hopping along, hope your Thursday is wonderful and enjoy creating!


Monday, September 30, 2019

Wreath Full of Posies Tag

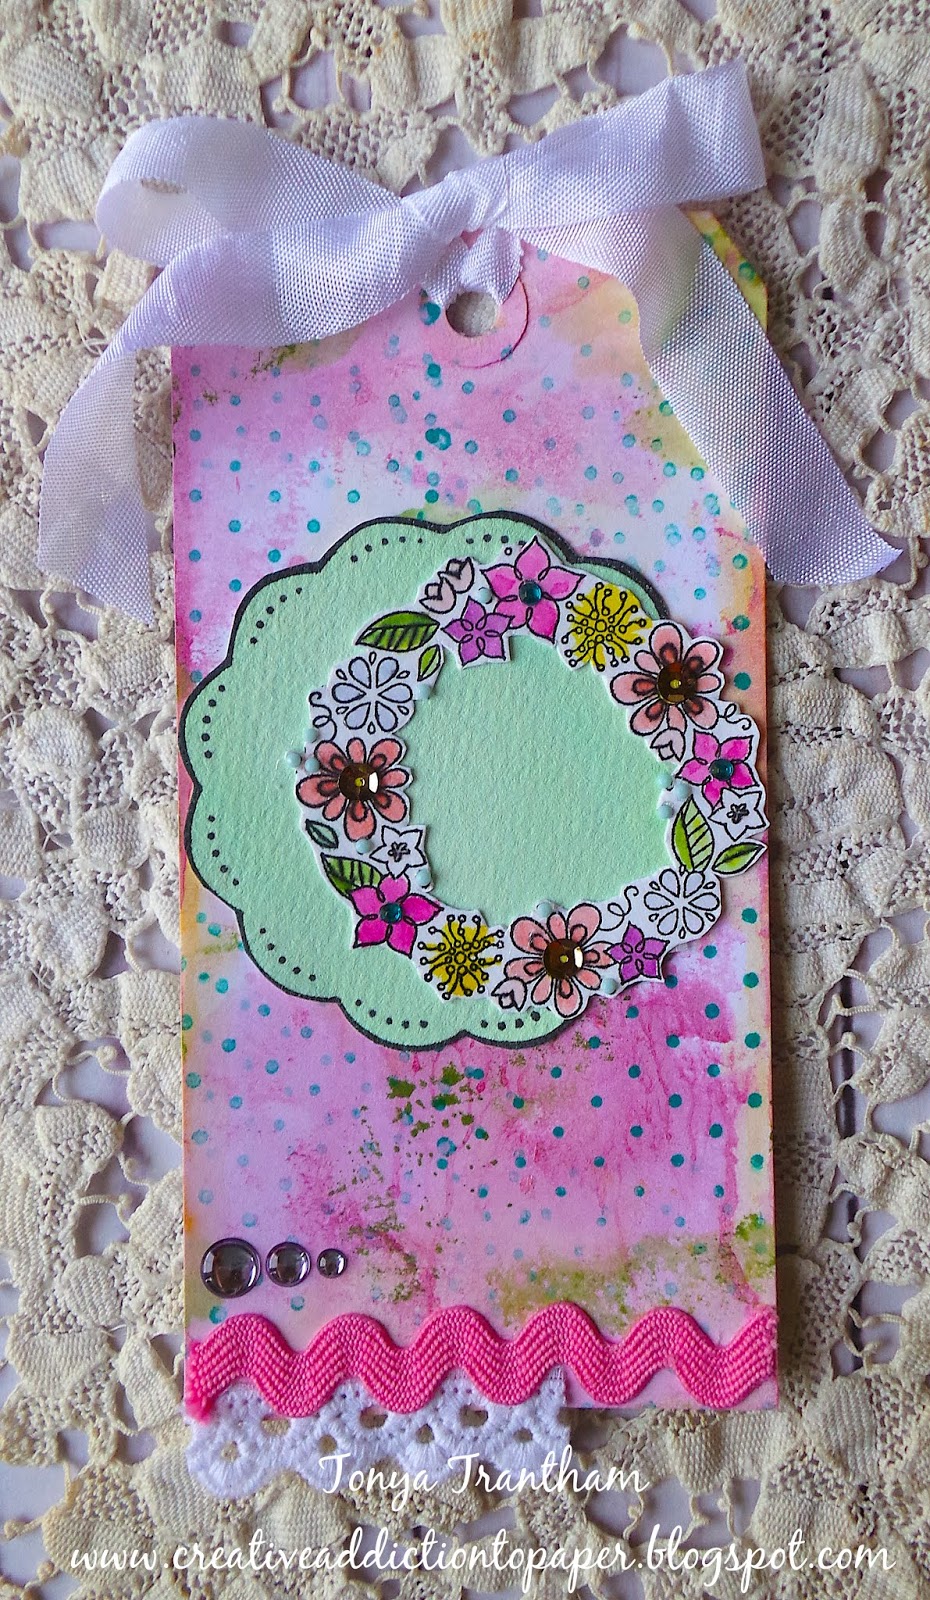
Hi everyone! I want to share a tag that I hadn't got around to sharing that I created for ColorBox. I had actual started this tag several months ago. If I ink up my glass tray and I have leftover inks I just grab a blank tag and place it in the mixture. If it isn't covered I continue to place the tag into any leftover ink until I have it completely covered.


The tag has a mix of the following inks on it: Wildberry, Sunshine and Frog Blends Inks. I inked the Simple Dots Rollgraph with Tahiti Dyestress Blendable Dye Ink and rolled onto the tag.


I inked the Wreath Wood Stamp with Wicked Black Archival Dye Ink and stamped onto a piece of Watercolor PaperI started by inking a glass tray with the following Dyestress Blendable Dye Inks, adding water and painting the following parts of the stamped wreath: Inchworm leaves and shade with Moss. Flowers-AsterMulberryBumble BeeSalmon and Princess and let dry. I placed the doily stamp from the Cookies Clear Stamps onto the MISTI Stamping Tool inked the stamp with Wicked Black Archival Dye Ink and stamped onto a piece of watercolor paper. Next I inked the glass tray with Mint Dyestress Blendable Dye Ink  added water and painted the stamped doily. Once dry I fussy cut the doily out and adhered to tag.


I fussy cut the wreath out adhered to the tag, added sequins and gems to the flowers on the wreath. I finished by adhering a scrap of lace and ric rac to the bottom of the tag. I also added three glossy dots above ric rac and a seam binding bow to top of tag. As always if you have any questions about this project please let me know.


Supplies

ColorBox/Eileen Hull: Wildberry Blends Ink 
ColorBox:/Eileen Hull: Sunshine Blends Ink 
ColorBox/Eileen Hull: Frog Blends Ink
ColorBox: Wreath Wood Stamp
ColorBox: Simple Dots Rollagraph 
ColorBox: Rollagraph Handle
ColorBox: Cookies Clear Stamps
Beacon Adhesive: Zip Dry Adhesive
Sequins
Gems
Glossy Dots
Ric Rac
Lace 
Tag
Seam Binding
Glass Tray 
Watercolor Paper

(Products listed above are Affiliated Links for your convenience)


DISCLAIMERS

This blog is compensated to provide opinion on products, services, websites, and various other topics. Even though the owner(s) of this blog receives compensation for our posts or advertisements. I always give my honest opinions, findings, beliefs, or experiences on those topics or products. The views and opinions expressed on this blog are purely my own. Any product claim, statistic, quote or other representation about a product or service should be verified with each manufacturer, provider, or party in question.This blog contains affiliate links, clicking and shopping through these links helps to support and run Tonya Trantham Designs - Creative Addiction to Paper Blog at no additional cost to you. Today's features are ColorBox and Scrapbook.com Products. 


Thanks for stopping by, hope your Monday is awesome and enjoy creating!


Friday, September 20, 2019

Blooming Birthday Folded Card

Hi everyone! I am back again with another fun project that I created using Eileen Hull's newest Gift Card Folder and Label 2 Diecut but I turned it into a fun little card.


I started this project by placing a piece of White Chipboard on top of the Gift Card Folder and Label #2 Diecut, running it through the Diecut Machine and I folded all four sides of the diecut down. I inked a glass tray with Melon and Wildberry Blends Inks, added water to each ink and placed the diecut in the ink mixture. I covered completely on both sides of diecut. Once I had it covered I removed and let dry.


I placed each flap of diecut into the Damask 2 Embossing Folder and run through the diecut machine. I cut a strip of patterned cardstock 1/2"x8", wrapped around the folded card and adhered the ends together to create a belly band. Next I placed the heart stamp from the Bible Clear Stamps onto the MISTI Stamping Tool, inked with Wicked Black Archival Dye Ink and stamped onto a piece of Watercolor Paper  I inked two Art Daubers with Salmon and Princess Dyestress Blendable Dye Ink and inked the center of the heart with Salmon and the outer edges of the heart with Princess. I fussy cut only the stamped heart out.


I inked the glass tray with Caribbean Dyestress Blendable Dye Ink, added water to the ink and painted a scrap of watercolor paper. Once dry I inked the Simple Dots Rollagraph with Tahiti Dyestress Blendable Dye Ink and rolled onto the painted scrap of watercolor paper. I punched a circle from paper and adhered to the belly band. I cut a "v" in a small scrap of decorated watercolor paper and adhered to the circle punch on the belly band along with stamped heart, flower and a leaf from my stash. I also added a gem to center of flower.


I placed the Blooming Birthday stamp and the leaves stamp from the Blooming Floral Diecuts and Stamps onto the MISTI Stamping Tool and inked both with Wicked Black Archival Dye Ink and stamped onto a piece of watercolor paper. 


I placed the matching diecut over the stamped sentiment and leaves, secured both with washi tape and run through the diecut machine. I inked the glass tray with Inchworm Dyestress Blendable Dye Ink, added water and painted the stamped leaves image. I adhered the sentiment, stamped leaves and flower which was from my stash and added sequins and a gem to center of flower. There you have it a small card that can be added to a birthday present. I think I might try and do some different theme cards just for the fun of it. As always if you have any questions about this project please let me know. 


Supplies

ColorBox/Eileen Hull: Melon Blends Ink
ColorBox/Eileen Hull: Wildberry Blends Ink
ColorBox/Eileen Hull: Frog Blends Ink
Sizzix/Jen Long: Blooming Florals Diecuts and Stamps 
Patterned Cardstock
Gems
Various Fabric flowers and leaves
Circle Punch
Sequins
Paper Cutter
Scissors
Glass Tray
Paint Brush
Washi Tape
Beacon Adhesive: Zip Dry Adhesive

(Products listed above are Affiliated Links for your convenience)


DISCLAIMERS

This blog is compensated to provide opinion on products, services, websites, and various other topics. Even though the owner(s) of this blog receives compensation for our posts or advertisements. I always give my honest opinions, findings, beliefs, or experiences on those topics or products. The views and opinions expressed on this blog are purely my own. Any product claim, statistic, quote or other representation about a product or service should be verified with each manufacturer, provider, or party in question.This blog contains affiliate links, clicking and shopping through these links helps to support and run Tonya Trantham Designs - Creative Addiction to Paper Blog at no additional cost to you. Today's features are Sizzix and Scrapbook.com Products. 


Thanks for stopping by, hope your Friday is awesome and enjoy creating!


Thursday, September 19, 2019

Autumn Foliage Planner Clip

Hi everyone! I am back with a planner clip I created for Momenta! With Autumn only a couple of days away I decided I wanted to create a planner clip in a Fall theme for my planner.


I started with one of the binder clips from the The Explorer Journal Binder Clips.


I placed a piece of 5/8" stretch elastic around an ink pen and the edges of the binder clip before cutting. Since ink pens are different sizes I didn't include the measurement. You do want the elastic to be a little snuggle so your ink pen won't fall out of the clip.


I adhered each side of the elastic to either side of the clip.


I cut two piece of cardstock from the Metallic Ink Paper Pad slightly larger...height wise and adhered the bottom of each piece to either side of the clip. I cut on either side of the elastic the cardstock and folded the middle piece under.


I adhered the "tabs" of the leftover cardstock that was cut over the backside of each side of the clip.


I cut a couple of leaves from crinoline fabric using the Leaves, Acorn and Wood Grain Cut and Emboss Templates. Also if you didn't know Momenta has a new Diecut Machine too. 😊


I watercolored the leaves with an assortment of orange, yellow and brown inks.


I adhered a piece of ric rac and gems to one side of the clip. I added one leaf to the corner of the clip, a couple of sequins, thread and cording to the center of the leaf.


I clipped the planner clip to one of my notebooks and then added an ink pen. 


It's a perfect and stylish way to keep my ink pen handy. 
If you aren't following Momenta on their social media pages please do so! You can find them on FacebookInstagram and Twitter.
As always if you have any questions about this project please let me know.


Supplies

Momenta: Diecut Machine
Beacon Adhesive: Zip Dry Adhesive
5/8" Stretch Elastic
Crinoline Fabric
Thread 
Cord
Gems
Sequins
Ric Rac
Inks: Orange, Yellow and Brown

(Products listed above are Affiliated Links for your convenience)


Thanks for stopping by, hope your Thursday is wonderful and enjoy creating!


Monday, September 16, 2019

Fall is in the Air House

Hi everyone! It is hard to believe that in about a week Autumn will officially be here. As many of you know I am not really a fan of cooler weather, leaves changing colors or pumpkin spice latte (I'm allergic to cinnamon) but today I am over on Eileen Hull's blog sharing how I created this fun little Fall house. I love the colors and the texture...it is the first time using extra heavy gel...and how didn't I know about this gel sooner??? 😮 Anyway you can find my blog post HERE.


Also I've included links to all of the supplies I used in this projects.

Supplies

ColorBox: Cornucopia Chalk Paintbox-Red Barn, Pumpkin Spice, Harvest, Butter dark Brown, Mint, Dark Moss
ColorBox: Art Daubers
ColorBox: Mandala Art Screen
Sizzix/Eileen Hull: House Ornament Diecut 
Golden Artist Colors: Extra Heavy Gel (Matte)
Spatula 
Beacon Adhesive: Zip Dry Adhesive 
Gems
Cording
Crinoline Fabric
Glass Tray
Chipboard Flower

(Products listed above are Affiliated Links for your convenience)


Thanks for stopping by, hope your Monday is wonderful and enjoy creating!