
Hi everyone and welcome to the Pocket Notebook Release Party! This is Eileen Hull’s newest book die with Sizzix.

On the die, you get all of the pieces you need to make an entire book-the cover, pages, latch and pen loop! The Pocket Notebook measures 6 3/4” x 4 1/2” with a spine that can adjust from of 3/8” to almost 2”! String it with elastic, hemp, ribbon or twine. So many option for this fun die!

Eileen’s Inspiration and Educator teams have combined to show us their amazing Pocket Notebook ideas. Please follow the Blog Hop to see all of the fabulous projects, techniques and videos! There are also two GIVEAWAYS- the Pocket Notebook die and a gift certificate for Eileen’s Etsy store. To enter to win, leave a comment on each of the posts. Winners will be announced on Tuesday, October 8 on Eileen’s Facebook Live show.


I started by covering both sides of Chipboard with Adhesive Sheets. Once I completed that step I added patterned cardstock from the Cozy and Bright Paper Pad and cut two of the covers from the Pocket Notebook Diecut and the larger "panel" from the Make It 3D Diecut (retired).


I adhered both "panels" tabs to the inside cover of the pocket notebook diecut.

Next I adhered the other cover to the other side of the "panel".

I adhered the spine/bottom together and covered the sides with more patterned cardstock (I wanted cleaner edges and to cover the holes in the spine).

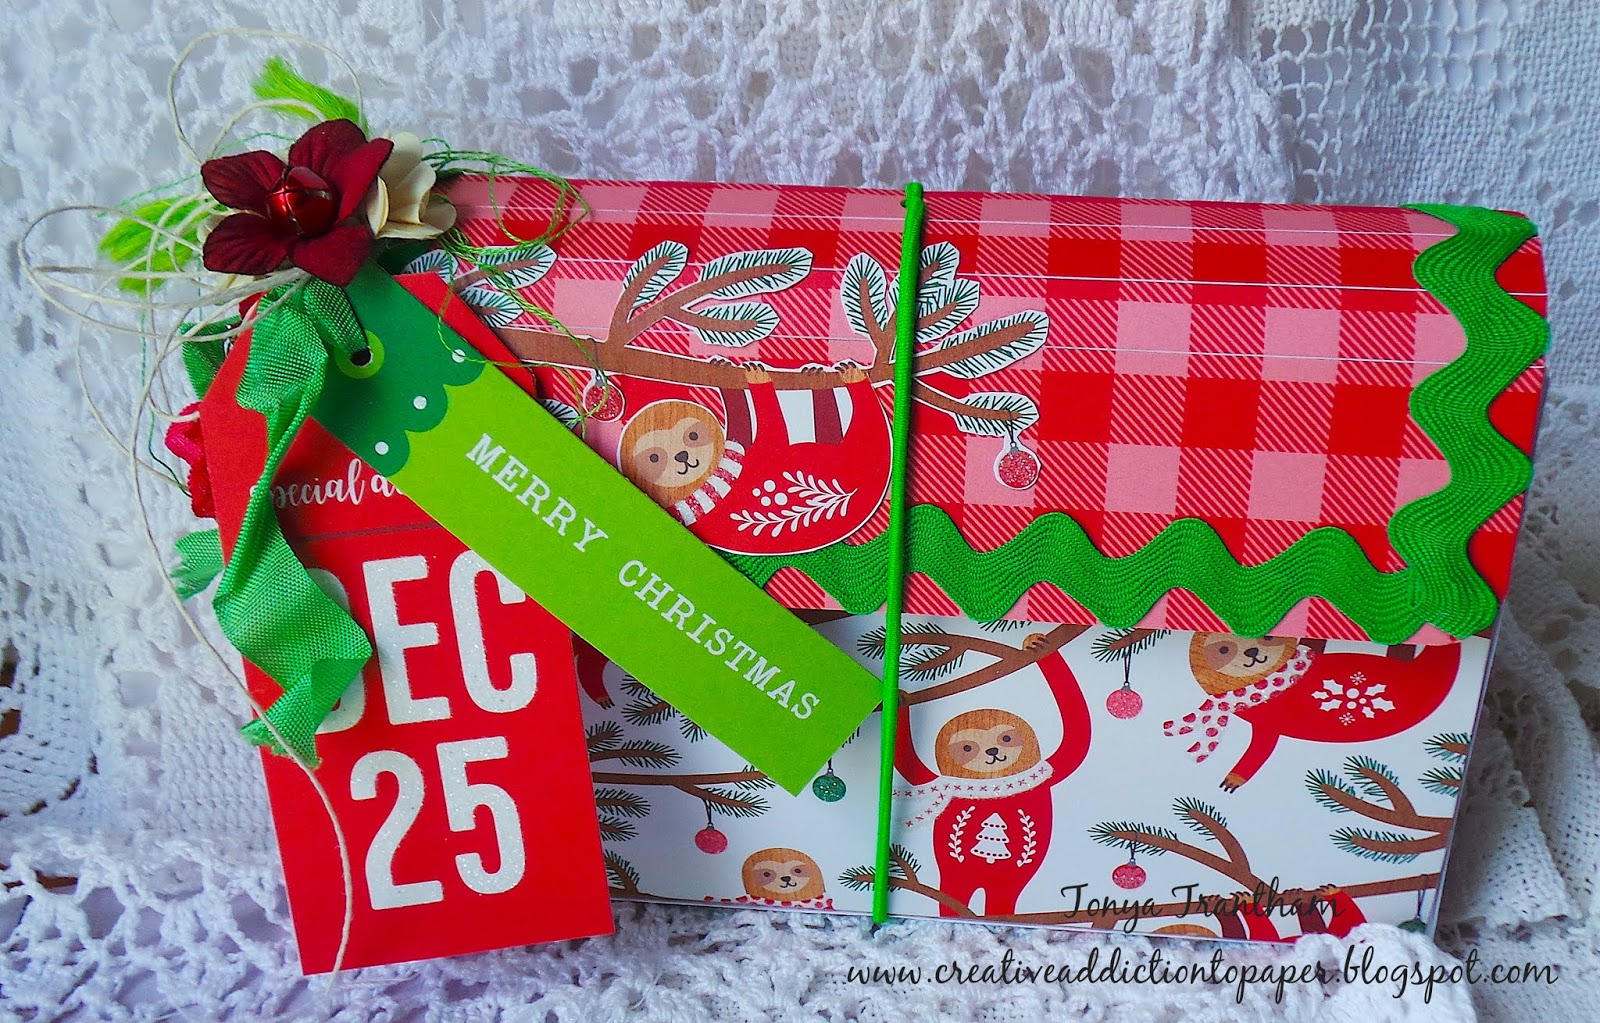
I covered chipboard with adhesive sheets on both sides and applied patterned cardstock to both sides and cut "flaps"/spines from the Pocket Notebook Diecut. One flap is 1 7/8" wide from the fold and I used a corner on the edges of the flap. The second flap is 1 1/2" wide from the fold. I folded/rounded the edges of both spines.

I adhered the 1 1/2" to the back side of the box.

The 1 7/8" spine I lined up will the center hole after applying adhesive.


I added ric rac around the flap of the box.

I added velcro to the inside.

And before adding an Elastic Closure through the center hole on the flap I fussy cut one of the sloths out and adhered to the corner.

I gathered all my Christmasy seam binding, thread, jute, a bell and flowers and added to the corner of the flap.

Also from the same paper pad I cut out two tags and added those to the seam binding.

There you have it! Easy Peasy Christmas gift box using the Pocket Notebook Diecut! I am definitely going to make more of these to have on hand to put my Christmas presents in.
Supplies
Sizzix/Eileen Hull: Make It 3D Diecut (retired)
Sizzix: Adhesive Sheet
Pebbles: Cozy and Bright Paper Pad
Beacon Adhesive: Zip Dry Adhesive
Momenta: The Explorer Journal Elastics
Ric Rac
Seam Binding
Velcro
Flowers
Bell
Thread, Cording and Green Jute
(Products listed above are Affiliated Links for your convenience)
DISCLAIMERS
This blog is compensated to provide opinion on products, services, websites, and various other topics. Even though the owner(s) of this blog receives compensation for our posts or advertisements. I always give my honest opinions, findings, beliefs, or experiences on those topics or products. The views and opinions expressed on this blog are purely my own. Any product claim, statistic, quote or other representation about a product or service should be verified with each manufacturer, provider, or party in question.This blog contains affiliate links, clicking and shopping through these links helps to support and run Tonya Trantham Designs - Creative Addiction to Paper Blog at no additional cost to you. Today's features are Eileen Hull and Sizzix Products.

Now for all the fun stuff! As stated earlier in this blog post there will be two giveaways-the new Pocket Notebook Diecut and a gift certificate to Eileen's blog. So be sure to comment and follow. 😊
Tonya Trantham ←YOU'RE HERE
Thanks for hopping along with us today!
Thanks for hopping along, hope your Thursday is wonderful and enjoy creating!

OH I LOVE THIS twist on the notebook project.
ReplyDeleteThe moment you said "I started by covering both sides of Chipboard with Adhesive Sheets" and your accompanying pictures I had an idea. WHY NOT MAKE AN ADVENT CALENDAR to slip inside this box - I'm not sure yet how I'm going to complete it - but the idea is perculating.
This would make such an adorable Christmas for a friend. Thanks for sharing.
ReplyDeleteHow adorable and great instructions! I don't think I could ever make something so sweet - thanks for sharing!!
ReplyDeleteOh my goodness Slothy wonderful!! I love the Christmas theme - papers - just everything - you are very creative TFS
ReplyDeleteSuch a cute slothy Christmas project. LOVE the papers!
ReplyDeleteOMG you are so smart! Thanks for the tutorial as I am now planning on making one for myself! (but I don't think I can beat the Christmas sloths!)
ReplyDeleteYou are genius! What a great idea. I am thinking of all the treasures that could go in this amazing box.
ReplyDeleteVery clever. An idea to borrow.
ReplyDeleteWhat a cute idea! So clever!
ReplyDeleteWow! I love this. Great idea and beautiful colors. I think this would be great for my granddaughter’s Christmas countdown gifts.
ReplyDeleteWow, this gift box is brilliant. I love it.
ReplyDeleteAnita Holte
Very cute book. Love the sloths!
ReplyDeleteWell - how clever is this?! turning a notebook into a box - great idea! xx
ReplyDeleteOOOh-I am giddy looking at this creative way to use Eileen`s new die.I`m lucky because I bought the make it 3d-die years ago:)
ReplyDeleteHow unique-I love the way you used the die for something different than a album. Very cute box-great project.
ReplyDeleteVery creative...love this idea and love the paper too!! Thanks for sharing the how to on this project. Just hope mine comes out as nice as yours!!
ReplyDeleteWOOZER!! Love this idea! Everyone needs to have the Make It 3D Die from Eileen...the possibilities are endless with it as I can see with creating your gift box with the new Pocket Notebook Die. Your gift box is a gift in it self! Love it!
ReplyDeletethis was a nice twist ! love it , thanks for sharing and thank you for the hop xx
ReplyDeleteSo clever, Tonya! Awesome use of the pocket notebook die!
ReplyDeleteI love the festive sloths.
ReplyDeleteSuch a cute book Tonya. The sloths are so adorable. Now I want a sloth for Christmas!
ReplyDeleteYour alteration of this is just too clever, and oh the cute papers...love that sloth! Just so pretty and fun!
ReplyDeleteI think everyone needs a sloth Christmas gift box this year. I love this project!
ReplyDeleteThis is a cool project I wish the make it 3D was not retired(insert sad face)
ReplyDeleteWhat fun way to think "inside" the box!
ReplyDeleteWhat a fun creative way to turn the book into a gift box! Thanks for sharing the how-to!
ReplyDeleteWhat a great idea, almost looks like a coupon box too! Thanks for sharing!
ReplyDeleteWow, this is such a cool idea! I love that there are so many ways this could be used, for a gift or as a box of cards, or really just to hold special mementos. Thanks for sharing your creativity
ReplyDeleteThis is adorable and what a great idea...especially for gifts. Love this...thank you for sharing. Great tutorial too. :)
ReplyDeleteI love how you turned it into a gift box Tonya. Great idea! Super cute papers... love the sloth! The poinsettia with the tag look lovely.
ReplyDeleteOh Tonya I love it!!! What a brilliant idea to use the Make It 3D die to add sides to the front and back of the Notebook to create the sides of the box - genius! The Christmas papers are so much fun and as ever I love how you've added a cluster of embellishments to finish it so beautifully x
ReplyDeleteSooo cute!
ReplyDeleteTonya your projects are always so fun! The sloth paper is adorable. I love that you turned the book into a box! And also for figuring out that the Make-It-3D die works for the sides- genius :-) I love your colors and added embellishments- they just make the project. So glad you are creating with my dies <3 Thanks...
ReplyDeleteThis is so clever!
ReplyDeleteSo cute with the sloths and I like the other papers too.
ReplyDeleteOh Tonya, this is adorable, sloths for Christmas, who could not want that as a lovely gift box, beautiful.
ReplyDeleteThis is a splendid technique! The dies are so adaptable, and boxes are so useful, I'll bet you could make a case to put glasses in this way, thanks for the inspiration!
ReplyDeleteThe box is great! I hope it is easy peasy, have to try it. Love how you decorated with different Christmas paper that almost don't match but they worked perfectly.
ReplyDeleteThanks so much Pauline! I just used the paper pad I had on hand and went for it as to what cardstock I used...I like things a little quirky. :-)
DeleteWow!! What a different way to use this same die! Funny holiday papers and so fresh!!
ReplyDeleteThanks so much! <3
DeleteVery clever cute box! And adorable Christmas papers too! Luv that big green rick-rack! TFS, hugs, Suzy Q
ReplyDeleteThank you Suzy! <3
DeleteSo clever! Can’t wait to try!
ReplyDeleteThanks! <3
Delete