Monday, March 18, 2019

Spring Butterfly Tag

Hi everyone and happy Monday! I want to share a springy tag I created for ClearSnap!


I started by inking a glass tray with Hydrangea Blends Ink, adding water and placing the Tag in the ink mixture. The tag didn't have to be completely covered so I removed and let dry. I cleaned the glass tray and inked with Frog Blends Ink, added a small amount of water to ink and randomly lay parts of the tag in mixture, removed and let dry. Next I inked the Simple Dots Rollagraph with Glacier Lake Archival Dye Ink and roll over tag.


I placed the Tear Drop Circle Diecut on top of a piece of Textured White Cardstock and  placed between two cutting plates and ran through the Diecut Machine. I placed the first Butterfly Art Screen on top of the Tear Drop Circle Diecut and inked an Art Dauber with Citronella Dyestress Blendable Dye Ink and ink over the screen and removed.


I placed the second Butterfly Art Screen directly over stenciled area of butterfly, ink art dauber with Shamrock Dyestress Blendable Dye Ink and ink over screen and removed.


I placed the third Butterfly Art Screen directly over stenciled area of the butterfly, inked an art dauber with Moonstone Dyestress Blendable Dye Ink and ink over screen.  


Once I removed the screen I inked an art dauber with Old Rose Ink from the Sunset Petal Point Inks and ink over the edges of diecut. I added pop dots to the back of the Tear Drop Circle Diecut and place on top of tag. With a paper cutter I cut a piece of patterned cardstock 1 7/8"x4 1/4: and cut a "v" in the end which creates a banner. I adhered the banner to the tag.


I cut from textured white cardstock Flowers and leaves from crinoline fabric from the Journaling Cards Flowers  and Leaves DiecutsI inked an art dauber with Old Rose Ink from the Sunset Petal Point Inks and ink the edges of two of the flower diecuts, shaped and adhere both flowers together. I added a button to the center of the flower. I inked an art dauber with Olive Ink from the Sunset Petal Point Inks and ink over the crinoline fabric leaf and adhered to back of flower before adding to tag. Next I made two bows one from seaming binding and one from thread and adhered both to the corner and underneath flower.


I placed the "For Small Wonders" stamp from the Butterfly Clear Stamp Set on the MISTI Stamp Tool  Ink with Leather Premium Dye Ink and stamp onto a piece of textured white cardstock. I cut the word "Small" and "Wonders" out with a paper cutter. Cut a "v" in the end of each to create a banner and adhered both to the bottom of stenciled butterfly and under the flower. I cut three 8 inch pieces of ribbon and lace and threaded all pieces through the top of tag. Tie off and adhere a button to ribbon and lace. As always if you have any questions about this project please let me know.


SUPPLIES USED:

ColorBox/Eileen Hull:Hydrangea Blends Ink
ColorBox/Eileen Hull:Frog Blends Ink
ColorBox: Art Dauber
Canvas Corp:Tag
Sizzix: Diecut Machine
Spellbinders: Tear Drop Circle Diecut 
Lace
Seam Binding
Button
Crinoline Fabric
Thread
Beacon Adhesive: Zip Dry Adhesive


 Thanks for stopping by, hope your Monday is wonderful and enjoy creating!


Wednesday, March 13, 2019

Dragonfly Photo Box

Hi everyone! I am back today with a Photo Box I created using Eileen Hull's Stamp and Photo Storage Diecut and embossing powders by ColorBox. I started by cutting two Stamp and Photo Storage Diecut from Matboard using a Diecut Machine


I cut one of the flaps off of each diecut and placed one of the diecuts in the Floral Frame Embossing Folder and run through the diecut machine. I put the box together according to directions on the Stamp and Photo Storage Diecut packaging.


I used a hot glue gun to adhere the two diecuts together to create a box and I cut to fit three pieces of cardstock and adhere to the sides of the box. 


I adhered lace and flat back pearls to the bottom of the box. 


Next I cut two flowers from the Stitchy Flowers and Leaf Diecuts and punch leaves from the mini leaf punch and shape and adhere to the bottom of the box and add a flat back pearl to the center of the flower.


I used two dragonfly diecuts from my own personal stash and ink completely with Aquamarine Chalk Ink


After the ink dried I inked both with Top Box Clear Embossing Ink and added Copper Embossing Powder randomly on both dragonfly diecuts. 


I set the embossing powder with a Heat Tool and applied more Top Box Clear Embossing Ink and complete the same steps with the Gold Sparkle and Opalescent Clear Embossing Powders until desired effect is achieved.


I added adhesive to the center of one of the dragonfly diecuts and glue on top of the other dragonfly diecut. 


I bent the wings up on the dragonfly, adhere to the top of the photo box and add a flatback pearl to finish off the box.


This would be a perfect gift to hold wedding photos, graduate or personal photos in. Also below is links to most of the tools and supplies I used if you want to recreate this project for yourself. As always if you have any questions about this project please let me know.

SUPPLIES USED:

Sizzix/Eileen Hull: Stamp and Photo Storage Diecut 
Sizzix: Matboard
Sizzix: Diecut Machine
Sizzix/Brenda Walton:(Be Merry 2 PK Embossing Folders) Floral Frame Embossing Folder
Sizzix/Eileen Hull: Stitchy Flowers and Leaf Diecuts
ColorBox:(Surf's Up Chalk Ink Set ) Aquamarine Chalk Ink
Beacon Adhesive: Zip Dry Adhesive
Flatback Pearls
Lace


Thanks so much for stopping by, hope your Wednesday is wonderful and enjoy creating!


Tuesday, March 12, 2019

Always be an Original Card

Hi everyone! I am back with a quick card I created using some inks and a creative card by ColorBox. Last week was very crazy because my husband had a health scare and wound up being sent to the ER by his personal doctor and then was admitted to the hospital and kept over night for a procedure. 😳 So all my big plans for being productive and posting for last week was put on hold. But anyway...lets get started!


I stamped the Escape Pigment Ink onto a glass tray, add water to each color and painted around the building images on Cityscape Creative Card


I used a "dappling effect"with the Paint Brush to create a cloudy look on the base of the card and then I let dry.


I cut two strips of patterned cardstock and adhered near the top of the card. Next I cut out one house from the House One Diecuts (Spellbinders retired) or you can cut a house out by hand. I adhered the house diecut to the card and add mini gems to the top of the house die to create a roof.


I printed from the computer the sentiment "Always be an Original", punched out with a decorative punch, inked around the edges with the Escape Pigment Ink and adhere to the card.


I punched two flowers and two leaves from patterned cardstock, shape and glue to the sentiment and house. I  also added flat back pearls to the center of each flower and adhered a couple loops of thread underneath one of the flowers. As always if you have any questions about this project please let me know.


Thanks for stopping by, hope your Tuesday is awesome and enjoy creating!


Friday, March 1, 2019

Lucky Shamrock Tag

Hi everyone and Happy March the 1st! I wanted to start off the month by sharing a shamrock tag I created!


I started by cutting Good Luck on Ivory Cardstock 6.25"x3.125" and punching a hole at the top center of the tag.


I inked a glass tray with ColorBox Blends Leaf Ink, added water to the ink, loaded paint brush and splatter tag with mixture. I repeated Step 2 but with ColorBox Blends: Frog Ink and I let the tag dry.


I inked the Shamrock Rubber Stamp with Wicked Black Ink and stamp onto a piece of textured green cardstock. I fussy cut the shamrock image out and adhered an acrylic heart gem to the center of the shamrock image.


I inked the "lucky" sentiment from the Dress Up Stamp and Cut Set and stamp onto white cardstock, cut out and ink edges with Ice Jade Chalk Ink and cut a banner from the  piece of green cardstock, emboss with the Waffle Embossing Folder (retired). Next I inked the edges and over the embossed area with Ice Jade Chalk Ink. I adhered the sentiment to the banner and the banner to the tag. I glued the shamrock image underneath the sentiment with a small portion hanging off the tag.


I finished off the tag by cutting three 6" pieces of lace and threaded through the hole at the top of the tag, tied off with thread and adhere a button to the lace. As always if you have any questions about this project please let me know.


Thanks for stopping by, hope your Friday is awesome and enjoy creating!


Thursday, February 28, 2019

Sewing Notions Drawers

Hi everyone! I am back for my final project of February! I created this sewing notions drawers from Eileen Hull's new diecut, Stacking Drawer Diecut that premiered  at Creativation in January.


Instead of stacking the drawers on top of each other I decided to place them side by side.


I cut three sets of drawers diecuts from Matboard and put together according to directions on the packaging. I adhered all three "walls" together and covered with patterned cardstock from Authentique. Actually all cardstock used on this project is from Authentique and if I remember correctly it from the Fabulous Collection.


I put all the drawers together and covered with cardstock outside and on the inside too. Before covering the inside with cardstock I added drawer pulls which I attached with brads.


I cut all the flowers and leaves from the Flowers and Leaves Jouranling Cards Diecuts.


I shaped all the flowers and added cording, lace, pearl top pins and mini spools to the top of the drawers.


I also added sequins and gems to the center of each flower. 


I dressed up the outside edges by adhering decorative trim to both sides of the drawers. Be sure to stop by Eileen Hull's blog to see what the rest of the team has created! You can find these post HERE and HERE. As always if you have any questions about this project please let me know.


I would also like to submit this project for the following challenge:

Word Art Wednesday Anything Goes: Weeks #376-#377


Thanks for stopping by, hope your Thursday is wonderful and enjoy creating!


Tuesday, February 12, 2019

You have all my Heart Tag

Hi everyone! I am back with another Valentine's Day project I created for ClearSnap inks and stamps!


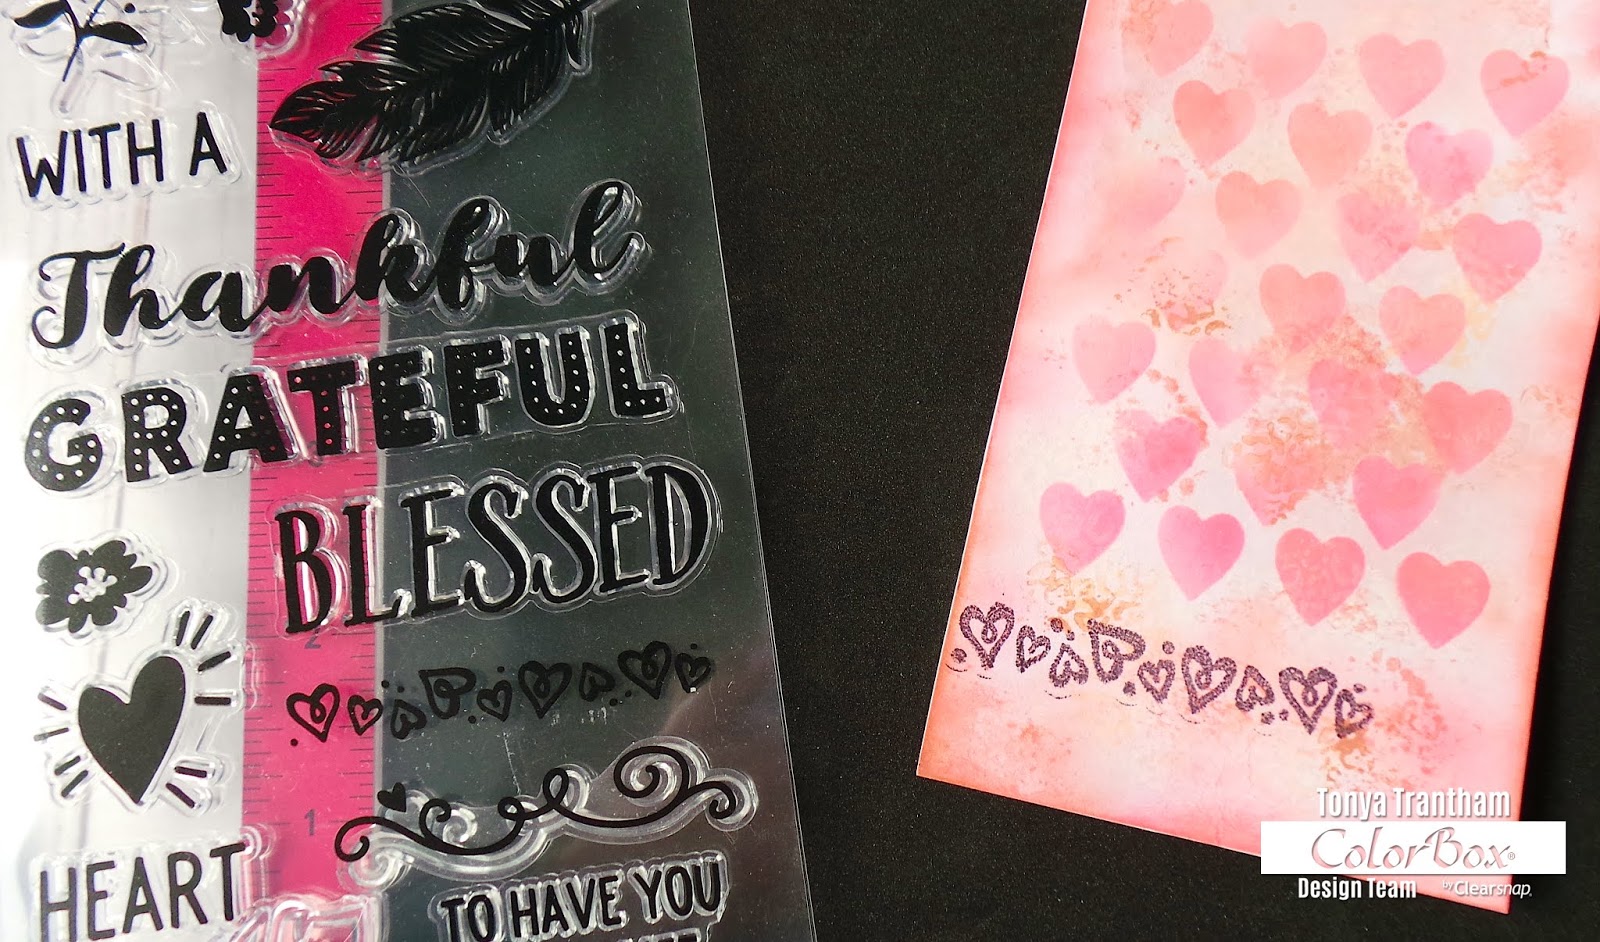
I started by inking a glass tray with Melon Blends Ink, added water and placed the Tag into the ink mixture and let dry. (Side note tag doesn't have to be completely covered in ink.) I placed a piece of Acetate on top of the larger Hearts Journaling Card Diecut and place between cutting plates before running through the Diecut Machine. I removed all loose hearts so I could use the whole heart diecut as a stencil for my tag. I placed the heart stencil on top of the tag and loaded an Art Dauber with Rosebud Classic Pigment Ink and rub over the heart stencil. Next I loaded another Art Dauber with Watermelon Classic Pigment Ink and randomly rub over the heart stencil and let dry.


Next I inked the Exotic Mini Molding Mat with a mix of Petal Point Fluid Chalk Ink Pad: Soft Pastel- Alabaster and Creamy Brown Chalk Inks and stamp randomly over the tag and let dry.


I placed the row of hearts from the Thankful Clear Stamp Set onto the MISTI Stamping Tool and ink with Leather Premium Dye Ink and stamped onto the bottom corner of the tag. I glued a scrap of lace and flatback pearls underneath stamped image.


I cut three patterned gold paper straws and adhere together, wrapped with cording and tie and adhered to the tag. 


I added five flatback pearls randomly to the stamped hearts.


I inked the Swirl Heart Rubber Stamp with Leather Premium Dye Ink and stamp onto a piece of colored cardstock, fussy cut heart out and adhered to straws. I doubled up two Pop Dots and place under heart.


I added three clear sequins to tag and cut 10 inches of lace, threaded through top and tie off and adhered button to top lace.


As always if you have any questions about this project please let me know.


Thanks for stopping by, hope your Tuesday is wonderful and enjoy creating!