Friday, February 28, 2020

Simple Thanks Card

Hi everyone! I'm back with my second project of the month for Momenta! I wanted to create a quick and simple card that took less than 30 minutes to make so lets get started.


I started by placing the Nested Square Border Diecuts on top of a piece of Watercolor Paper and run through the Freestyle Die Cutting and Embossing Machine. Next I placed the square diecut into the corner of the embossing folder from the Thanks Floral Embossing and Diecuts and run through the diecut machine. I lightly inked over the embossed area and edges of the diecut.


I placed a scrap of green watercolor cardstock from the Watercolor 8"x8" Paper Pad and cut two vines diecuts out from the Christmas Tree Embossing Folder and Diecuts. I  also cut one flower from Thanks Floral Embossing and Diecuts using the same paper pad. I cut a portion off of each vine and shaped, along with the flower diecut, with a Stylus. I adhered the vines to the back of the flower along with a sequins and glossy dot to the center of the flower.


I added a bit of glue to the back of the flower and placed in the lower corner of the square diecut. Next I placed an Adhesive Sheet on the back of a scrap piece of cardstock from the Metallic Ink Paper Pad, placed the thanks diecut from the Thanks Floral Embossing and Diecuts on top of the cardstock and run through the diecut machine. I peeled the backing off of the thanks sentiment and placed on the square diecut.


I cut a piece of blue cardstock from the Watercolor 8"x8" Paper Pad and folded it 4"x5 1/2" to create the card base. I added a small strip of metallic cardstock to the card before adding foam pop dots to the back of the square diecut and placing on the front of the card. Very easy card! I would like to also add before wrapping up my post that this is my last Momenta post...for the time being...I hope to come back at a later date once I am finished with a few home projects. 😊
As always if you have questions about this project please let me know.  If you aren't following Momenta on their different social medias you can find them at:
twitter  
YouTube  


Supplies

Momenta: Christmas Tree Embossing Folder and Diecuts
Beacon Adhesive: Zip Dry Adhesive 
Green Ink
Glossy Dot
Foam Pop Dots

(Products listed above are Affiliated Links for your convenience)

DISCLAIMERS

This blog is compensated to provide opinion on products, services, websites, and various other topics. Even though the owner(s) of this blog receives compensation for our posts or advertisements. I always give my honest opinions, findings, beliefs, or experiences on those topics or products. The views and opinions expressed on this blog are purely my own. Any product claim, statistic, quote or other representation about a product or service should be verified with each manufacturer, provider, or party in question.This blog contains affiliate links, clicking and shopping through these links helps to support and run Tonya Trantham Designs - Creative Addiction to Paper Blog at no additional cost to you. Today's features are Momenta Products. 


Thanks for stopping by, hope your Friday is wonderful and enjoy creating!


Wednesday, February 19, 2020

Chunky Mini Vintage Junk Journal

Hi everyone! I had started this project almost two years ago...do you have  several of those types of projects laying around? 😬 I had started this for another design team that I was on but the company was bought out and all the design team members were let go. Soooo I just laid it aside with the intent of finishing it for one of Eileen Hull's projects. When I did pick it back up to work on it I found out the Needle Book diecut had been retired. Soooo I put it up again until now. One of my goals for this year is to work on my mountain of unfinished projects...along with new projects, of course! 😁  


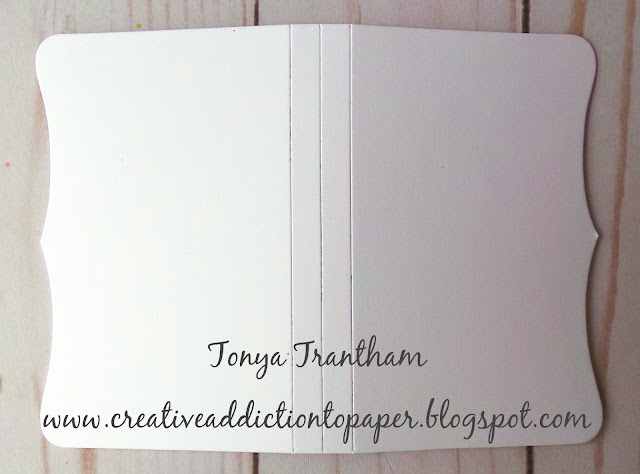
I started by applying Adhesive Sheets to the front and the back of a piece of Mat Board, placing on top of the diecut and running through the Diecut Machine. I then cut the diecut down the middle of the spine.


I cut another needle book from mat board and I cut it down the middle diecut. I measured 1" on each side of the fold and cut.


Then I cut another piece of matboard 2" wide by 3 5/8" high and adhered each 1" sides to the matboard. This re-enforces the spine of the needle book.


I adhered each of the covers to each of the flaps of the spine.


I measured on the inside of the spine and marked where I would sew in the signatures and punched small holes on both ends of the spine.


Each signature has 8 pieces of patterned cardstock. I used an abundance of leftover scraps from my stash.


I punched holes in the signatures and sewed each one into the spine and tied off.


Before decorating the inside pages I decorated the cover with a frozen Charlotte that I made with a mold and paper clay. I inked it and added butterfly wings to the back. I added an oval diecut, a flower with leaves before adhering the frozen Charlotte to the cover. 


I added bits of ephemera, scraps of cardstock, diecuts, etc. to the pages of this mini. 


As always if you have any questions about this project please let me know.
Also I would like to submit this project for the following challenge: 
Mini Album Makers Challenge: February


Supplies

Eileen Hull/Sizzix: Needle Book Diecut (retired)
Beacon Adhesive: Zip Dry Adhesive
Ephemera
Paper Flowers
Twine
Needle
Frozen Charlotte Figurine 
Various Patterned Cardstocks Scraps


(Products listed above are Affiliated Links for your convenience)

DISCLAIMERS

This blog is compensated to provide opinion on products, services, websites, and various other topics. Even though the owner(s) of this blog receives compensation for our posts or advertisements. I always give my honest opinions, findings, beliefs, or experiences on those topics or products. The views and opinions expressed on this blog are purely my own. Any product claim, statistic, quote or other representation about a product or service should be verified with each manufacturer, provider, or party in question.This blog contains affiliate links, clicking and shopping through these links helps to support and run Tonya Trantham Designs - Creative Addiction to Paper Blog at no additional cost to you. Today's features are Eileen Hull, Sizzix and Scrapbook.com Products. 


Thanks for stopping by, hope your Wednesday is awesome and enjoy creating!


Tuesday, February 18, 2020

Whispers of Love Note Pad Holder

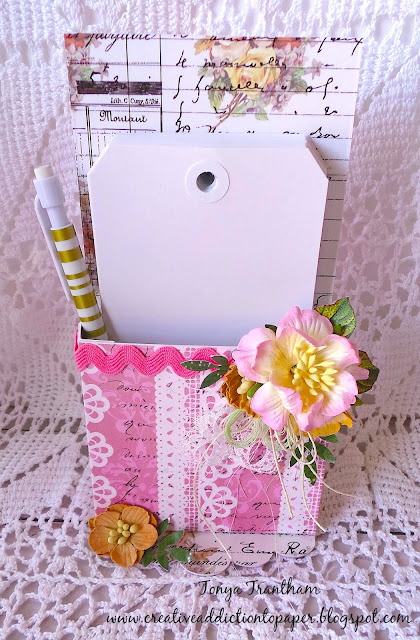
Hi everyone! I'm back this week with a fun little notepad holder I created with Eileen Hull's newest Gift Box with Scallop Edges and Label Diecut and part of her oldie but goodie Trinket Box and Frame Book and Pages Diecut.


I started by applying Adhesive Sheets to both sides of the Mat Board and placed the cardstock from Whispering Love Paper Pad on top of the matboard. I cut one side and two of the larger scalloped edges from the Gift Box with Scallop Edges and Label Diecut. I cut one square with the small flap off with a Paper Cutter and folded both small flaps. This will create the bottom of the box.


I completed the same steps for applying adhesive sheets to mat board and cardstock and cut two hinges from the Trinket Box and Frame Book and Pages Diecut. I cut a little off of the top of each one and one of the folded edges and then folded each side.


I adhered both hinges to each side of the box.


I cut a piece of patterned cardstock to fit the bottom of the box and adhered to the small flaps. The two scalloped edges I adhered to the bottom of the box. 


I adhered Ric Rac, added flowers from my stash and fussy cut a couple of leaves from the Whispering Love Paper Pad and glued to the back of the larger flower.


I punched out a few leaf sprigs and shaped and added to the smaller flowers. I tied a bow in cording and another bow in thread and added along with a little piece of lace to finish off the holder.


Instead of adding a note pad I think I will use it for the time being to hold my set of tags. As always if you have questions about this project please let me know.


If you haven't checked out Eileen's Inspiration Team latest projects you can find those HERE and HERE.

  
Supplies

Beacon Adhesive: Zip Dry Adhesive
Thread
Cording 
Paper Flowers
Scissors
Leaf Sprig Punch
Ric Rac
Lace

(Products listed above are Affiliated Links for your convenience)

DISCLAIMERS

This blog is compensated to provide opinion on products, services, websites, and various other topics. Even though the owner(s) of this blog receives compensation for our posts or advertisements. I always give my honest opinions, findings, beliefs, or experiences on those topics or products. The views and opinions expressed on this blog are purely my own. Any product claim, statistic, quote or other representation about a product or service should be verified with each manufacturer, provider, or party in question.This blog contains affiliate links, clicking and shopping through these links helps to support and run Tonya Trantham Designs - Creative Addiction to Paper Blog at no additional cost to you. Today's features are Eileen Hull and Sizzix Products. 


Thanks for stopping by, hope your Tuesday is wonderful and enjoy creating!


Tuesday, February 11, 2020

Be my Valentine Coffee Sleeve Album

Hi everyone! I want to share a project from the past with you today. This coffee sleeve album I created was published in the Craft Ideas magazine several years ago. I came across this while looking for something in my craft room and thought why not share (the magazine is no longer around. 😞)


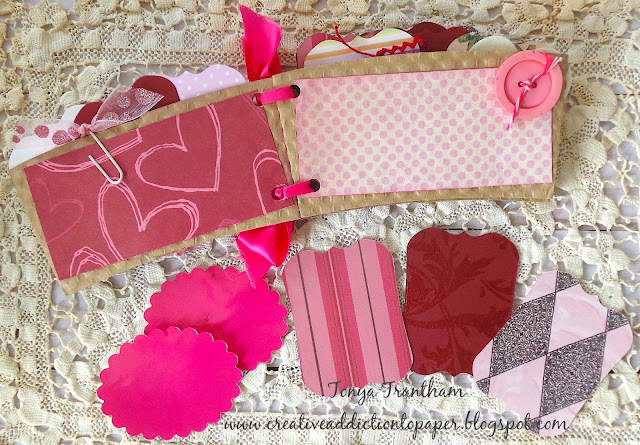
I used four coffee sleeves that I had saved from Starbuck's coffee runs with my husband. I adhered various rectangle shaped patterned cardstock to each side before using a Crop-A-Dile to punch two holes in each sleeve. I adhered the bottom of each sleeve together.


I deconstructed a Victoria Secrets bag carefully. I cut the ribbon from the handles and used those to tie the sleeves together. 


I used a scalloped diecut and cut a couple from the solid hot pink on the gift bag and placed with paper clips on two of the sleeves.


From my stash of Valentine goodies I added sentiments, used postage stamp, buttons, hearts, etc., to each of the pages.


I punched twelve diecuts out from cardstock and added three to each of the pockets on the sleeves. 


I added an assortment of diecuts and the "Be my Valentine" sentiment to the cover.


I also used paper flowers, a felt heart, buttons, mini gems shaped like hearts and pearl top pins to finish the cover of the album. As always if you have any questions about this project please let me know. I also hope this inspire you to use with you have laying around the house to create your own album.


Supplies

Four Coffee Sleeves
Victoria Secrets Gift Bag
Crop-A-Dile
Zip Dry Adhesive
Paper Cutter
Diecut Machine
Baker's Twine
Paper Clips
Ephemera
Ric Rac, 
Gems and Flatback Pearls
Various Patterned Cardstock
Various Diecuts and Punches
Buttons
Various Paper Flowers
Pearl Top Pins

(Products listed above are Affiliated Links for your convenience)

DISCLAIMERS

This blog is compensated to provide opinion on products, services, websites, and various other topics. Even though the owner(s) of this blog receives compensation for our posts or advertisements. I always give my honest opinions, findings, beliefs, or experiences on those topics or products. The views and opinions expressed on this blog are purely my own. Any product claim, statistic, quote or other representation about a product or service should be verified with each manufacturer, provider, or party in question.This blog contains affiliate links, clicking and shopping through these links helps to support and run Tonya Trantham Designs - Creative Addiction to Paper Blog at no additional cost to you. Today's features are Scrapbook.com Products. 


Thanks for stopping by, hope your Tuesday is awesome and enjoy creating!


Wednesday, February 5, 2020

February 14th Love Card and Candy Treat

Hi everyone! I'm back this week with some quick projects for Valentine's Day using Momenta paper pads, diecuts and a few things from my own personal stash.


I started the card by cutting a piece of black cardstock from the Metallic Ink Paper Pad 4 1/4"x 51/2" (that's folded).


I raided my stash and adhered a doily to the front of the card. I placed a piece of Adhesive Sheet onto the backside of a piece of cardstock, placed the Love diecut from the Floral Wreath Cut and Emboss onto the cardstock and run through the Freestyle Die Cutting and Embossing Machine. I removed the backing from the "negative" of the love diecut and placed on top of the doily.


I fussy cut a bouquet of flowers from one piece floral cardstock from the Peony Paper Pad and added foam pop dots to the back before placing on the card base. From my stash I adhered "14" and "Feb" from a scrap of cardstock above and below the flowers. I finished the card off by adding messy loops of thread and glitter glue to the leaves and centers of the flowers.


I made another quick project to give as treats for the family. 


I cut two of the smaller diecuts from the  Nested Borders Rectangles Metal Diecuts (it's a great way to use up scraps of cardstock) and adhered the smaller diecut off center. I punch a hole on each side of the larger diecut.


The love diecut that was leftover from the card and a smaller bunch of fussy cut flowers I adhered to the diecut. I adhered a button, sequin and flatback pearl to the sentiment and place a lolly pop in the puched holes. You can make several of these in an hour and these would be perfect for class parties.
As always if you have questions about these projects please let me know.  If you aren't following Momenta on their different social medias you can find them at:


Supplies

Momenta: Peony Paper Pad
Beacon Adhesive: Zip Dry Adhesive
Hole Punch
Foam Pop Dots
Clear Glitter Glue
Doily and Scraps of Patterned Cardstock
Button, Sequin and Flatback Pearl
Thread

(Products listed above are Affiliated Links for your convenience)

DISCLAIMERS

This blog is compensated to provide opinion on products, services, websites, and various other topics. Even though the owner(s) of this blog receives compensation for our posts or advertisements. I always give my honest opinions, findings, beliefs, or experiences on those topics or products. The views and opinions expressed on this blog are purely my own. Any product claim, statistic, quote or other representation about a product or service should be verified with each manufacturer, provider, or party in question.This blog contains affiliate links, clicking and shopping through these links helps to support and run Tonya Trantham Designs - Creative Addiction to Paper Blog at no additional cost to you. Today's features are Momenta Products. 


Thanks for stopping by, hope your Wednesday is wonderful and enjoy creating!