Tuesday, January 28, 2020

Memo Pad Holder and Pen Clip with Eileen Hull

Hi everyone! I'm back from Creativation and I had a tiring but fun time! I hope to do a blog post later about my adventures there in the next week or two...it is so hard to get back into the swing of things. Anyway, I want to share my project using Eileen Hull's newest Display Stand Diecut.


I started by placing Adhesive Sheets on both sides of the Matboard and adding patterned cardstock over the adhesive (this makes it so much easier) before placing the diecut on top and running through the Diecut Machine.


I tried to put the stand together according to the directions but I bent the diecut the wrong way to begin with...can we say up oh...the bottom front of the diecut once I put it together right was buckled up pretty bad. BUT!!! I was able to cover up my mistake with hot pink gems which in my opinion dressed it up. I cut a piece of cardstock about an inch wide and the length of the stand and adhered each end to the stand. I created a belly band which I then placed the back sheet of the memo pad through the band. This is an easy way to replace the pad of paper once it is used up.


Next I cut a piece of elastic to fit around an ink pen and adhered each end to each side of a binder clip. 


From my stash of flowers and leaves I had cut from the Flowers and Leaves Journaling Cards Thinlits Dies I shaped flowers and leaves and adhered to the top of the display stand and to the binder clip. 


I also added buttons, glossy dots and loops of green thread to the center of each flower. 


I placed an ink pen into the binder clip holder before clipping to the side of the display stand. This diecut has so many possibilities! As always if you have questions about this project please let me know. To see the rest of Eileen's Inspiration Teams projects you can find the posts HERE, HERE, HERE and HERE.


Supplies

Sizzix/Eileen Hull: Display Stand Diecut
Memo Pad
Gems
Binder Clip
Elastic
Thread
Buttons
Glossy Dots
Beacon Adhesive: Zip Dry Adhesive
Anna Griffin Cardstock (retired)

(Products listed above are Affiliated Links for your convenience)

DISCLAIMERS

This blog is compensated to provide opinion on products, services, websites, and various other topics. Even though the owner(s) of this blog receives compensation for our posts or advertisements. I always give my honest opinions, findings, beliefs, or experiences on those topics or products. The views and opinions expressed on this blog are purely my own. Any product claim, statistic, quote or other representation about a product or service should be verified with each manufacturer, provider, or party in question.This blog contains affiliate links, clicking and shopping through these links helps to support and run Tonya Trantham Designs - Creative Addiction to Paper Blog at no additional cost to you. Today's features are Sizzix and Eileen Hull Products. 


Thanks for stopping by, hope your Tuesday is wonderful and enjoy creating!


Tuesday, January 14, 2020

Dress My Crafts HUGS Box

Hi everyone! I want to hop on real quick and share a project that I will be showcasing at Creativation in the Dress my Crafts booth 930. If by chance you are at the show please come by the booth Sunday and say hello and make this Hugs box. 


Also the first 50 people that comes by the booth will receive a bag of goodies.


If by chance you can't make it to Creativation I've shared some affliated links below of what I used to create this box. As always if you have any questions about this project please let me know.


Supplies

Dress My Crafts: Couple and Heart Diecuts
Dress My Crafts: Floral Hug Diecuts
Brads
Various Cardstock

(Products listed above are Affiliated Links for your convenience)

DISCLAIMERS

This blog is compensated to provide opinion on products, services, websites, and various other topics. Even though the owner(s) of this blog receives compensation for our posts or advertisements. I always give my honest opinions, findings, beliefs, or experiences on those topics or products. The views and opinions expressed on this blog are purely my own. Any product claim, statistic, quote or other representation about a product or service should be verified with each manufacturer, provider, or party in question.This blog contains affiliate links, clicking and shopping through these links helps to support and run Tonya Trantham Designs - Creative Addiction to Paper Blog at no additional cost to you. Today's features are Dress My Crafts Products. 


Thanks for stopping by, hope your Tuesday is wonderful and enjoy creating!


Monday, January 13, 2020

Have a Happy Heart Tag

Hi everyone! Sorry to be missing in action so to speak but I have been preparing for my trip to Creativation again this year. I've been working on "Top Secret" projects for the show.😉 I do have my second project of the month that I created for Momenta that I would like to share with y'all.


I always have an extra tag laying around that I have sopped up the leftover ink from past projects that I always have on my glass tray.  So I grabbed one of those tags from my stash, extra heavy gel, palette knife and the Floral stencil out of the Floral Stencil Value 4 Sheet Pack


I placed the floral stencil on top of the tag and loaded the palette knife with extra heavy gel and applied over the stencil. I didn't completely cover the tag with heavy gel. Only in random spots on the tag.


While letting the heavy gel dry...which doesn't take that long... I inked the Love Birds Rubber Stamp with Pink to Orange Ombre Pigment Ink and stamped onto a piece of White Cardstock. I kinda cleaned the orange ink off of the stamp and inked it with the pink ink and again stamped onto a piece of cardstock. Since the ink is "juicy" I let it dry before fussy cutting the image.


I raided my scraps of patterned cardstock and adhered midway and at the bottom of the tag. I added Foam Pop Dots to the back of the stamped image and placed on the tag. Before cutting out the words "Happy" and Heart" from the Hope/Dream/Believe Diecuts I applied an Adhesive Sheet to the back of the an piece of gold metallic cardstock from the Metallic Ink Paper Pad. Once I cut out the word diecuts I removed the backing from the diecuts and placed midway of the tag.


From the Romance Pack Diecuts I cut the decorative heart bracket with heart out and adhered to the tag.


I finished the tag by adding lace, Ric Rac and gold trim to the bottom of the tag along with three glossy dots. I also added a seam binding bow to the top of the tag.


As always if you have questions about this project please let me know.  If you aren't following Momenta on their different social medias you can find them at: FacebookInstagram, twitter, Pinterest and YouTube.  

Supplies

Lace, Ric Rac, Trim and Seam Binding
Glossy Dots
Various Patterned Cardstocks
Tag

(Products listed above are Affiliated Links for your convenience)

DISCLAIMERS

This blog is compensated to provide opinion on products, services, websites, and various other topics. Even though the owner(s) of this blog receives compensation for our posts or advertisements. I always give my honest opinions, findings, beliefs, or experiences on those topics or products. The views and opinions expressed on this blog are purely my own. Any product claim, statistic, quote or other representation about a product or service should be verified with each manufacturer, provider, or party in question.This blog contains affiliate links, clicking and shopping through these links helps to support and run Tonya Trantham Designs - Creative Addiction to Paper Blog at no additional cost to you. Today's features are Momenta Products. 


Thanks for stopping by, hope your Monday is awesome and enjoy creating!


Sunday, January 12, 2020

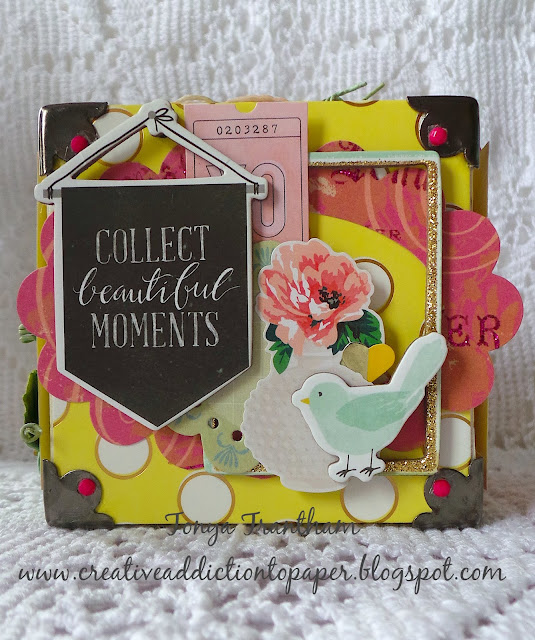
Collect Beautiful Moments Box with Eileen Hull

Hi everyone! I am super excited to share Eileen Hull's newest  Gift Box with Scalloped Edges and Label Diecut from her Chapter One Collection! There is so much you can do with this diecut. The obvious is a box that you can add a gift inside if you like, a book or just decorate and use as a home decor piece.


For my project I used cardstock and cut a parts from an old Recollections paper pad I had. After I put the box together according to the directions I adhered corner protectors to each corner of the box and gems. 


  I raided my stash of paper flowers and other paper ephemera and added to the box.


I also used chipboard embellishments and stickers from Crate Paper/Maggie Holmes. I tried to add as much dimension as I could to each side. I accomplished this adding Foam Pop Dots to the back of the embellishments.


The top of the box I adhered a doily, decorative diecut, buttons, paper flower and a bow made from cording. 


For more inspiration hop on over to Eileen's blog for more creativity from her team. You can find this month's post HERE and HERE. Also if you have any questions about this project please let me know.


Supplies

Patterned Cardstock
Chipboard Embellishments
Stickers
Corner Protectors 
Cording
Buttons
Paper Flowers

(Products listed above are Affiliated Links for your convenience)

DISCLAIMERS

This blog is compensated to provide opinion on products, services, websites, and various other topics. Even though the owner(s) of this blog receives compensation for our posts or advertisements. I always give my honest opinions, findings, beliefs, or experiences on those topics or products. The views and opinions expressed on this blog are purely my own. Any product claim, statistic, quote or other representation about a product or service should be verified with each manufacturer, provider, or party in question.This blog contains affiliate links, clicking and shopping through these links helps to support and run Tonya Trantham Designs - Creative Addiction to Paper Blog at no additional cost to you. Today's features are Eileen Hull, Sizzix and Scrapbook.com Products. 


Thanks for stopping by, hope your Sunday is wonderful and enjoy creating!


Saturday, January 4, 2020

Let it Snow Tag

Hi everyone! I am back after a little break from the holidays with my first project of the new year for Momenta! This tag takes no time to create. Maybe 30 to 45 minutes at the most but lets get started!


I started by placing a tag into the Let it Snow Embossing Folder and run through the Freestyle Die Cutting and Embossing Machine.


Next I inked three Art Daubers with the inks from the Blue to Teal Ombre Pigment Ink Pad and inked over the embossed image and edges of the tag.


I cut one Intricate Snowflakes Diecut from mint cardstock and cut three of the snowflakes from the diecut.


Next I cut one snowflake and two of the tiny star bursts in a light blue cardstock from the Let it Snow Embossing Folder and Diecuts and lightly inked the edges of all the diecuts. 


I placed Foam Pop Dots behind the snowflake and star burst dies before placing onto the tag. 


I adhered the three intricate snowflakes dies randomly on the tag along with sequins and gems.


I finished the tag by tying ribbon into a bow at the top of the tag and called it finished! 


As always if you have questions about this project please let me know.  
If you aren't following Momenta on their different social medias you can find them at:
twitter  
YouTube  


Supplies:

Momenta: Let it Snow Embossing Folder and Diecuts
Momenta: Intricate Snowflakes Diecut
Cardstock
Beacon Adhesive: Zip Dry Adhesive
Light Blue Gems
Ribbon
Sequins
(Products listed above are Affiliated Links for your convenience)

DISCLAIMERS
This blog is compensated to provide opinion on products, services, websites, and various other topics. Even though the owner(s) of this blog receives compensation for our posts or advertisements. I always give my honest opinions, findings, beliefs, or experiences on those topics or products. The views and opinions expressed on this blog are purely my own. Any product claim, statistic, quote or other representation about a product or service should be verified with each manufacturer, provider, or party in question.This blog contains affiliate links, clicking and shopping through these links helps to support and run Tonya Trantham Designs - Creative Addiction to Paper Blog at no additional cost to you. Today's features are Momenta Products. 


Thanks for stopping by, hope your Saturday is wonderful and enjoy creating!