Saturday, August 27, 2016

Dresser Up-cycle Project

Hi everyone! How is your day going? Me? I am slowly getting back into the swing of things. August has been a rough month with me still mending for my surgery, my dad finding out he has prostate cancer (doctor is hopeful since it has been caught in time) and the sudden lost of our grandson who was only 16 months old. My crafting mojo went into hiding and all I could do was sit and look at my supplies. I have forced myself to complete design team projects for this month  and I am slowly getting that itch to create.
I do have an up-cycle project that has been in the works for several months now and I can now finally share the finished piece. Well, as you all know I am in the never ending remodeling project here and me and my very handy parents are still working in the laundry room, den/breakfast nook/kitchen. In the kitchen was a hideous built in desk...imagine country blue laminate with burgundy tile...can we say ICK! :-p . Well, I had my dad remove the desk but then there was the empty space beneath the cabinets. So I go the idea to refurbish this dresser. As you can see it had seen better days but the best part it is made of wood and solid. The only problem was it was a little too tall for where I wanted to put it. Sooooo...I had my dad cut almost two inches off the top of it. We removed the top before sawing and the decorative piece on the top (that will be used in another project later on).


Pardon my cat's tail in the photo :-D but this is what it looked like after cutting it down. I also removed two of the drawers since I wanted a place for my husband's massive lunch box when he wasn't at work.


My dad installing the shelf in the dresser...the wood is leftover from the desk top that my dad cut for me.


After my dad sanded this is what the completed project looks like.


The paint is actually a custom color. I found a paint chip at Walmart but had it mixed at Lowes. I buy the most expensive paint they have because it has no odor (also this is the color I am painting my kitchen cabinets). I have bad alergies and my husband has migraines...who wants to smell paint for almost two weeks??? Not me!


The top of the dresser I left natural and painted with a clear sealer. Also the drawer pulls I spray painted with Rust-oleum Metal Satin Nickel. Later I might add a curtain to the opening to hide the massive lunch box. ;-) Now I have storage for linens, towels and whatever else that I can't fit into my cabinets.
I hope you like this and if you have any questions please let me know.


Thanks for stopping by, hope your Saturday is wonderful and enjoy creating!


Friday, August 26, 2016

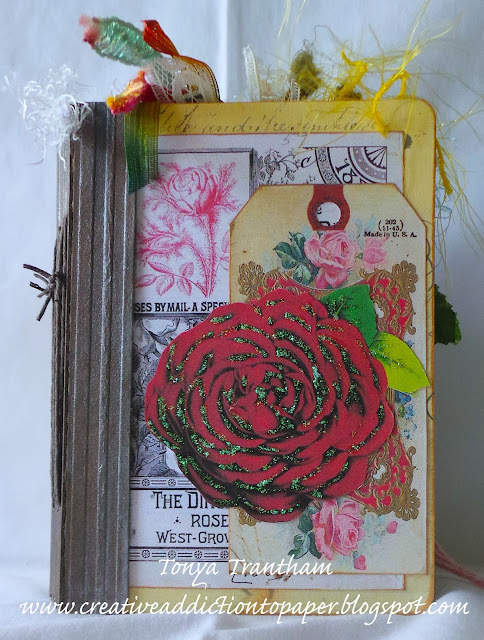
Tsunami Rose Designs: A Rose by any Other Name Junk Journal

Hi everyone! I am back with a little junk journal I created for my design team project for Tsunami Rose Designs. I used the Pass Port Book diecut to cut the covers, spine and pages bases which are coffee dyed paper. 


I used a variety of printables from the shop and are as listed: Ephemera Set 2 30 PagesBig Elements 11 English Cards 3 PagesDecoupage Flowers Set 1 4 PagesVintage Shipping Tag Collection 1 5 PagesVintage Shipping Tag Collection 5 3 Page and Big Elements 13 B&W 2 4 Page. Along with some freebie printables that can be found on the Tsunami Rose Design blog. :-) Also for more photos of my project you can see it HERE.


Also you still have a week left to get printables at $2.50 each on the Tsunami Rose Designs etsy shop and that does include kits too!!! This sale ends September 1st so be sure to hop over there!
If you aren't a part of the TsunamiRose FB Group be sure to join. There are so many talented folks in this group that are sure to inspire along with the awesome group of ladies that are part of TsunamiRose Blog design team.
If you have any questions about this little junk journal please let me know.


Thanks for stopping by, hope your Friday is awesome and enjoy creating!


Tuesday, August 23, 2016

Fall Fairy on Wheels

Hi everyone! I am here to share my project I created for Eileen Hull's Inspiration Team. This month we are showing how to use the Twist and Style Tool. You can do all sorts of fun things with this tool...jewelry, create stems for flowers, etc.


For my project I started by cutting from Matboard the "drawer" from the Candy Box Drawer diecut. I embossed the drawer with Honeycomb Embossing Folder and spritzed both sides with the following Tattered Angels mists: Walnut Gold, Bronze and Tattered Leather. I then put the drawer together according to directions.


Next I cut four 8 inches of 20 gauge jewelry wire, folded in half and put each end through the button holes. To use the Twist and Style tool you can watch the how to video HERE.


Once I got all the buttons and wire twisted I cut the wire down to fit the bottom of the drawer to create wheels which I adhered to the drawer.


I printed a little girl image that I had found on the Land of Nod blog (which has since been deleted :-(). I fussy cut the little girl out, used butterfly wings from my stash, added a little Stickles to the wings and then adhered together and then placed in the drawer box.


I cut a Rosette from specialty paper, adhered to the top of the drawer a long with a small bead.


I twisted a few copper color wire on the Twist and Style tool and then I wrapped the wire around a small dow.


I added moss, a mini pinecone with an assortment of flower and leaf punches to the inside to finish off my little drawer on wheels.


Be sure to hop on over to Eileen's blog to see what the Inspiration Team has created this month. You can see their projects: HERE, HERE and HERE and as always if you have any questions please let me know.


Thanks for stopping by, hope your day is awesome and enjoy creating!