Monday, July 30, 2018

Baby Wrapped Journal Cover Part One

Hi everyone! It has been a crazy and insane month and I am barely getting in a project for Eileen Hull's Inspiration Team...EEK!!! 😰 I decided since I will have a new grandson in nine weeks I would create a little baby album using the Wrapped Journal Diecut.


I started by cutting the Wrapped Journal Diecut from a piece of Mat Board and I embossed both end with a cloud embossing folder that I had picked up at Joann's. Next I inked a glass tray with ColorBox Blends Bay Ink, added water, painted both outside and inside ends of the journal and the same for the spines and I let dry. I adhered a patterned cardstock on the back of the journal since I accidentally bled on it. 😔


I lightly inked the edges of the journal and the embossed images with ColorBox Blends Uniform Ink. Next I inked the glass tray with ColorBox Blends Coconut Ink and with a paint brush I lightly painted a wash over the clouds, let dry and then I dry brushed around some of the clouds.


I cut a couple of stars from the Bookplate, Hinges and Label Diecut and inked with ColorBox Blends Tutu Ink and once dry I added Stickles to each star.


I cut the "baby" journaling card from the Simply Stories Hello Baby Paper Pad and added a star brad before adhering to the smaller journal flap. I glued the star diecuts and mini gems to the cover.


I punched a hole at the end of the baby journaling card and added a brad which will be used as a closure. I cut a piece of cording which I folded in half making it 14 inches long before tying it around the brad. I wrapped the cording around the brad, then tied a knot in the cording and added three beads before tying the end of the cording and cut the excess cording off.


The inside of the journal I added patterned cardstock from the Simply Stories Hello Baby Paper Pad. I also covered the back of the baby journaling card with a piece of wood patterned cardstock to hide the back of the brad. I strung the journal with elastic cording and waa laa...finished! I will follow up next month with the inside of this baby album so stay tuned for a full reveal! 😀
If you haven't checked out Eileen Hull's blog this month to see what the Inspiration Team has created you can find those posts HERE and HERE.  Also if you have any questions about this project please let me know.


Also I would like to submit this project for the following challenge:
Word Art Wednesday Challenge: #344-#345 Anything Goes


 Thanks for taking the time to stop by, hope your day is wonderful and enjoy creating!


Tuesday, July 3, 2018

Eileen Hull: Pleather Wrapped Journal

Hi everyone! Can you believe it is already July?!?! I can't! When I created this wrapped journal for Eileen Hull's  booth at Creativation it was in January! If you haven't seen my past blog posts from last month of this newest diecut from Eileen's Book Club Chapter 2 Collection you can find those HERE, HERE and HERE.


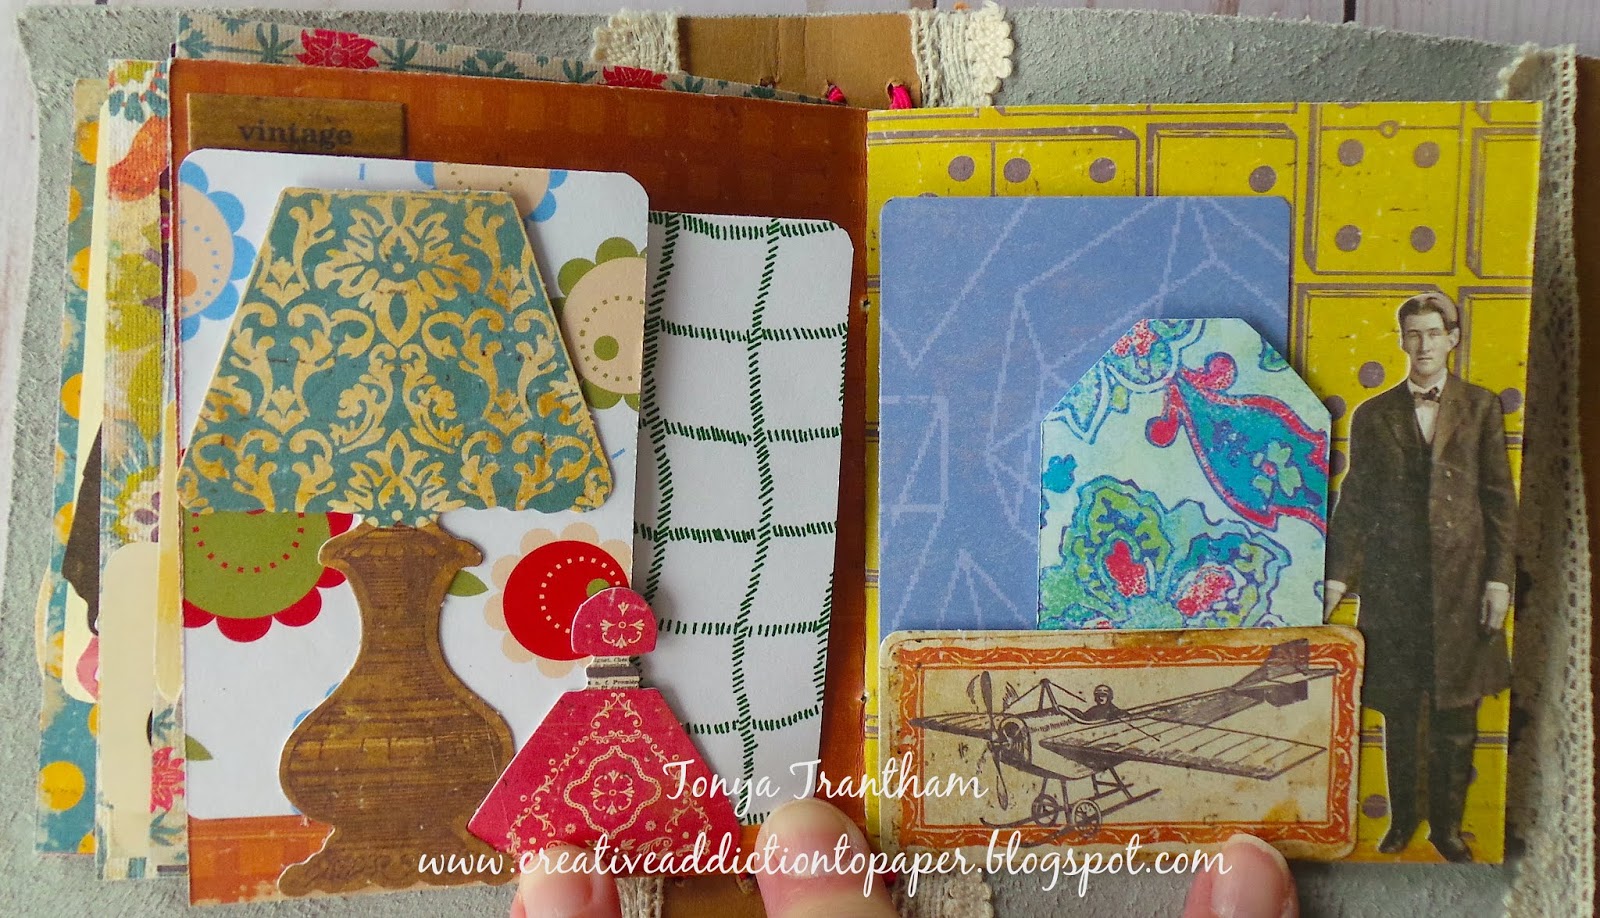
The Wrapped Journal Diecut I used a piece of "pleather" (plastic that looks like leather) to create this journal. I cut to fit two a pieces of Kraft Paper Leather and adhered to the inside on both spines. I also cut a piece of lace to cover the spine where the booklets would be and glued with Fabri-Tac Adhesive. 


I strung elastic to hold the booklets and tied off inside of the journal. I punch a small hole on the smaller flap and added a decorative brad which I tied bright colored seam binding around the brad. On the inside I adhered lace on either side of the paper leather.


Since I used bright and cheery colors for my journal I went with a similar theme for the inside of the journal.


I used Paper Doll Diecuts through out the journal.


Since I am a hoarder of scrapbook paper, embellishments, etc. This year I have tried to incorporate more of my stash into what I am creating.


I think the little sayings and whimsical diecuts are from Crate Paper but not for sure? I had received those in a swap a few years back. But I think they are a perfect compliment to the paper dolls.


I used up a lot of scraps of cardstock by cutting out several tags from the Credit Card Sleeve and Tags  Diecuts.


I adhered only the lower part of the paper dolls to the page so I could add several tags behind them.


Be sure to stop by Eileen Hull's blog and see what her Inspiration Team has been up to. You can find her blog HERE. As always if you have any questions about this project please let me know.


Also I would like to submit this project for the following challenges:
Mini Album Challenge: July
Cut It Up: Challenge #151


Thanks for stopping by, hope your Wednesday is wonderful and enjoy creating!


Friday, June 29, 2018

Eileen Hull: Peaches and Cream Felt Planner Journal

Hi everyone! I'm back again with another project using Eileen Hull's Wrapped Journal Diecut but this time I made a planner out of it!


Before placing felt over the Wrapped Journal Diecut I placed the Movers and Shapers Floral Cutout Die inside the opening of the wrapped journal diecut  and cut out the journal. Then I used the Magnetic Platform and placed the Movers and Shapers Scallop Border Diecut and place the end of the wrapped journal over the scalloped die and cut.


Next I cut Tan Paper Leather to fit the inside of the journal and adhered with Fabri-Tac adhesive. This will make the journal sturdier. 


Next I cut a piece of pleather to fit over the paper leather and adhered to the inside.


I forgot to add that before adhering the paper leather and pleather to the inside I adhered tulle behind the floral design. The buttons I threads and tied off on the backside and adhered to the center of each floral cutout.


I adhered Pom Pom trim and lace to the outer inside edge of the journal.


I strung the spine with elastic cording and the closure I threaded elastic cording through the button and then sewed to the middle of the spine. I also added bits of lace, trim and ribbon to the spine.


I purchased a pack of three mini composition notebooks from the Dollar Tree and covered the front and back with cardstock.


I used an assortment of chipboard embellishments from my stash to decorate the covers. 


I cut a file folder down and created a place to hold stitchy notes and washi tape samples.


I cut from white cardstock the Credit Card Sleeve Diecut, embossed with the Daisy Wreath Embossing Folder and lightly inked over the embossed images. I adhered the sleeve to the folder, cut a tag to fit the slot and wrapped washi tape around the tape in case I wanted to decorate the planner on the go.


I created a pen loop to hold an ink pen inside the planner. I cut flowers and a leaf from felt with the Stitchy Flowers and Leaf Diecuts and adhered together and added a gem to the center of the flower.


I wrapped a small piece of elastic around the pen I am going to use in my planner and cut. Next I adhered each side of the elastic on either side of the binder clip, adhere the felt flower to the side of the binder clip and clip to the folder or notebook and add the pen.


I used motivational saying on the covers of the notebooks.


As always if you have any questions about this planner please let me know. Also if you haven't had a chance to see what Eileen's Inspiration Team has been up to you can find those posts HERE, HERE and HERE.


I would also like to submit this project for the following challenge:
Mini Album Makers Challenge: June Challenge


Thanks for stopping by, hope your Friday is wonderful and enjoy creating!


Thursday, June 28, 2018

Eileen Hull: Love and Prayers Card

Hi everyone! I'm back with a quick card I created using some of Eileen Hull's newest diecuts from her Book Club Chapter 2 Collection. I started by folding a 6"x12" piece of patterned cardstock in half to create a 6"x6" card base.


I cut flowers on white cardstock from the Journaling Cards, Flowers and Leaves Diecut. I inked a glass tray with Tutu ColorBox Blends, watered down and painted three of the flowers. Once dry I shaped, adhered together and added a flatback pearl to the center of the flower. I cleaned the tray off and inked with Frog ColorBox Blends, watered down and painted a leaf and once dry shaped and adhered to the back of the flower.


I cut from a piece of gold vellum a scalloped journaling card from the Journaling Cards, Flowers and Leaves Diecut. I also cut from white cardstock the words "love" and "prayers" from the Journaling Words Diecuts.


I cut a part a paper doily and adhered to the back of 3"x 5 1/2" piece of patterned cardstock and adhered to the card base. Next I added the vellum journaling card, words and the & shape to the card.


I finished off by adding loops of thread and cording to the back of the flower before adhering to the card. 
If you haven't had a chance to check out Eileen's blog to see what the team has been up to you can find those posts HERE, HERE and HERE. As always if you have any questions please let me know.


Thanks for stopping by, hope your Thursday is awesome and enjoy creating!