Showing posts with label Flower. Show all posts

Monday, April 15, 2019

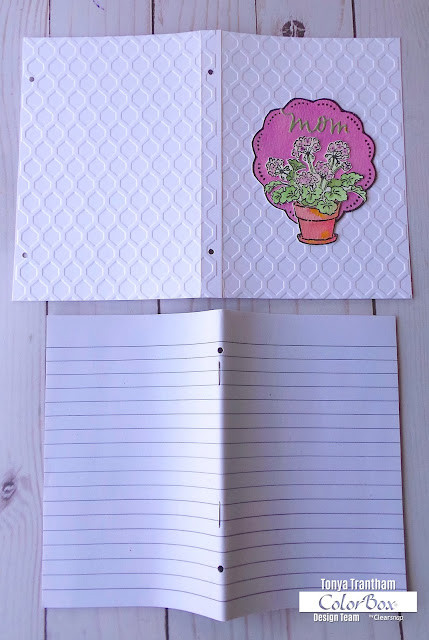
Mom Journal

Hi everyone! With Mother's Day right around the corner I wanted to share an easy project that you can make.


I started by placing the Doily/Scalloped Circle stamp from the Cookies Clear Stamps onto the MISTI Stamping Tool and ink with Wicked Black Archival Dye Ink. I stamped onto a piece of Watercolor Paper and fussy cut the stamped image out. I inked a glass tray with the following inks: Mulberry and Cabernet Dyestress Blendable Dye Inks and added water to each ink. I laid the stamped image into ink mixture and once the image is completely covered I removed and let dry.


I inked the Geranium Pot Wood Stamp with Wicked Black Archival Dye Ink and stamped onto a piece of watercolor paper. I inked the glass tray with the following inks: Princess, Cabernet, Tomato, Bumble Bee, Moss and Inchworm Dyestress Blendable Dye Inks. I added a little amount of water to each ink. Next I painted the Geranium Pot image. The leaves and stems...Inchworm and shade with Moss Dyestress Blendable Dye Inks. The flowers...Princess and the center of each flower with Cabernet Dyestress Blendable Dye Inks. The pot...Tomato and shade with Bubble Bee Dyestress Blendable Dye Inks. Once dry I fussy cut the geranium pot image out and add Clear Glitter Glue to the center of each flower.


I placed a piece of White Chipboard on top of the Stamp and Photo Storage Scoreboard L Diecut   and placed between plates and run through Diecut Machine. I cut two out. I placed the diecut in the Honeycomb Embossing Folder (retired), between two plates and run through the diecut machine. Emboss second diecut too. 


I cut the flap off the top of both diecuts and cut the first fold off the side of each diecut. I added adhesive to the remaining flap and glue to the other flap. This creates the spine of the notebook.


I measured one inch on either end of spine, mark and punched holes. I also measured one inch on either end of  the back cover, marked and punch holes. I threaded elastic through the holes on the back cover and tie off inside.


I removed the cover from a store bought notebook (I found these notebooks at the Dollar Tree). 


I lined up the notebook on the inside of the cover, marked and punch holes. Next I threaded a needle with thread and sewed the notebook to the inside cover and tied off on the inside. I adhered the doily/scalloped circle and geranium pot images to the front cover. 


I placed a scrap of Adhesive Sheet on the back side of a piece of green cardstock and placed the piece of cardstock on top of the "Moments" diecut from the Floral Arch and Words Diecuts. I placed the diecut between plates and run through the diecut machine. I removed the backing from the adhesive and before placing on cover cut off the "ents". The elastic can be placed around the front cover to keep closed when not in use.


As always if you have any questions about this project please let me know.


SUPPLIES USED:

ColorBox: Princess Dyestress Blendable Dye Ink
Sizzix/Eileen Hull: Floral Arch and Words Diecuts
Sizzix/Eileen Hull: Honeycomb Embossing Folder (retired)
Notebook 4"x6"
Scrap of Green Cardstock
Beacon Adhesive: Zip Dry Adhesive
Glass Tray
Elastic 3MM
Studio g: Clear Glitter Glue
Needle
Thread
Paint Brush

(Products listed above are Affiliated Links for your convenience)


Thanks for stopping by, hope your Monday is awesome and enjoy creating!


Thursday, June 28, 2018

Eileen Hull: Love and Prayers Card

Hi everyone! I'm back with a quick card I created using some of Eileen Hull's newest diecuts from her Book Club Chapter 2 Collection. I started by folding a 6"x12" piece of patterned cardstock in half to create a 6"x6" card base.


I cut flowers on white cardstock from the Journaling Cards, Flowers and Leaves Diecut. I inked a glass tray with Tutu ColorBox Blends, watered down and painted three of the flowers. Once dry I shaped, adhered together and added a flatback pearl to the center of the flower. I cleaned the tray off and inked with Frog ColorBox Blends, watered down and painted a leaf and once dry shaped and adhered to the back of the flower.


I cut from a piece of gold vellum a scalloped journaling card from the Journaling Cards, Flowers and Leaves Diecut. I also cut from white cardstock the words "love" and "prayers" from the Journaling Words Diecuts.


I cut a part a paper doily and adhered to the back of 3"x 5 1/2" piece of patterned cardstock and adhered to the card base. Next I added the vellum journaling card, words and the & shape to the card.


I finished off by adding loops of thread and cording to the back of the flower before adhering to the card. 
If you haven't had a chance to check out Eileen's blog to see what the team has been up to you can find those posts HERE, HERE and HERE. As always if you have any questions please let me know.


Thanks for stopping by, hope your Thursday is awesome and enjoy creating!


Monday, June 11, 2018

Pansy Bird Cage Candle Holder

Hi everyone! I'm back to share a quick and easy candle holder project I created! This can be used as a center piece on a table for a wedding or as a decoration in your home. Lets get started!


I cut two each of the medium and small pansies from the  Pansy Flower Diecut on white cardstock and one leaf sprig from the Spring Leaves Diecut. I inked up the glass tray with Heliotrope and  Peony Inks, add a small amount of water to each ink and laid the Pansy flowers into the mixture. I used a small paint brush to make sure both sides are covered in ink.


Once the flowers dried I shaped each flower with a stylus and adhere together.I cleaned the tray off and inked with Cat's Eye Pigment Lime Ink and add a small amount of water. Next I placed the Leaf Spring diecut into mixture and once completely covered I removed to dry. Once the leaf sprig is dry I inked the edges of the leaves with Jade Chalk Ink and shape each leaf with a stylus.


I adhered the pansy, smaller flowers and leaf sprig to the top of the bird cage and addws a yellow glossy dot to the center of the pansy and purple flat back pearls to the centers of the smaller flowers. I also added a small amount of dried moss as a filler between the flowers.


I looped several strands of light green thread, tied off,  glued underneath the pansy and leaf sprig along with pearl sprays and added a battery operated candle. Now it is finished! 😊 As always if you have questions please let me know.


I would also like to submit this project for the following challenges:
Word Art Wednesday Challenge: #338-#339
Crafter's Castle Challenge: #6
Simon Says: Anything But A Card


Thanks for stopping by, hope your day is wonderful and enjoy creating!


Wednesday, February 21, 2018

Little Birdie Crafts: Floral Heart Pocket

Hi everyone! Today over on the Little Birdie Crafts blog I I have a heart pocket I created using an assortment of products from Little Birdie. For all the details you can find my blog post HERE.


Thanks for stopping by, hope your Tuesday is awesome and enjoy creating!


Wednesday, January 24, 2018

Valentine's Day Candy Jar

Hi everyone! I am back with a very quick and easy project that I created for Valentine's Day! 


I purchase these cups of Oui yogurt  and the cups are made of glass. I love the shape and thought wouldn't these make great gifts if I could dress them up in some way?


Well, I started by peeling the labels off, giving the jar a good washing and rubbing Goof Off to get the sticky residue off the glass.


I cut several flowers and leaves from the Stitchy Flowers and Leaf Diecuts on White Cardstock.


I spritzed the following glimmer and simply sheer mists onto a glass plate: Gold, Moss (retired), Soft Peach, Rosy and Classy Green.


I added a little water to the mists and watercolored the flowers and leaves and let dry.


I cut strips of white and soft blue cheese cloth...Hobby Lobby now has cheese cloth in different colors...and tied around the lip of the jar. I added a bit of adhesive to hold the cheese cloth in place. I cut a two inch strip of lace and bunched up an assortment of different colored thread and adhered to where I tied off the cheese cloth.


I used a stylus and shaped the flower pedals and leaf and adhered together.


I used pliers to snip off the shank off the back of a button so it would lay flat when I glued it to the center of the flower.


I adhered the flower to the jar and waaaa laaaaa finished!!! Now all I have to do is add candy!


Which I did! 😊 Once the candy is eaten a battery operated candle can be added to the jar for a nice decorative touch. 
As always if you have any questions about this project please let me know.


Also I would like submit this for the following challenge:

Word Art Wednesday Anything Goes: Challenge #318-#319


Thanks for stopping by, hope your Wednesday is awesome and enjoy creating!


Friday, June 30, 2017

Bloom Tea Cup

Hi everyone! I am back again with another quick project for Eileen Hull and Stampotique collaboration this month! I cut the 3D Tea Cup die from Matboard and embossed with the Daisy Wreath Embossing Folder.


I forgot to photograph the tea cup while I was inking...oops! 😕 But I used Eileen's ColorBox  Hydrangea Blends which can be found in a set in her shop on etsy HERE. First I added a dab on ink on a tray and watered down and then painted onto the individual pieces. Once dry I lightly inked over the pieces again with the blend to make the embossing stand out. Once that was completed I put together according to the direction on the packaging.


Next I stamped the Kassa's Bloom onto a piece of watercolor paper. From the same Colorbox Blends Set that the Hydrangea Blend came from I watered down the Tutu and Wildberry Blends and watercolored the flower. Also I used the Melon Blend and Nutmeg Blends which you can find those HERE and HERE.


Next I fussy cut the flower out and added a combo of Stickles and Icicle Glimmer Glaze to the flower and let dry. I cut out and Glimmer Misted a leaf from the Leaves, Spring Diecut.


I adhered the flower and leaf to the front of the tea cup along with thread and twine. 


If you have missed any of the past projects this month you can find Eileen's Inspiration Team's projects HERE, HERE and HERE. Stampotique Design Team's project can be found HERE, HERE and HERE.
As always if you have any questions about this project please let me know.


 I would also like to submit this project for the following challenges:
Word Art Wednesday: Challenge #288-#289
Stampotique Designers Challenge: SDC275


Thanks for stopping by, hope your Friday is wonderful and enjoy creating!