Showing posts with label Wedding. Show all posts

Thursday, August 22, 2019

From this Day Forward Wedding Tag

Hi everyone! I'm back with a tag I created in honor of my son and daughter in law's wedding anniversary that is today. I had these photos laying around and I thought why not create something with them and this is what I came up with.


I started by placing a Size #10 Tag (upper half) in the Floral Tapestry Embossing Folder and placed  between two cutting plates and run through the Diecut Machine. I removed and place lower half of tag in the Floral Tapestry Embossing Folder and completed the same steps. I inked two Art Daubers with Leaf and Frog Blends 2 Inks and inked over the leaves and vines of the embossed areas on the tag. Next I inked three Art Daubers with Tutu, Wildberry and Melon Blends 2 Ink and inked over the flowers of the embossed areas on the tag.


I placed the Geometrics Art Screen on top of tag, loaded two art daubers with Tutu and Melon and randomly ink areas of art screen and once I achieved the desired effect I removed the art screen. I inked the glass tray with Coconut Blends 2 Ink, added water to ink, loaded a Paint Brush with ink mixture and splattered the tag.


I cut two photos to fit the tag. I adhered the first photo slightly off the side of tag. The second photo I cut a piece of textured white cardstock slightly larger than the photo an inked an art dauber with Melon Blends 2 Ink and inked the edges of cardstock and then adhered the photo to the mat. I added Foam Pop Dots to back of photo and placed slightly off other side of tag.


I placed a scrap of white cardstock on top of the Journaling Cards, Flowers and a piece of Crinoline Fabric on top of the Leaves Diecuts and run through the diecut machine. I shaped two flowers diecuts with a Stylus and adhered together and added two sequins and a gem to center of the flower.


Next I inked an art dauber with Frog Blends 2 Ink and inked the fabric leaf. Once dry I adhered to back of flower and added to the bottom of the photo.


I looped several threads to create two messy bows and adhered one under the flower diecut and other under the smaller photo along with a few pearl sprays.


 I finished the tag by cutting two nine inch pieces of seam binding and tying into a bow at the top of tag. As always if you have questions about this project please let me know.


Supplies

ColorBox/Eileen Hull: Tutu Blends 2 Ink
ColorBox/Eileen Hull: Wildberry Blends 2 Ink
ColorBox/Eileen Hull: Melon Blends 2 Ink
ColorBox/Eileen Hull: Leaf Blends 2 Ink
ColorBox/Eileen Hull: Frog Blends 2 Ink
ColorBox/Eileen Hull: Coconut Blends 2 Ink
ColorBox: Art Daubers
Sizzix/Brenda Walton: Floral Tapestry Embossing Folder
Glass Tray 
Seam Binding
Pearl Sprays
Sequins
Gem
Tag: Size #10
Thread
Beacon Adhesive: Zip Dry Adhesive
Crinoline Fabric

(Products listed above are Affiliated Links for your convenience)


Thanks for stopping by, hope your Thursday is great and enjoy creating!


Friday, June 28, 2019

Bridal Shower Love Card

Hi everyone! I'm back with my project this month for Eileen Hull! I know I am cutting it close this month...YIKES!!! 😳


I started by cutting a piece of black cardstock and folded in half to create a 6"x6" card base. I cut another piece of patterned cardstock slightly smaller than the card base along with flocked paper, part of a doily and lace which I adhered all to the card base. Next I inked my glass tray with the following Blends 2 Inks: Melon, Tutu, Sunshine, Frog, Wildberry and Leaf Inks. You can find these inks in Eileen Hull's etsy store HERE. I added water to each ink and laid flowers and leaves that I had cut from the Flowers and Leaves Journaling Cards Diecuts ( these I cut from Crinoline Fabric). And once I had them completely covered I removed and let dry.


I had a wooden "love" sentiment in my stash and inked with Coconut Blends 2 Ink (this can be found in Eileen's etsy shop also).


While the sentiment was still wet I applied Eileen's new Glistening Glass Molten Dimensions and set with a Heat Tool.


 I glued the sentiment to the bottom corner of the card. I added adhesive to the center of each flower and pinched in the center and "fluffed". I adhered leaves to each flower before added to each side of the love sentiment.


I added a bit of tulle and thread to finish the card. Now all I need to do is add a gift card and my bridal gift is complete! Be sure to stop by Eileen's blog and see what the rest of the Inspiration Team has been up to! You can find those posts HERE and HERE. As always if you have any questions please let me know.


Supplies

Beacon Adhesive: Zip Dry Adhesive
Tulle
Thread
Crinoline Fabric
Cardstock
Doily
Lace

(Products listed above are Affiliated Links for your convenience)


Thanks for stopping by, hope your Friday is wonderful and enjoy creating!


Saturday, June 1, 2019

Petite Floral Tea Light Altered Jar

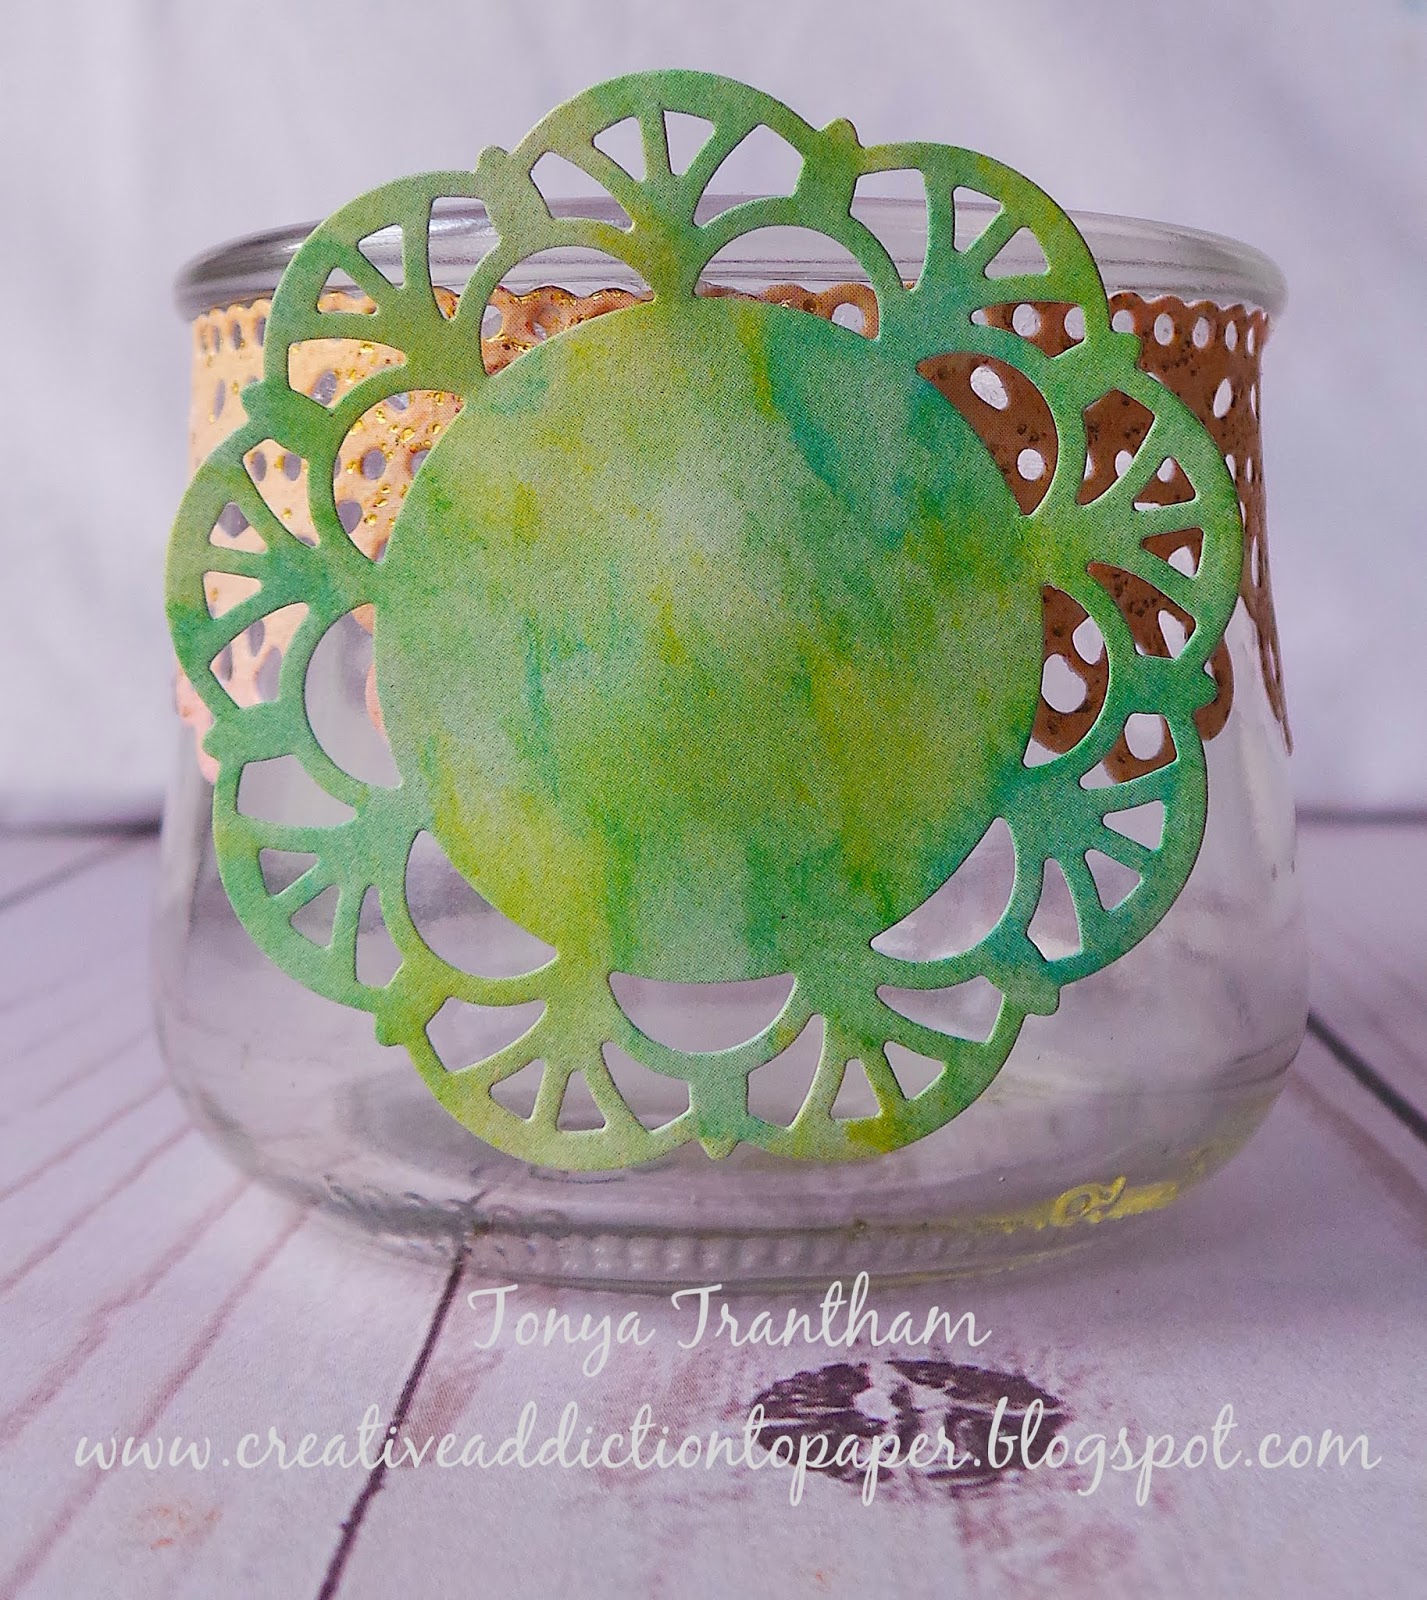
Hi everyone and happy first day of June! I am back today with a quick project for Momenta. I created this tea light candle holder using an empty Yoplait petite Oui glass jar. I love the yogurt and I love the shape of these jars to the point where I have a small collection of them for crafting proposes. 😁


I peeled the label off and removed the sticky residue with soap and water...if that doesn't work I use Goof Off. From the Metallic Paper Pad I selected a peachy pink with gold flicks cardstock to use with the Border Intricate Flowers Metal Diecuts. I run the diecut through the Diecut Machine and cut two of the diecuts out. 


I adhered one whole and a half of the other diecut around the lip of the jar.


I selected a green paper doily from the 2" Doily Watercolor Package and adhered to the front of the jar.


From the same peachy pink cardstock I punched a circle and adhered to the center of the doily. I cut a leaf and three flowers from the Cut and Emboss Floral Wreath Template. I shaped the flowers and leaf with a Stylus.


I adhered all three flowers and the leaf to the front of the jar along with several loops of thread. I also added a green gem to the center of the flower. I added a battery operated candle to the inside of the jar and it's finished! This would be perfect for decorating tables for a wedding don't you think? Be sure to stop by the Momenta DIY Project Page  for more inspiration!  As always if you have any questions about this project please let me know.


(Products listed above are Affiliated Links for your convenience)


Thanks for stopping by, hope your Saturday is awesome and enjoy creating!


Wednesday, March 13, 2019

Dragonfly Photo Box

Hi everyone! I am back today with a Photo Box I created using Eileen Hull's Stamp and Photo Storage Diecut and embossing powders by ColorBox. I started by cutting two Stamp and Photo Storage Diecut from Matboard using a Diecut Machine. 


I cut one of the flaps off of each diecut and placed one of the diecuts in the Floral Frame Embossing Folder and run through the diecut machine. I put the box together according to directions on the Stamp and Photo Storage Diecut packaging.


I used a hot glue gun to adhere the two diecuts together to create a box and I cut to fit three pieces of cardstock and adhere to the sides of the box. 


I adhered lace and flat back pearls to the bottom of the box. 


Next I cut two flowers from the Stitchy Flowers and Leaf Diecuts and punch leaves from the mini leaf punch and shape and adhere to the bottom of the box and add a flat back pearl to the center of the flower.


I used two dragonfly diecuts from my own personal stash and ink completely with Aquamarine Chalk Ink. 


After the ink dried I inked both with Top Box Clear Embossing Ink and added Copper Embossing Powder randomly on both dragonfly diecuts. 


I set the embossing powder with a Heat Tool and applied more Top Box Clear Embossing Ink and complete the same steps with the Gold Sparkle and Opalescent Clear Embossing Powders until desired effect is achieved.


I added adhesive to the center of one of the dragonfly diecuts and glue on top of the other dragonfly diecut. 


I bent the wings up on the dragonfly, adhere to the top of the photo box and add a flatback pearl to finish off the box.


This would be a perfect gift to hold wedding photos, graduate or personal photos in. Also below is links to most of the tools and supplies I used if you want to recreate this project for yourself. As always if you have any questions about this project please let me know.

SUPPLIES USED:

Sizzix/Eileen Hull: Stamp and Photo Storage Diecut 
Sizzix: Matboard
Sizzix: Diecut Machine
Sizzix/Brenda Walton:(Be Merry 2 PK Embossing Folders) Floral Frame Embossing Folder
Sizzix/Eileen Hull: Stitchy Flowers and Leaf Diecuts
ColorBox:(Surf's Up Chalk Ink Set ) Aquamarine Chalk Ink
Beacon Adhesive: Zip Dry Adhesive
Flatback Pearls
Lace


Thanks so much for stopping by, hope your Wednesday is wonderful and enjoy creating!


Monday, June 11, 2018

Pansy Bird Cage Candle Holder

Hi everyone! I'm back to share a quick and easy candle holder project I created! This can be used as a center piece on a table for a wedding or as a decoration in your home. Lets get started!


I cut two each of the medium and small pansies from the  Pansy Flower Diecut on white cardstock and one leaf sprig from the Spring Leaves Diecut. I inked up the glass tray with Heliotrope and  Peony Inks, add a small amount of water to each ink and laid the Pansy flowers into the mixture. I used a small paint brush to make sure both sides are covered in ink.


Once the flowers dried I shaped each flower with a stylus and adhere together.I cleaned the tray off and inked with Cat's Eye Pigment Lime Ink and add a small amount of water. Next I placed the Leaf Spring diecut into mixture and once completely covered I removed to dry. Once the leaf sprig is dry I inked the edges of the leaves with Jade Chalk Ink and shape each leaf with a stylus.


I adhered the pansy, smaller flowers and leaf sprig to the top of the bird cage and addws a yellow glossy dot to the center of the pansy and purple flat back pearls to the centers of the smaller flowers. I also added a small amount of dried moss as a filler between the flowers.


I looped several strands of light green thread, tied off,  glued underneath the pansy and leaf sprig along with pearl sprays and added a battery operated candle. Now it is finished! 😊 As always if you have questions please let me know.


I would also like to submit this project for the following challenges:
Word Art Wednesday Challenge: #338-#339
Crafter's Castle Challenge: #6
Simon Says: Anything But A Card


Thanks for stopping by, hope your day is wonderful and enjoy creating!


Friday, August 28, 2015

A Good Day for a Wedding

Hi everyone! I am here to finally share the fans (forty of them) I created for my son and now wife's wedding which was last week. I had found in the Silhouette library a 3D Rosette Flower-Dotted design ID #21879 but it was small so I sized it up to 3 1/2" in height and 11 1/8 wide and copied pasted another image onto the design area to be printed.
I used the following cardstocks from Canvas Corp to create these fans: Gold & Kraft Diamond, Gold & Kraft Damask and Gold & Kraft Stripe cardstocks.


After folding and gluing both strips of the rosette together (end to end) I had a circle that had to be "pushed" down to create the rosette. I used a hot glue gun to glue a small Kraft cardstock circle to the center. It dries a lot faster so you don't have to hold it for what seems like forever. Then I repeated the same process on the other side of the rosette.


Since my daughter in law's colors for the wedding was mint green, Lavender and pink I ran cardstock through my diecut machine to cut out several scalloped circles and then embossed with Brenda Walton's Floral Tapestry embossing folder. 


I adhered those to the front and back of each fan. Along with a wood paddle that I purchased at Hobby Lobby.


Here is a small portion of the fans before I boxed them and since them off with my son before the wedding. :-)


The day of the wedding it rained just a little bit and then cleared up...isn't rain suppose to be good luck for a wedding? But all in all it was the perfect day for an outdoor wedding. The bride was beautiful and all the decorations and special touches truly made this a day to remember. Plus I gained a daughter I never had too. :-)


If you have any questions about this project please let me know. 
Thanks for stopping by, hope your Friday is awesome and enjoy creating!