Showing posts with label flowers. Show all posts

Thursday, June 13, 2024

Moroccan Treasure Box

 Hi everyone! I'm back with a sneak peek of a project I created using the re-released Treasure Box Diecut and the new Painterly Blooms and Background Thinlits, and a few older dies, all by Eileen Hull. You can find the full post HERE


Thanks for stopping by, hope your Thursday is awesome and enjoy creating!


Friday, April 19, 2024

Bird House and Feathers Tag

 Hi everyone! I wanted to share a sneak peek of a tag I created! If you would like more details and photos you can find the post HERE


Thanks for stopping by, hope your Friday is great and enjoy creating!


Friday, June 26, 2020

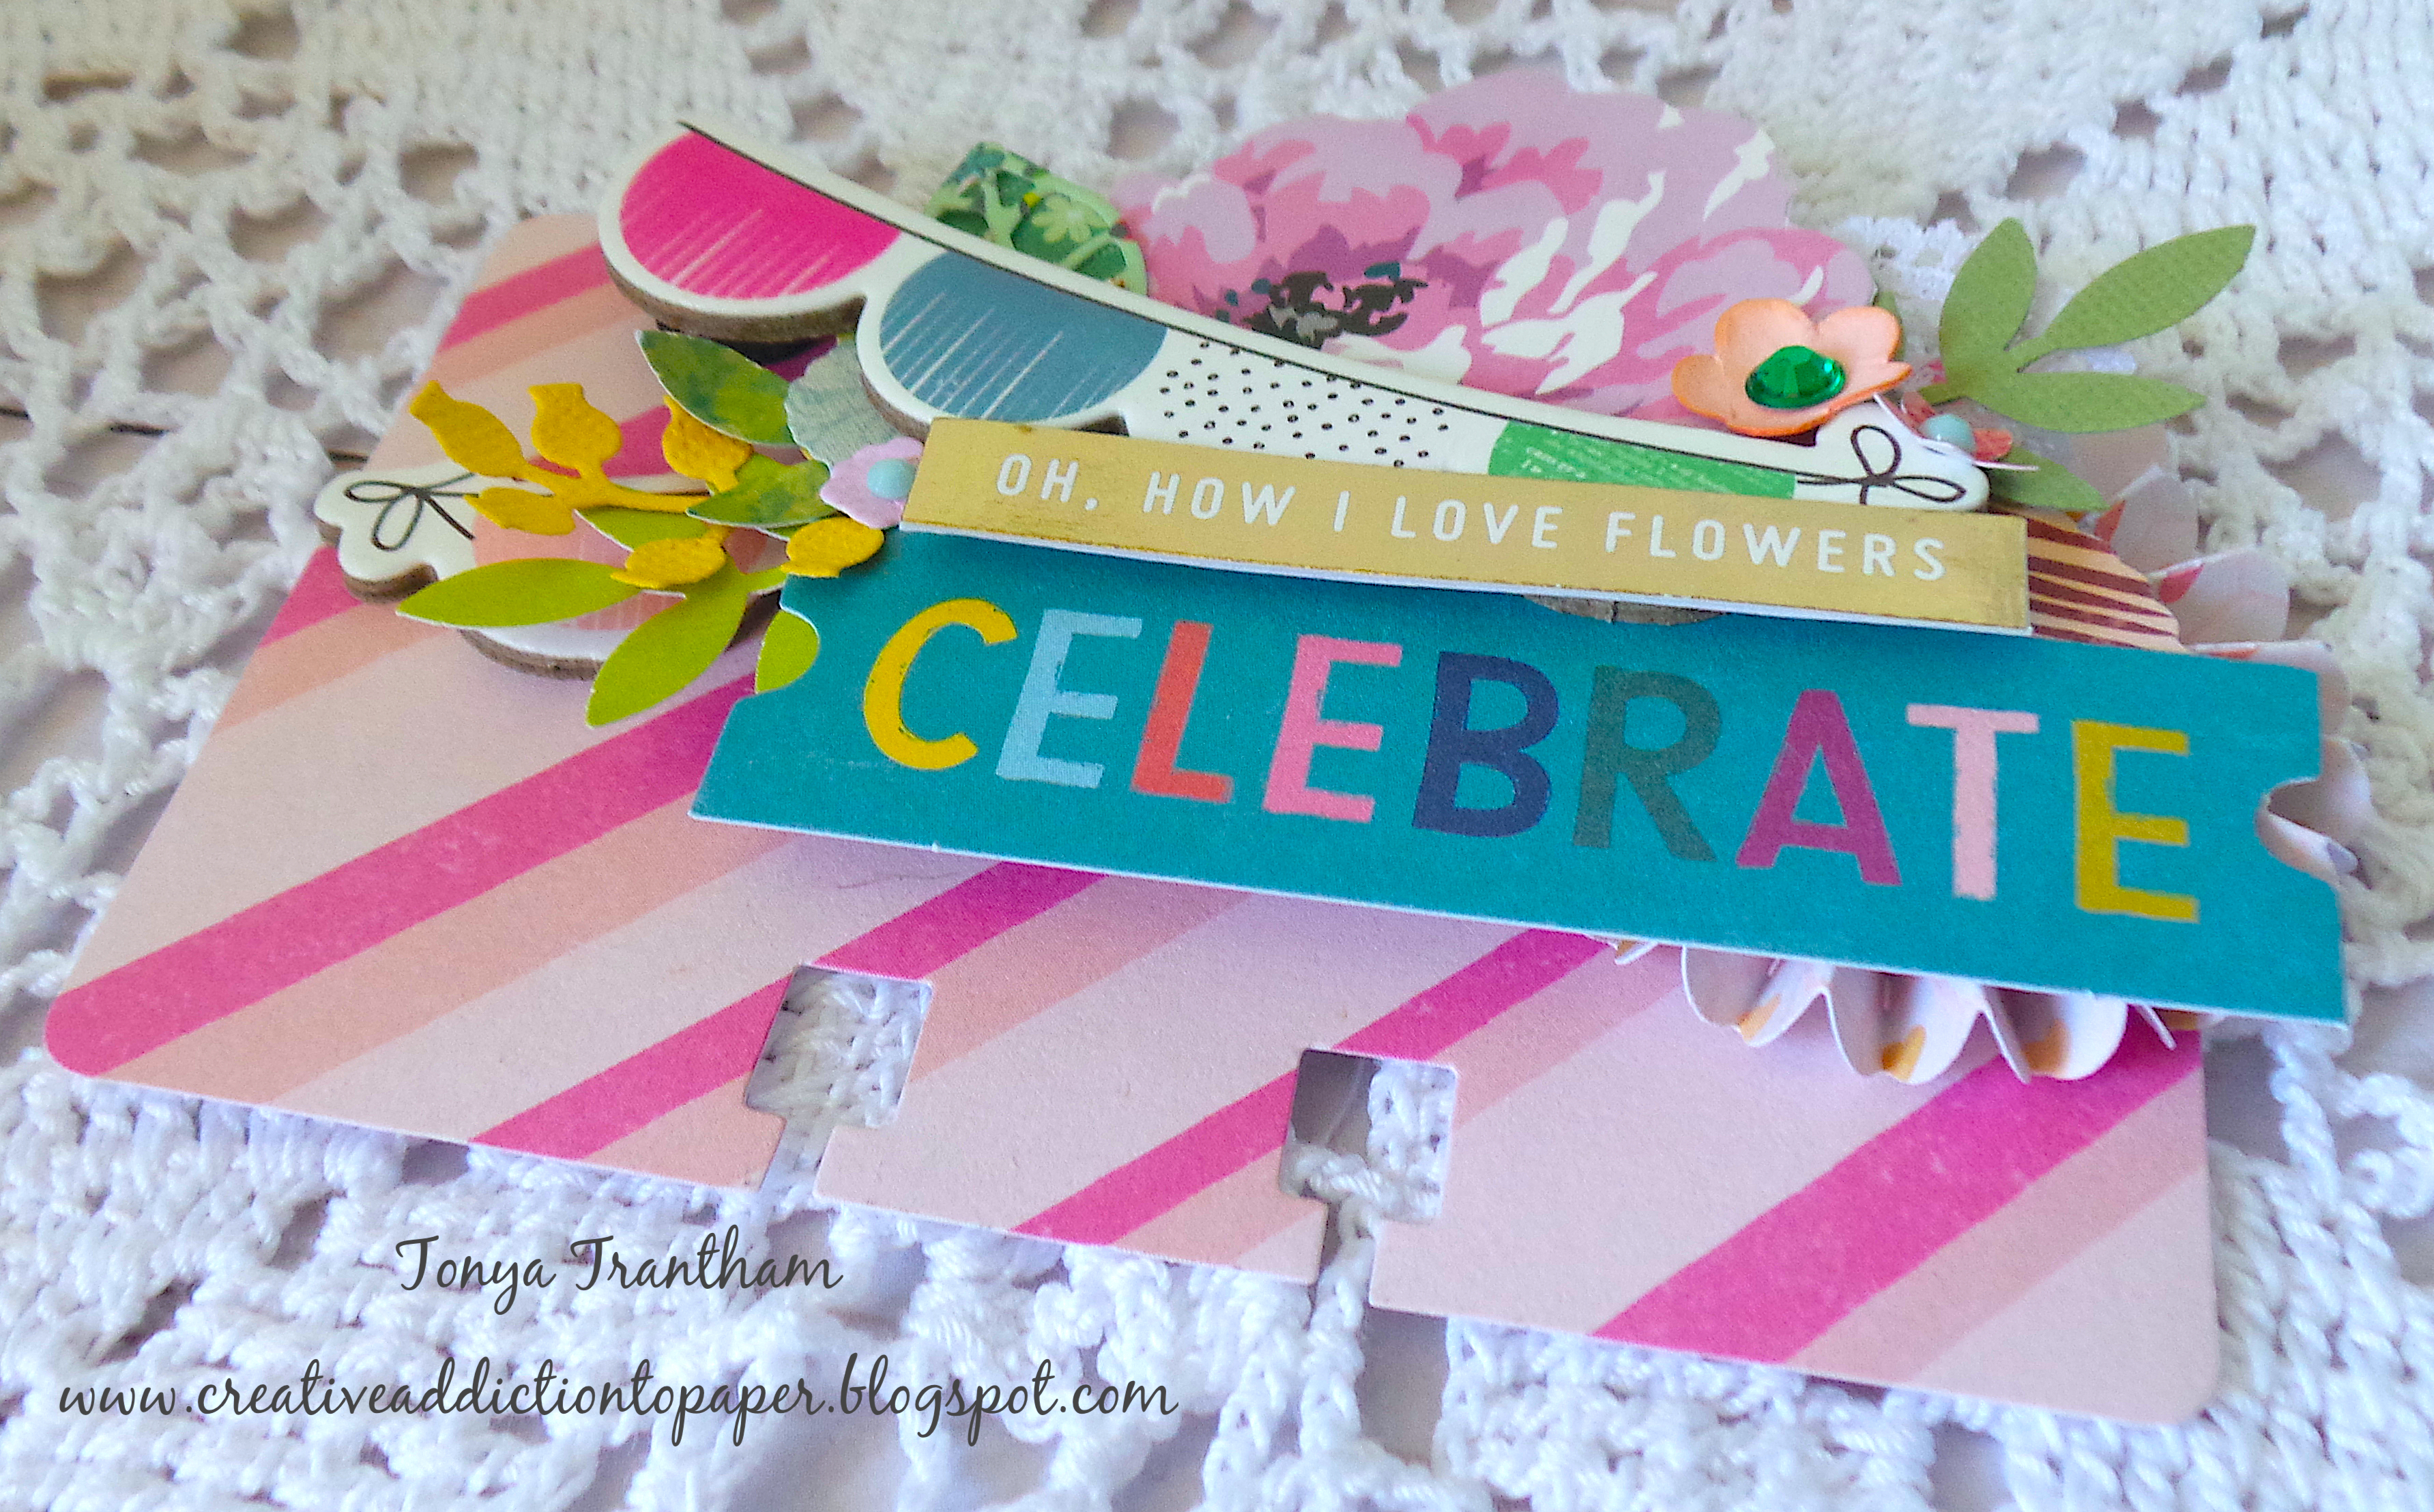
Oh, How I Love Flowers Rolodex Card

Hey everyone! I'm back with another quick project I created for the Easter Swap I was in awhile back. I used a Rolodex Diecut that I had purchased from Stampin' Up! several years ago(retired). But there are Memorydex diecuts that can be used instead and you can find those diecuts HERE and HERE.


I did a lot of layering with what I had on hand in my stash. I started by adding a Medallion Diecut (retired) to the corner of the rolodex card. I know you can barely see it but it was how I built up the layering on the card. 


I cut a chipboard banner in to and placed next to the medallion diecut and the other half of the banner I placed on top of the medallion. I added Foam Pop Dots to the other end of the banner. I backed a flower sticker with cardstock and fussy cut and added behind the banner. I placed flowers and leaves diecuts from my stash also to the card.


I finished off by adding two sentiments from my stash to complete the rolodex card. As always if you have any questions about this project please let me know.


Supplies

Various Patterned Cardstocks
Beacon Adhesive: Zip Dry Adhesive
Stickers, Chipboard Banner, Various Floral and Leaves Diecuts
Gems 

(Products listed above are Affiliated Links for your convenience)

DISCLAIMERS
This blog is compensated to provide opinion on products, services, websites, and various other topics. Even though the owner(s) of this blog receives compensation for our posts or advertisements. I always give my honest opinions, findings, beliefs, or experiences on those topics or products. The views and opinions expressed on this blog are purely my own. Any product claim, statistic, quote or other representation about a product or service should be verified with each manufacturer, provider, or party in question.This blog contains affiliate links, clicking and shopping through these links helps to support and run Tonya Trantham Designs - Creative Addiction to Paper Blog at no additional cost to you. Today's features are Scrapbook.com Products. 


Thanks for stopping by, hope your Friday is awesome and enjoy creating!


Thursday, June 11, 2020

Floral Spring House Rolodex


Hi everyone! I'm back again with a project I created for a swap I was in! For this swap we had to create three rolodex/memorydex cards plus decorate a small basket for Easter...I know Easter was several months ago. 😁 The swap was put on hold for about a month because of Covid19 and once everything started opening back up a new date was set for the swap. Well, by this time I got behind and I am just now getting caught up with my extra curricular projects.


I have an old Rolodex Diecut that I had purchased from Stampin' Up a very long time ago that I used to cut out my rolodex blanks. You can use store bought rolodex cards or here are links to Heidi Swapp's Memorydex Card Diecuts HERE and HERE.


I used Brenda Walton's Country Cottage 3D Diecut, Floral Tapestry Embossing Folder and Eileen Hull's Make It 3D Diecut (all retired) to created the house for the rolodex card. I used Chipboard that I covered in patterned cardstock to created the house and I also backed the rolodex with chipboard as well. I wanted the house diecut to be "thinner" than the original so I cut only the front and back and used the Make It 3D diecuts for the sides and then adhered to the rolodex card base.


I dug into my stash of flowers, leaves and butterfly punches and added those to the roof along with thread, trim and a gem for the center of the flower.


On the corner of the rolodex I adhered more flowers, thread and cheese cloth. And there you have it! The first rolodex of three that I have created. I will be back soon to share the other two rolodex cards. If you have any questions about this project please let me know.


Supplies

Heidi Swap: Memorydex Cards One and Two
Sizzix/Brenda Walton: Country Cottage 3D Diecut (retired)
Sizzix/Brenda Walton: loral Tapestry Embossing Folder (retired)
Sizzix/Eileen Hull: Make It 3D Diecut (retired)
Various Patterned Cardstocks
Beacon Adhesives: Zip Dry Adhesive
Flower, Butterfly and Leaf Spring Punches
Trim
Thread
Gems
Cheese Cloth
Pearl Sprays

(Products listed above are Affiliated Links for your convenience)

DISCLAIMERS
This blog is compensated to provide opinion on products, services, websites, and various other topics. Even though the owner(s) of this blog receives compensation for our posts or advertisements. I always give my honest opinions, findings, beliefs, or experiences on those topics or products. The views and opinions expressed on this blog are purely my own. Any product claim, statistic, quote or other representation about a product or service should be verified with each manufacturer, provider, or party in question.This blog contains affiliate links, clicking and shopping through these links helps to support and run Tonya Trantham Designs - Creative Addiction to Paper Blog at no additional cost to you. Today's features are Scrapbook.com Products. 


Thanks for stopping by, hope your Friday is great and enjoy creating!


Thursday, May 21, 2020

Designer Crafts Connection: Petal Paper Flowers Tag

Hi everyone! I am so excited to be a part of the Designer Crafts Connection group blog hop this month that is sponsored by DCWV. 
DCWV has been a long-time producer of the stack-a set of coordinated papers. Stacks have been made in so many themes and colors over the years. Happy members of the American Crafts family of products, they continue their pursuit of serving the consumer and their crafty needs with new paper stacks releasing several times a year in updated themes and colors. You can find them online and in a variety of craft stores.


Each designer received a package of Petal Paper by DCWV which can be found at Joann's in store or online. I knew that DCWV produced the stacks but had no idea that they had a line of different colored crepe papers? Who knew? I received a package of yellow and orange petal papers and knew I had to grab some diecuts and make flowers out of this.  


I folded the paper several times and placed the flower diecuts on top of the Petal Paper and run through the diecut machine.


I added a drop of adhesive to the center of each flower diecuts, placed on top of each other and pinched in the center and shaped.


Next I inked up my glass tray and added a little water to each ink. I randomly painted a tag and once dry placed in the Fractal Embossing Folder and run through the diecut machine. I lightly inked over the edges and raised areas of the tag with a blue chalk ink. 


I raided my stash and added a frame diecut and banners I created from cardstock to the tag. I adhered the flowers, leaves and leaf sprigs to the upper and lower corners of the frame diecut.


I also glued thread and cording bows, buttons, a heart shaped gem and a bit of lace to the flowers.


I placed two cute little girls paper dolls to the tag. I also applied an adhesive sheet to the piece of cardstock before cutting out a hello diecut and placing over the little girls. I finished off by adding sequins, pearls and a ribbon bow to the top of the tag.


You can find more ideas HERE.


Supplies Used 

Beacon Adhesive: Zip Dry Adhesive 
Tag
Various Inks 
Chalk Ink
Various Patterned Cardstocks
Lace
Ribbon
Cording 
Thread
Sequins
Pearls
Buttons

(Products listed above are Affiliated Links for your convenience)

DISCLAIMERS

This blog is compensated to provide opinion on products, services, websites, and various other topics. Even though the owner(s) of this blog receives compensation for our posts or advertisements. I always give my honest opinions, findings, beliefs, or experiences on those topics or products. The views and opinions expressed on this blog are purely my own. Any product claim, statistic, quote or other representation about a product or service should be verified with each manufacturer, provider, or party in question.This blog contains affiliate links, clicking and shopping through these links helps to support and run Tonya Trantham Designs - Creative Addiction to Paper Blog at no additional cost to you. Today's features are DCWV, Joann's, Scrapbook.com Products. 


Thanks for stopping by, hope your Thursday is great and enjoy creating!


Thursday, August 15, 2019

Bouquet Pocket Tag

Hi everyone! I am here with my second Momenta project for the month! Since I love creating tags I decided I would try my hand at making a pocket tag. Plus I had been sick with a stomach bug and about all I could do was lay around and fussy cut flowers and leaves out from the Peony Paper Pad. 😖


I started by cutting a tag, 6.25"x3.25", from one of the cardstocks from the Watercolor Metallic Paper Pad. Next I cut a piece of polka dot metallic cardstock from the same paper pad 4"x3.25" and used a scalloped punch on the 3.25" end. I "curled" the scalloped side down and adhered to the tag.


I fussy cut several leaves and flowers from the Peony Paper Pad.


Before adding the assortment of flowers and leaves I shaped several with a Stylus to give them a little dimension. 


I adhered a piece of lace behind one of the flowers and I added several loops of thread to the pocket too.


 I added sequins to the center of  two fo the flowers and a little glitter glue on the rest of the flowers. 
Beside finding Momenta on their website which can be found HERE. You can find Momenta also on:FacebookInstagram and Twitter.


Supplies

Scalloped Edge Punch
Beacon Adhesive: Zip Dry Adhesive 
Lace
 Thread
Sequins
Glitter Glue

(Products listed above are Affiliated Links for your convenience)


Thanks for stopping by, hope your Thursday is wonderful and enjoy creating!


Friday, June 28, 2019

Bridal Shower Love Card

Hi everyone! I'm back with my project this month for Eileen Hull! I know I am cutting it close this month...YIKES!!! 😳


I started by cutting a piece of black cardstock and folded in half to create a 6"x6" card base. I cut another piece of patterned cardstock slightly smaller than the card base along with flocked paper, part of a doily and lace which I adhered all to the card base. Next I inked my glass tray with the following Blends 2 Inks: Melon, Tutu, Sunshine, Frog, Wildberry and Leaf Inks. You can find these inks in Eileen Hull's etsy store HERE. I added water to each ink and laid flowers and leaves that I had cut from the Flowers and Leaves Journaling Cards Diecuts ( these I cut from Crinoline Fabric). And once I had them completely covered I removed and let dry.


I had a wooden "love" sentiment in my stash and inked with Coconut Blends 2 Ink (this can be found in Eileen's etsy shop also).


While the sentiment was still wet I applied Eileen's new Glistening Glass Molten Dimensions and set with a Heat Tool.


 I glued the sentiment to the bottom corner of the card. I added adhesive to the center of each flower and pinched in the center and "fluffed". I adhered leaves to each flower before added to each side of the love sentiment.


I added a bit of tulle and thread to finish the card. Now all I need to do is add a gift card and my bridal gift is complete! Be sure to stop by Eileen's blog and see what the rest of the Inspiration Team has been up to! You can find those posts HERE and HERE. As always if you have any questions please let me know.


Supplies

Beacon Adhesive: Zip Dry Adhesive
Tulle
Thread
Crinoline Fabric
Cardstock
Doily
Lace

(Products listed above are Affiliated Links for your convenience)


Thanks for stopping by, hope your Friday is wonderful and enjoy creating!


Wednesday, May 29, 2019

Doilies and Flowers Drawer

Hi everyone! I back with another project in the same week for Eileen Hull!  I used the Stacking Drawer Diecut, Flowers and Leaves Journaling Cards Diecuts and Eileen's new Easy Cut Adhesive Sheets which are perfect for this type of project!


I started by applying the Adhesive Sheet to the Chipboard and adding the patterned cardstock (both sides) from the Best of Jillibean Soup Paper Pad (I think the paper pad is retired) before placing it on top of the Stacking Drawer Diecut and running it through the Diecut Machine. I put it together according to the directions on the packaging.


I cut flowers and leaves from the same paper pad using the Flowers and Leaves Journaling Cards Diecuts and shaped with a StylusI fussy cut two doilies from one of the cardstocks and two strips of patterned cardstock.


 Before adhering the strips of patterned cardstock around the cover I added cording, long enough to tie into a bow, around one side of the cover. I glued the doilies on top of along with the flowers, leaves and bows I made out of sewing thread. To finish off the flowers I added glossy dots and sequins to the center of each flower.


I dressed up the inside of the drawer with pink trim...I made a couple of mistakes which I won't point out...that covered those and no one is the wiser. 😬


I packed all sorts of goodies inside since this is for a swap I am in...I should have taken a photo of all the things before packing it I know. But if I had unpacked it I would have never got it all fit back in the drawer. 😳  Be sure to hop on over to Eileen's blog and see what the rest of the Inspiration Team has been up to. You can find this month's blog posts HERE and HERE.


SUPPLIES:

Sizzix/Eileen Hull: Stacking Drawer Diecut
Eileen Hull: Easy Cut Adhesive Sheets
Beacon Adhesive: Zip Dry Adhesive 
Jillibean Soup: Best of Jillibean Soup Paper Collection
Cording
Thread
 Pink Trim
Glossy Dots 
Sequins

(Products listed above are Affiliated Links for your convenience)


 Thanks for stopping by, hope your Wednesday is great and enjoy creating!