Showing posts with label Gems. Show all posts

Friday, December 6, 2024

From Recycled Amazon Mailer to Gift Bag

 Hi everyone! I want to share a sneak peek of my latest project! I recycled an Amazon Mailer and turned it into a gift bag to use for Christmas. You can find the complete blog post HERE.


Thanks for stopping by, hope your Friday is wonderful and enjoy creating! 


Friday, June 26, 2020

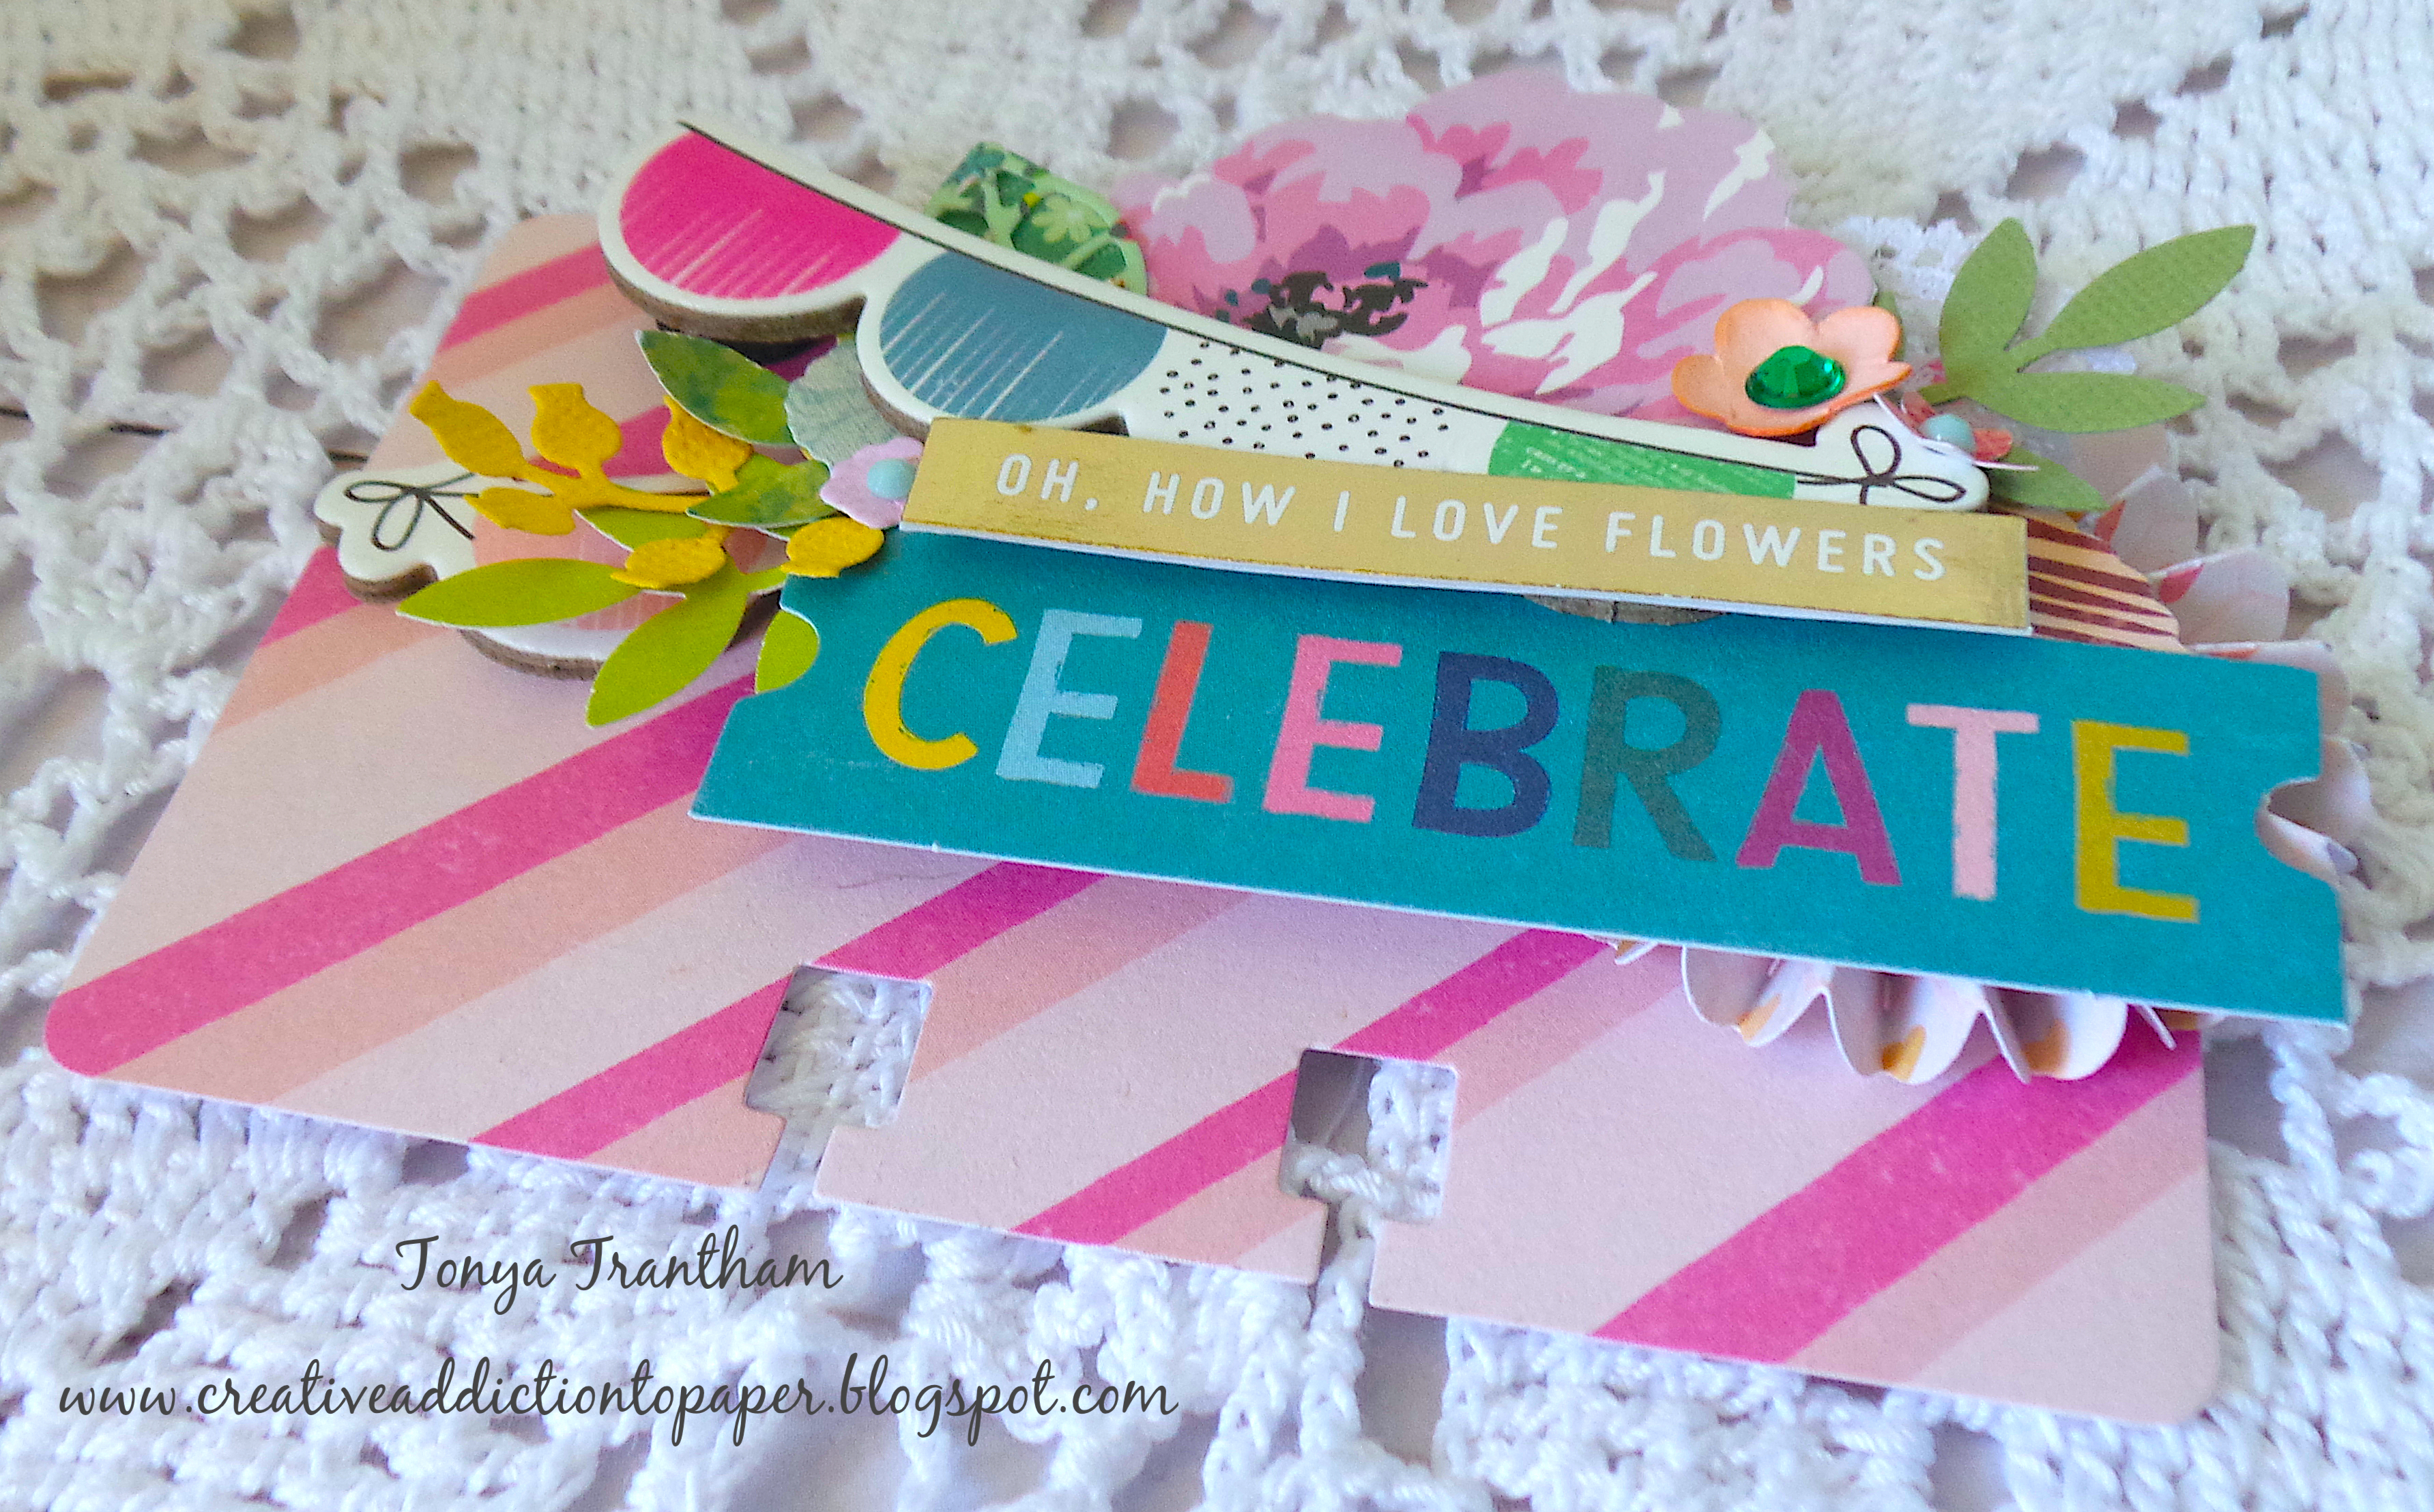
Oh, How I Love Flowers Rolodex Card

Hey everyone! I'm back with another quick project I created for the Easter Swap I was in awhile back. I used a Rolodex Diecut that I had purchased from Stampin' Up! several years ago(retired). But there are Memorydex diecuts that can be used instead and you can find those diecuts HERE and HERE.


I did a lot of layering with what I had on hand in my stash. I started by adding a Medallion Diecut (retired) to the corner of the rolodex card. I know you can barely see it but it was how I built up the layering on the card. 


I cut a chipboard banner in to and placed next to the medallion diecut and the other half of the banner I placed on top of the medallion. I added Foam Pop Dots to the other end of the banner. I backed a flower sticker with cardstock and fussy cut and added behind the banner. I placed flowers and leaves diecuts from my stash also to the card.


I finished off by adding two sentiments from my stash to complete the rolodex card. As always if you have any questions about this project please let me know.


Supplies

Various Patterned Cardstocks
Beacon Adhesive: Zip Dry Adhesive
Stickers, Chipboard Banner, Various Floral and Leaves Diecuts
Gems 

(Products listed above are Affiliated Links for your convenience)

DISCLAIMERS
This blog is compensated to provide opinion on products, services, websites, and various other topics. Even though the owner(s) of this blog receives compensation for our posts or advertisements. I always give my honest opinions, findings, beliefs, or experiences on those topics or products. The views and opinions expressed on this blog are purely my own. Any product claim, statistic, quote or other representation about a product or service should be verified with each manufacturer, provider, or party in question.This blog contains affiliate links, clicking and shopping through these links helps to support and run Tonya Trantham Designs - Creative Addiction to Paper Blog at no additional cost to you. Today's features are Scrapbook.com Products. 


Thanks for stopping by, hope your Friday is awesome and enjoy creating!


Tuesday, May 12, 2020

Itty Bitty Mini Junk Journal with i-crafter


Hi everyone! Today over on the i-crafter's blog I share how I created this tiny little junk using diecuts and the new Geometric Dimensional Dome. You can find the link to the blog post HERE. I've also included a more detailed supply list of the products I used below.


Supplies

i-crafter: i-Clik Pick
Patterned Cardstock and Butterfly Images
Sequins
Seed Beads
Gems, Buttons, Charms
Trim, Lace, Pom Pom Trim, Ric Rac
Beacon Adhesive: Zip Dry Adhesive
Needle and Thread

(Products listed above are Affiliated Links for your convenience)

DISCLAIMERS

This blog is compensated to provide opinion on products, services, websites, and various other topics. Even though the owner(s) of this blog receives compensation for our posts or advertisements. I always give my honest opinions, findings, beliefs, or experiences on those topics or products. The views and opinions expressed on this blog are purely my own. Any product claim, statistic, quote or other representation about a product or service should be verified with each manufacturer, provider, or party in question.This blog contains affiliate links, clicking and shopping through these links helps to support and run Tonya Trantham Designs - Creative Addiction to Paper Blog at no additional cost to you. Today's features are i-crafter and Scrapbook.com Products.  


Thanks for stopping by, hope your Tuesday is wonderful and enjoying creating!


Tuesday, May 5, 2020

Hot Pink Floral Extended Mini Book Case

Hi everyone! I wanted to share a project I created using Eileen Hull's newest Tiny Book Case Diecut with a fun added "twist"!


After applying an Adhesive Sheets to both sided of a piece of Chipboard I added patterned cardstock to each side, placed the diecut on top and run through the Diecut Machine. As in the photo below you can see where I cut an extra set of "flaps". 


I adhered the "extra set" of flaps to the front of the case.


I also glued the bottom halves and the lid together.


I cut strips of patterned cardstock the same size as the outside and inside of the case and adhered to give it a cleaner look. 


I cut cording and tied to the closure and added a button, sequin and gem to the center of the closure.


I added an assortment of flowers and leaves, handmade and store bought, to the top of the lid along with lace, cheese cloth, thread bows and pearl sprays.


There you have it! I absolutely LOVE this bookcase diecut and how versatile this diecut is! 


For more inspiration stop by Eileen's blog to see the latest projects from the rest of team! You can find the latest blog post HERE. As always if you have any questions about this project please let me know.


 Supplies

Eileen Hull/Sizzix: Tiny Book Case Diecut
Beacon Adhesive: Zip Dry Adhesive
Lace
Cheese Cloth
Thread
Flowers
Pearl Sprays
Sequins
Elastic Cording
Button

(Products listed above are Affiliated Links for your convenience)

DISCLAIMERS

This blog is compensated to provide opinion on products, services, websites, and various other topics. Even though the owner(s) of this blog receives compensation for our posts or advertisements. I always give my honest opinions, findings, beliefs, or experiences on those topics or products. The views and opinions expressed on this blog are purely my own. Any product claim, statistic, quote or other representation about a product or service should be verified with each manufacturer, provider, or party in question.This blog contains affiliate links, clicking and shopping through these links helps to support and run Tonya Trantham Designs - Creative Addiction to Paper Blog at no additional cost to you. Today's features are Eileen Hull, Sizzix and Scrapbook.com Products. 


Thanks for stopping by, hope your Tuesday is great and enjoy creating!


Saturday, January 4, 2020

Let it Snow Tag

Hi everyone! I am back after a little break from the holidays with my first project of the new year for Momenta! This tag takes no time to create. Maybe 30 to 45 minutes at the most but lets get started!


I started by placing a tag into the Let it Snow Embossing Folder and run through the Freestyle Die Cutting and Embossing Machine.


Next I inked three Art Daubers with the inks from the Blue to Teal Ombre Pigment Ink Pad and inked over the embossed image and edges of the tag.


I cut one Intricate Snowflakes Diecut from mint cardstock and cut three of the snowflakes from the diecut.


Next I cut one snowflake and two of the tiny star bursts in a light blue cardstock from the Let it Snow Embossing Folder and Diecuts and lightly inked the edges of all the diecuts. 


I placed Foam Pop Dots behind the snowflake and star burst dies before placing onto the tag. 


I adhered the three intricate snowflakes dies randomly on the tag along with sequins and gems.


I finished the tag by tying ribbon into a bow at the top of the tag and called it finished! 


As always if you have questions about this project please let me know.  
If you aren't following Momenta on their different social medias you can find them at:
twitter  
YouTube  


Supplies:

Momenta: Let it Snow Embossing Folder and Diecuts
Momenta: Intricate Snowflakes Diecut
Cardstock
Beacon Adhesive: Zip Dry Adhesive
Light Blue Gems
Ribbon
Sequins
(Products listed above are Affiliated Links for your convenience)

DISCLAIMERS
This blog is compensated to provide opinion on products, services, websites, and various other topics. Even though the owner(s) of this blog receives compensation for our posts or advertisements. I always give my honest opinions, findings, beliefs, or experiences on those topics or products. The views and opinions expressed on this blog are purely my own. Any product claim, statistic, quote or other representation about a product or service should be verified with each manufacturer, provider, or party in question.This blog contains affiliate links, clicking and shopping through these links helps to support and run Tonya Trantham Designs - Creative Addiction to Paper Blog at no additional cost to you. Today's features are Momenta Products. 


Thanks for stopping by, hope your Saturday is wonderful and enjoy creating!


Thursday, August 8, 2019

Count Every Beautiful Thing Tag

Hi everyone! I'm back today and wanted to share this colorful and slightly quirky tag I created using Eileen Hull's Blends Inks.


I started by inking my glass tray with Sunshine and Melon Blends Inks, adding water and placing the tag into the ink mixture. Once the tag was completely covered I removed and let dry. I inked the Ornate Border Molding Mat with Berry Pigment Ink from the Mermaid Paintbox Collection and randomly inked over the tag.


I inked the Doll Faces Rollagraph with Wicked Black Premium Dye Ink, rolled onto a piece of Watercolor Paper  and cut out the face of girl looking straight ahead. I inked the Butterfly Wooden Stamp with Wicked Black Premium Dye Ink and stamp onto a piece of watercolor paper. Again I inked the glass tray with following Taos Petal Point: Amber and the Mermaid Paintbox Papaya Cream and Berry Inks. I added water and painted the butterfly image with ink mixtures and let dry. I fussy cut the butterfly image out, cut down the middle, added Clear Glitter Glue around outer edge of butterfly and once dry I adhered the butterfly wings, one on either side of the face image. 


I placed Watercolor Paper  on the Long Classic Scalloped Rectangle Large Diecut, placed between the cutting plates and run through the Diecut MachineBefore cleaning the glass tray I randomly placed the scalloped rectangle diecut into the leftover ink mixture from butterfly. Then removed and let dry. Next I inked the glass tray with Sunshine Blends Ink, added water, placed the scalloped rectangle diecut into the ink mixture and once completely covered with  the ink mixture I removed and let dry. I inked the Ornate Border Molding Mat with Amber Pigment Ink from the Taos Petal Point Collection and stamped onto the scalloped rectangles diecut.  


I placed the "Play in the Sun" stamp onto the MISTI Stamping Tool and inked with Wicked Black Premium Dye Ink and stamped onto the lower half of the scalloped rectangle diecut. Next I inked two leaves from a leaf sprig punch with Turtle Pigment Ink and once dry adhered next to the word 'thing" along with sequins and a gem.


I placed vellum on top of the Delightful Circles Diecuts  placed between cutting plates and run through the diecut machine. I adhered to the backside of the scalloped rectangle diecut and then adhered to the tag.


I added Foam Pop Dots to the back of the butterfly face image before placing above the stamped sentiment.


I finished by adhering lace to the bottom of tag and adding a button, sequin, gem at bottom corner of tag and tying a bow at the top of the tag. I hope you like this tag as much as I enjoyed creating it. Also if you have any questions about this project please let me know.


Supplies

ColorBox/Eileen Hull: Sunshine Blends Ink
ColorBox/Eileen Hull: Melon Blends Ink
ColorBox: Jumbo Design Wheel and Handle
ColorBox: Doll Faces Rollagraph
ColorBox: Ornate Border Molding Mat
ColorBox: Butterfly Wood Stamp
ColorBox: Taos Petal Point Collection: Turtle and Amber Pigment Inks
ColorBox: Mermaid Paintbox Collection: Papaya Cream and Berry Pigment Inks
ColorBox: Wicked Black Premium Dye Ink
Paint Brush
Glass Tray
Clear Glitter Glue
Spellbinders: Long Classic Scalloped Rectangles Large Diecuts
Spellbinders Nestabilities: Delightful Circles Diecuts
Tag
Pink Ribbon
Sequins
Gems
Unity Stamps/Authentique: Play in the Sun Stamp

MISTI Stamping Tool
White Cardstock
Scissors
Buttons
Watercolor Paper 
Lace
Vellum
Leaf Sprig Punch
Foam Pop Dots
Diecut Machine
Beacon Adhesive: Zip Dry Adhesive


(Products listed above are Affiliated Links for your convenience)


Thanks for stopping by, hope your Thursday is wonderful and enjoy creating!


Saturday, July 6, 2019

Stars on the 4th of July Card

Hi everyone! If you celebrated Independence Day like me and my family I hope you had a great time. Mine was spent lounging in the pool or on the lounge chair reading with a little eating on the side. 😎 I want to share a 4th of July card I created for Momenta.


I started by cutting and folding a piece of cardstock (retired Momenta 12"x12" Basic Paper Pad Collection) 5 1/2"x4 1/4" to create the base for the card. I selected a piece of blue cardstock from the Gemstones 8"x8" Paper Pad and with the Star Confetti Metal Die Template I cut out one diecut. I adhered a piece of white cardstock to the back of the diecut before adding Foam Pop Dots and placing on the card base.


I used a 2" Watercolor Doily but flipped it over on the back since it was white and adhered to the corner of the diecut. 


From the same blue cardstock I cut the number 4 with the Numbers Cut and Emboss Template and adhered to the doily. I cut the word July from red cardstock from the Metallic Paper Pad using the Months of the Year Cutting Template.


I finished the card by adding sequins, gems and a red twine bow to the card. Be sure to stop by Momenta's website to see the latest projects! You can find their site HERE. As always if you have any questions about this card please let me know.

I would also like to submit this card for the following challenge:
Word Art Wednesday Anything Goes: #394-#395


SUPPLIES

Beacon Adhesive: Zip Dry Adhesive
Sequins
Red Gems
Red Twine

(Products listed above are Affiliated Links for your convenience)


Thanks for stopping by, hope your Saturday is awesome and enjoy creating!