Showing posts with label ColorBox Blends. Show all posts

Monday, September 30, 2019

Wreath Full of Posies Tag

Hi everyone! I want to share a tag that I hadn't got around to sharing that I created for ColorBox. I had actual started this tag several months ago. If I ink up my glass tray and I have leftover inks I just grab a blank tag and place it in the mixture. If it isn't covered I continue to place the tag into any leftover ink until I have it completely covered.


The tag has a mix of the following inks on it: Wildberry, Sunshine and Frog Blends Inks. I inked the Simple Dots Rollgraph with Tahiti Dyestress Blendable Dye Ink and rolled onto the tag.


I inked the Wreath Wood Stamp with Wicked Black Archival Dye Ink and stamped onto a piece of Watercolor PaperI started by inking a glass tray with the following Dyestress Blendable Dye Inks, adding water and painting the following parts of the stamped wreath: Inchworm leaves and shade with Moss. Flowers-AsterMulberryBumble BeeSalmon and Princess and let dry. I placed the doily stamp from the Cookies Clear Stamps onto the MISTI Stamping Tool inked the stamp with Wicked Black Archival Dye Ink and stamped onto a piece of watercolor paper. Next I inked the glass tray with Mint Dyestress Blendable Dye Ink  added water and painted the stamped doily. Once dry I fussy cut the doily out and adhered to tag.


I fussy cut the wreath out adhered to the tag, added sequins and gems to the flowers on the wreath. I finished by adhering a scrap of lace and ric rac to the bottom of the tag. I also added three glossy dots above ric rac and a seam binding bow to top of tag. As always if you have any questions about this project please let me know.


Supplies

ColorBox/Eileen Hull: Wildberry Blends Ink 
ColorBox:/Eileen Hull: Sunshine Blends Ink 
ColorBox/Eileen Hull: Frog Blends Ink
ColorBox: Wreath Wood Stamp
ColorBox: Simple Dots Rollagraph 
ColorBox: Rollagraph Handle
ColorBox: Cookies Clear Stamps
Beacon Adhesive: Zip Dry Adhesive
Sequins
Gems
Glossy Dots
Ric Rac
Lace 
Tag
Seam Binding
Glass Tray 
Watercolor Paper

(Products listed above are Affiliated Links for your convenience)


DISCLAIMERS

This blog is compensated to provide opinion on products, services, websites, and various other topics. Even though the owner(s) of this blog receives compensation for our posts or advertisements. I always give my honest opinions, findings, beliefs, or experiences on those topics or products. The views and opinions expressed on this blog are purely my own. Any product claim, statistic, quote or other representation about a product or service should be verified with each manufacturer, provider, or party in question.This blog contains affiliate links, clicking and shopping through these links helps to support and run Tonya Trantham Designs - Creative Addiction to Paper Blog at no additional cost to you. Today's features are ColorBox and Scrapbook.com Products. 


Thanks for stopping by, hope your Monday is awesome and enjoy creating!


Friday, September 13, 2019

Flower Baby Layout

Hi everyone! I'm back today after being gone on vacation! My husband and I spent an extra long weekend at the beach. It was fun but I have to admit that it was as hot if not hotter there in Panama City than at home. All we wanted to do was stay either in the ocean or pool the whole time we were outside...not that was a bad thing to do.😎
I want to share a layout I created from a photo of "Little Miss" when she was around a year old. 


I started by inking my glass tray with Melon and Sunshine Blends Inks , adding water to each ink and placing a 8"x8" piece of Watercolor Paper ( that I cut down to size) into the ink mixture. Once I had the paper covered I removed and let dry.


I adhered a paper doily with adhesive to the watercolor paper. 


I then placed the Swirl Dot Art Screen onto the watercolor paper and applied Matte Extra Heavy Gel with a Spatula . I removed the art screen and let dry. I inked three scraps of leftover watercolor paper with a mix of water and Sunshine Blends Ink (2 scraps of paper) and Leaf Blends Ink (1 scrap of paper). Once all were dry I adhered two of the watercolor papers horizontally to layout.


 Next I inked the glass tray with Wildberry Blends Ink, added water to the ink, loaded a paint brush with the ink mixture and splattered the watercolor paper. Also I added a piece of ric rac to the watercolor paper.


I inked the Botanical Mini Molding Mat with Leaf Blends Ink and stamped onto the inked Sunshine Blends scrap of watercolor paper. 


Once dry I adhered to the back corner of photo and glued both slightly off center of watercolor paper. 


I placed Crinoline Fabric on the flowers and leaves diecuts from the Book Mark, Tag and PocketJournaling Card, Flowers and Leaves Diecuts and Bookplate, Hinges and Label Diecuts and cut out one set of flowers and a leaf. I inked the glass tray with Wildberry, Frog and Sunshine Blends Inks, added water and placed the flowers in Wildberry and the leaf in Frog and one small flower into the Sunshine ink mixtures. Once completely covered I removed and let dry.


I add a brad to center of the flowers, adhered the leaf to back of the flower and to the lower corner of photo. Next I added several loops of green metallic thread to flower. I also added another flower to the top corner of the photo and adhered sequin to center of the flower. 


I inked a chipboard letter "B" with Sunshine Blends Ink an let dry. Next I inked the letter completely with Top Boss Embossing Stamp Pad Clear, applied Opalescent Embossing Powder to letter and set with a Heat Tool. I added a Foam Dots to back of letter and placed on the corner of the photo.


Even though the quality wasn't the greatest when I printed out this photo ( I just couldn't throw it away) I still think the layout turned out pretty cute! As always if you have any questions about this project please let me know. 


Supplies

ColorBox/Eileen Hull: Frog Blends Ink
ColorBox/Eileen Hull: Leaf Blends Ink
ColorBox/Eileen Hull: Sunshine Blends Ink
ColorBox/Eileen Hull: Wildberry Blends Ink
ColorBox/Eileen Hull: Melon Blends Ink
ColorBox: Swirl Dot Art Screen 
ColorBox: Botanical Mini Molding Mats
Glass Tray
Doily
Golden Artist Colors: Extra Heavy Gel (Matte)
Paint Brush
Chipboard letter B
Beacon Adhesives: Zip Dry Adhesive 
Crinoline Fabric
Sequin
Ric Rac
Green Metallic Thread
Brad

(Products listed above are Affiliated Links for your convenience)


Thanks for stopping by, hope your Friday is wonderful and enjoy creating!


Thursday, August 8, 2019

Count Every Beautiful Thing Tag

Hi everyone! I'm back today and wanted to share this colorful and slightly quirky tag I created using Eileen Hull's Blends Inks.


I started by inking my glass tray with Sunshine and Melon Blends Inks, adding water and placing the tag into the ink mixture. Once the tag was completely covered I removed and let dry. I inked the Ornate Border Molding Mat with Berry Pigment Ink from the Mermaid Paintbox Collection and randomly inked over the tag.


I inked the Doll Faces Rollagraph with Wicked Black Premium Dye Ink, rolled onto a piece of Watercolor Paper  and cut out the face of girl looking straight ahead. I inked the Butterfly Wooden Stamp with Wicked Black Premium Dye Ink and stamp onto a piece of watercolor paper. Again I inked the glass tray with following Taos Petal Point: Amber and the Mermaid Paintbox Papaya Cream and Berry Inks. I added water and painted the butterfly image with ink mixtures and let dry. I fussy cut the butterfly image out, cut down the middle, added Clear Glitter Glue around outer edge of butterfly and once dry I adhered the butterfly wings, one on either side of the face image. 


I placed Watercolor Paper  on the Long Classic Scalloped Rectangle Large Diecut, placed between the cutting plates and run through the Diecut MachineBefore cleaning the glass tray I randomly placed the scalloped rectangle diecut into the leftover ink mixture from butterfly. Then removed and let dry. Next I inked the glass tray with Sunshine Blends Ink, added water, placed the scalloped rectangle diecut into the ink mixture and once completely covered with  the ink mixture I removed and let dry. I inked the Ornate Border Molding Mat with Amber Pigment Ink from the Taos Petal Point Collection and stamped onto the scalloped rectangles diecut.  


I placed the "Play in the Sun" stamp onto the MISTI Stamping Tool and inked with Wicked Black Premium Dye Ink and stamped onto the lower half of the scalloped rectangle diecut. Next I inked two leaves from a leaf sprig punch with Turtle Pigment Ink and once dry adhered next to the word 'thing" along with sequins and a gem.


I placed vellum on top of the Delightful Circles Diecuts  placed between cutting plates and run through the diecut machine. I adhered to the backside of the scalloped rectangle diecut and then adhered to the tag.


I added Foam Pop Dots to the back of the butterfly face image before placing above the stamped sentiment.


I finished by adhering lace to the bottom of tag and adding a button, sequin, gem at bottom corner of tag and tying a bow at the top of the tag. I hope you like this tag as much as I enjoyed creating it. Also if you have any questions about this project please let me know.


Supplies

ColorBox/Eileen Hull: Sunshine Blends Ink
ColorBox/Eileen Hull: Melon Blends Ink
ColorBox: Jumbo Design Wheel and Handle
ColorBox: Doll Faces Rollagraph
ColorBox: Ornate Border Molding Mat
ColorBox: Butterfly Wood Stamp
ColorBox: Taos Petal Point Collection: Turtle and Amber Pigment Inks
ColorBox: Mermaid Paintbox Collection: Papaya Cream and Berry Pigment Inks
ColorBox: Wicked Black Premium Dye Ink
Paint Brush
Glass Tray
Clear Glitter Glue
Spellbinders: Long Classic Scalloped Rectangles Large Diecuts
Spellbinders Nestabilities: Delightful Circles Diecuts
Tag
Pink Ribbon
Sequins
Gems
Unity Stamps/Authentique: Play in the Sun Stamp

MISTI Stamping Tool
White Cardstock
Scissors
Buttons
Watercolor Paper 
Lace
Vellum
Leaf Sprig Punch
Foam Pop Dots
Diecut Machine
Beacon Adhesive: Zip Dry Adhesive


(Products listed above are Affiliated Links for your convenience)


Thanks for stopping by, hope your Thursday is wonderful and enjoy creating!


Friday, July 12, 2019

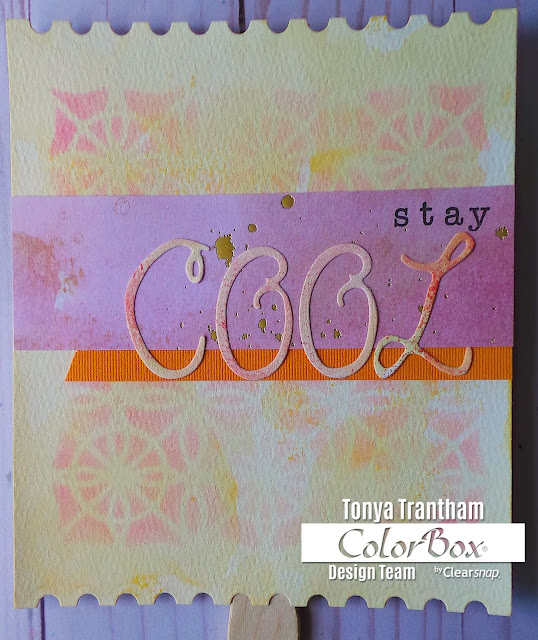
Stay Cool Fan

Hi everyone! I wanted to share a quick fan project I created! The weather has been HOT around here...mid to upper 90's and it's hard to stay cool so I thought I would create this fun fan using some of my ColorBox inks! 


I started by placing a piece of Watercolor Paper on top of the "Postage Stamp" looking diecut from the Creative Book Pages Diecuts. I placed between the cutting plates and run through the Diecut Machine. I cut off 1/2" on each side of diecut with a Paper Cutter. I inked the glass tray with Sunshine Blends 2 Ink  added water to ink mixture, placed the diecut in the ink mixture and once completely covered with ink removed and let dry.


I placed the Geometrics Art Screen on top of the diecut, inked an Art Dauber with Tutu Blends 2 Ink and applied over art screen. Then I removed the art screen and let dry.


Next I inked the following letter rubber stamps "stay" with Wicked Black Archival Dye Ink and stamped onto a piece of patterned cardstock. I cut cardstock to fit the fan and before adhering I cut a small banner from orange cardstock and glued both to fan.


I inked the glass tray with following Blends 2 Inks: Stop, Golden and Sunshine Blends 2 Inks, added water to each ink, laid a scrap of watercolor paper in the ink mixtures. Once the watercolor paper was completely covered I removed and let dry. 


I placed an Adhesive Sheet on the back side of watercolor paper and placed on top of following letter diecuts: C, O (cut 2) and L. Next I placed between cutting plates and run through the diecut machine. I removed the adhesive backing from letter diecuts and placed under the "stay" wording.


I finished by adhering a wooden paddle/stick to the fan. I know it is in no way a substitute for air conditioning but it does help a little to stir a breeze when you are hot and sweaty. Also this would be a fun craft to do with your children too. As always if you have any questions about this project please let me know.


SUPPLIES

ColorBox/Eileen Hull: Sunshine Blends 2 Ink
ColorBox/Eileen Hull: Tutu Blends 2 Ink
ColorBox/Eileen Hull: Stop Blends 2 Ink
ColorBox/Eileen Hull: Golden Blends 2 Ink
ColorBox: Art Daubers
Glass Tray
Sizzix: Funky Brush Sizzlits Diecuts (retired)
May Stamp Pegz: Lowercase Letters Set
Stick/Wooden Paddle
Patterned Cardstock Scraps
Beacon Adhesive: Zip Dry Adhesive

(Products listed above are Affiliated Links for your convenience)


Thanks for stopping by, hope your Friday is wonderful and enjoy creating!


Friday, June 14, 2019

Father's Day Mustache Container

Hi everyone! I am back again today with a quick and easy Father's Day project that I created using Blends 2 Inks, rubber stamp and a art screen! All you need is an empty container of your choice. 


I started by cleaning a container inside and out. I used an empty M and M container that I have received around Christmas. I also remove the labels on the outside and I used a little Goo Be Gone to get the sticky residue off. I placed Watercolor Paper on top of the Rectangle Border Diecut and placed in between cutting plates and run through the Diecut Machine. I cut out two diecuts to cover the front and back. I placed the lid from the container on top of watercolor paper and traced with a pencil onto the watercolor paper. Next I placed the Disco Art Screen 1 on top of rectangle diecut and loaded an Art Dauber with Beach Blends 2 Ink and applied over the art screen. I loaded another art dauber with Uniform Blends 2 Ink and apply lightly over screen. I completed the same steps for other rectangle diecut and lid and I inked around the edges of both diecuts and circle with Hydrangea Blends 2 Ink


I adhered both diecuts to container and circle to the top of lid.


I inked the Mustaches Wood Stamp with Wicked Black Archival Dye Ink and stamped onto White Cardstock  


I cut around the stamped image with a Paper Cutter  and inked an art dauber with Uniform Blends 2 Ink and ink edges of mustache tag. 


I adhered the stamped image to the corner edge of the diecut that is on the container. I made a bow from red seam binding and adhered to the diecut and mustache tag. And last but not least I filled it with yummy snack bars and candy. As always if you have questions about this project please let me know.


SUPPLIES

ColorBox/Eileen Hull: Hydrangea Blends 2 Ink
ColorBox/Eileen Hull: Beach Blends 2 Ink
ColorBox/Eileen Hull: Uniform Blends 2 Ink
ColorBox: Art Daubers
Beacon Adhesive: Zip Dry Adhesive
Red Seam Binding
Empty Container
Pencil

(Products listed above are Affiliated Links for your convenience)


Thanks for stopping by, hope your Friday is awesome and enjoy creating!