Saturday, June 1, 2019

Petite Floral Tea Light Altered Jar

Hi everyone and happy first day of June! I am back today with a quick project for Momenta. I created this tea light candle holder using an empty Yoplait petite Oui glass jar. I love the yogurt and I love the shape of these jars to the point where I have a small collection of them for crafting proposes. 😁


I peeled the label off and removed the sticky residue with soap and water...if that doesn't work I use Goof Off. From the Metallic Paper Pad I selected a peachy pink with gold flicks cardstock to use with the Border Intricate Flowers Metal Diecuts. I run the diecut through the Diecut Machine and cut two of the diecuts out. 


I adhered one whole and a half of the other diecut around the lip of the jar.


I selected a green paper doily from the 2" Doily Watercolor Package and adhered to the front of the jar.


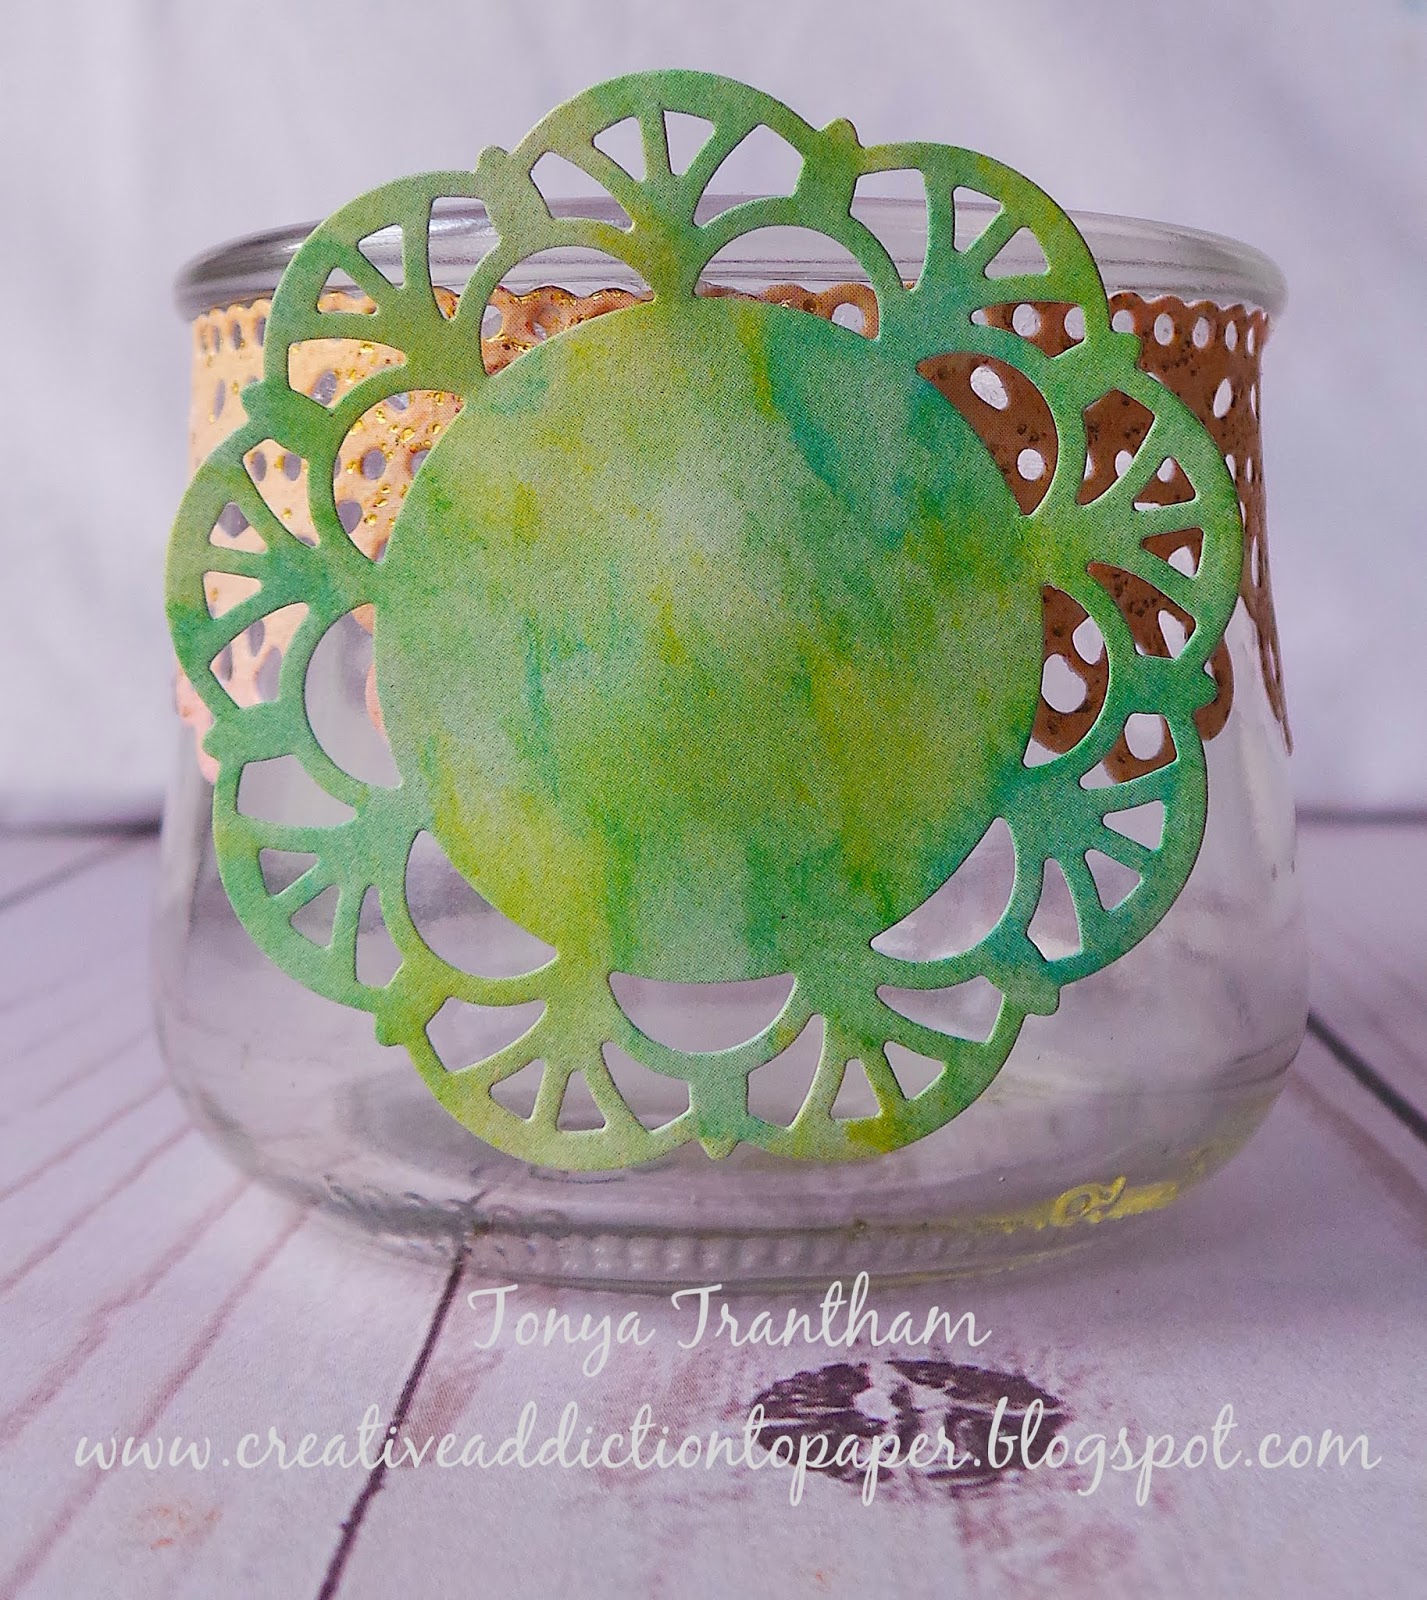
From the same peachy pink cardstock I punched a circle and adhered to the center of the doily. I cut a leaf and three flowers from the Cut and Emboss Floral Wreath Template. I shaped the flowers and leaf with a Stylus.


I adhered all three flowers and the leaf to the front of the jar along with several loops of thread. I also added a green gem to the center of the flower. I added a battery operated candle to the inside of the jar and it's finished! This would be perfect for decorating tables for a wedding don't you think? Be sure to stop by the Momenta DIY Project Page  for more inspiration!  As always if you have any questions about this project please let me know.


(Products listed above are Affiliated Links for your convenience)


Thanks for stopping by, hope your Saturday is awesome and enjoy creating!


Wednesday, May 29, 2019

Doilies and Flowers Drawer

Hi everyone! I back with another project in the same week for Eileen Hull!  I used the Stacking Drawer Diecut, Flowers and Leaves Journaling Cards Diecuts and Eileen's new Easy Cut Adhesive Sheets which are perfect for this type of project!


I started by applying the Adhesive Sheet to the Chipboard and adding the patterned cardstock (both sides) from the Best of Jillibean Soup Paper Pad (I think the paper pad is retired) before placing it on top of the Stacking Drawer Diecut and running it through the Diecut Machine. I put it together according to the directions on the packaging.


I cut flowers and leaves from the same paper pad using the Flowers and Leaves Journaling Cards Diecuts and shaped with a StylusI fussy cut two doilies from one of the cardstocks and two strips of patterned cardstock.


 Before adhering the strips of patterned cardstock around the cover I added cording, long enough to tie into a bow, around one side of the cover. I glued the doilies on top of along with the flowers, leaves and bows I made out of sewing thread. To finish off the flowers I added glossy dots and sequins to the center of each flower.


I dressed up the inside of the drawer with pink trim...I made a couple of mistakes which I won't point out...that covered those and no one is the wiser. 😬


I packed all sorts of goodies inside since this is for a swap I am in...I should have taken a photo of all the things before packing it I know. But if I had unpacked it I would have never got it all fit back in the drawer. 😳  Be sure to hop on over to Eileen's blog and see what the rest of the Inspiration Team has been up to. You can find this month's blog posts HERE and HERE.


SUPPLIES:

Sizzix/Eileen Hull: Stacking Drawer Diecut
Eileen Hull: Easy Cut Adhesive Sheets
Beacon Adhesive: Zip Dry Adhesive 
Jillibean Soup: Best of Jillibean Soup Paper Collection
Cording
Thread
 Pink Trim
Glossy Dots 
Sequins

(Products listed above are Affiliated Links for your convenience)


 Thanks for stopping by, hope your Wednesday is great and enjoy creating!


Tuesday, May 28, 2019

Wings and Things Notebook Planner

Hi everyone! I hope everyone had a wonderful long Memorial Day weekend! I did! I got to spend time with my son, daughter in law and grandson...I even got to watch Baby O while his mom and dad went out for the evening...that was fun. 😊 
Well, I would like to share my latest project with you all. Since I am in a swap on instagram I thought I would combined the swap with my project I created for Eileen Hull this month. 


I started by applying Eileen's newest product, Easy Cut Adhesive (Eileen's etsy shop is out at the moment but I went a head and tagged her shop which can be found HERE) to the Chipboard and then I picked cardstock for both the outside and inside covers from Crate Paper Chasing Dreams Paper Pad. I peeled the backing from the adhesive sheet and placed the cardstock on the cover. I did the same for the inside cover too. I then placed on top of the  Notebook Diecut and ran through the Diecut Machine. I cut the notebook in half at the "center fold" and then folded both of the small "flaps" down. I cut a two inch wide by five inch long piece of chipboard and then adhered the small flaps to either side of the 2"x5" of chipboard. I wanted to add more journals to the notebook and this was the perfect solution to extending the spine.


I cut and adhered a smaller piece of chipboard to fit between the flaps on the spine. 


I measured in 1/2 inch increments and marked the holes at the top and bottom of the spine.


I punched the holes in the top and bottom of the spine with a Crop-A-Dile. I cut cardstock and Easy Cut Adhesive to fit the spine. I applied the adhesive sheet to the cardstock and then placed on the spine. I punched over the holes again.


I decorated the cover with some past Crate Paper chipboard/embellishemnt pieces and fussy cut butterflies and leaves from one of the paper pads (retired).


Before adding elastic cording I added eyelets to the holes of the spine. I also added a mini envelope to the back cover. I only glued two of the sides down so notes and tags could be added behind the envelope.


I created a folder from a file folder and used an assortment of cardstock and stickers (Crate Paper) to decorate the cover.


I adhered pom pom trim to the inside edge and added sticky notes just in case my swap partner needs to jot down something.


This little notebook has blank pages in it and I thought it would be perfect to either draw or even do memory keeping in it. I decorated the cover with more cardstock and stickers.


The last two notebooks I bought in a pack of three at the Dollar Tree (you can find these notebooks in packs of two at Walmart). The size of these notebooks are 3.25"x4.5".


Like the other notebook and folder I decorated both sides with patterned cardstock, stickers, trim and chipboard/diecuts.


I slid all the notebooks and folder underneath the elastic cording.


I love how the pom pom trim looks from the side of the notebook planner! 😍 Also be sure to hop on over to Eileen Hull's blog and see what the Inspiration Team has been up to! You can find the posts for this month HERE and HERE.


As always if you have any questions about this project please let me know. 
I would also like to submit this project for the following challenge:

Word Art Wednesday: Anything Goes #388-#389


SUPPLIES:

Sizzix/Eileen Hull: Notebook Diecut
Sizzix: Diecut Machine
Hole Punch/Crop-A-Dile
Beacon Adhesive: Zip Dry Adhesive
Thread
Gems
Pom Pom Trim
Ric RacTrim

(Products listed above are Affiliated Links for your convenience)


Thanks for stopping by, hope your Tuesday is wonderful and enjoy creating!


Thursday, May 16, 2019

Memories Traveler's Notebook Cover

Hi everyone! I am back with my second blog post of the month for Momenta! I'm big into planners and I love that Momenta has an assortment of travelers notebooks for planning, doodling, journaling and goal setting.


I decided that I would decorate the cover of the Planner Pages Notebook and try to at least do highlights of what is happening for that particular month. The notebook has a calendar for each month with two lined pages. 


I started by cutting cardstock from the Watercolor Metallic Paper Pad to fit the front and back of notebook. Before adhering to the covers I lightly inked the edges of the cardstock.


I cut the largest Rectangle Border Diecut from a piece of cardstock from the Metallic Ink  Paper Pad.


I matted the diecut with two different colors from the same paper collection and added a  4" Watercolor Doily and adhered to the cover.


I cut two small banners and adhered to the doily. I selected a floral cardstock from the Peony Paper Pad and fussy cut one of the flowers out and glued to the banners on the cover of the notebook. I placed white cardstock along with adhesive backing already applied to the white cardstock on top of the memories diecut which is from the Hope/Dream/Believe Cutting Templates and run through the Diecut Machine. I placed the memories die above the banner on the cover.


I added Ric Rac trim to the front edge of the cover and on the inside I added Pom Pom trim to finish off the notebook.  For more inspiration click on the Momenta link HERE.


Also I am having problems with blogger where I can't respond to comments left on my blog. I have emailed blogger/google and have yet to receive a response to my problem. If you do have questions I do have an Instagram page that you can leave a comment if you need to. You can find my Instagram link HERE.


(Products listed above are Affiliated Links for your convenience)


Thanks for stopping by, hope your Thursday is wonderful and enjoy creating! 


Tuesday, May 14, 2019

Daydream Paper Clip

Hi everyone! I want to share another project, a paper clip I altered, that was shown in ClearSnap's booth this past January at Creativation .


I placed the cloud stamp from the Butterfly Clear Stamps onto an Acrylic Block/Precision Press(retired) and inked with Leather Premium Dye Ink and I stamped randomly on one side of the folded piece of cardstock. I inked an Art Dauber with Bahama Premium Dye Ink and lightly ink edges of banner and the cloud images.


I cut the stamped clouds cardstock 8"x3 1/2" and fold in half, 4"x3 1/2". I cut a "v" in the end of cardstock to create a banner.


I placed the Daydream stamp from the Butterfly Clear Stamps onto an acrylic block/Precision Press(retired) and inked with Leather Premium Dye Ink and stamped onto a piece of cardstock. Next I cut and folded, inked the edges with Sandstone Premium Dye Ink using an art dauber. I cut two smaller banners from patterned cardstock and slide all stamped and patterned cardstocks around the jumbo paper clip and adhered together.


I punched out a mini butterfly from cardstock and inked an art dauber with Rose Premium Dye Ink and inked the mini butterfly, adhered to the "Daydream" banner and add a Black Gem to the body.


I placed the outline of the Butterfly stamp from the Butterfly Clear Stamps onto an Acrylic Block/Precision Press(retired) and inked the stamp with Leather Premium Dye Ink and stamped onto a piece of White CardstockNext I placed the "filled in" image of Butterfly stamp onto an acrylic block or Precision Press...be sure to line up the stamp with the stamped Butterfly cardstock image...ink the stamp with Sandstone Premium Dye Ink and stamp on top of the stamped butterfly image.


I inked three art daubers with the following Premium Dye Inks: RoseRaspberry and Dandelion and inked the majority of the wings with Rose Premium Dye Ink, ink a small portion of the wings, next to the brown, with Raspberry Premium Dye Ink and the inner and the outer portions of the wings with Dandelion Premium Dye Ink. I fussy cut the butterfly image out.


I adhered the butterfly to paper clip banner, added three Black Gems to the body and clear glitter glue to the dots on the butterfly. I looped several gold metallic and yellow threads and glue underneath the butterfly.


SUPPLIES

ColorBox: Art Daubers
4" Jumbo Paper Clip
Gold Metallic and Yellow Thread
Clear Glitter Glue
Various Patterned and White Cardstock
Beacon Adhesive: Zip Dry Adhesive
Acrylic Block/Precision Press(retired)/MISTI Stamping Tool
Mini Butterfly Punch

(Products listed above are Affiliated Links for your convenience)


Thanks for stopping by, hope your Tuesday is wonderful and enjoy creating!