Showing posts with label Acrylic Paint. Show all posts

Wednesday, May 6, 2020

i-crafter: Grow Mini Canvas

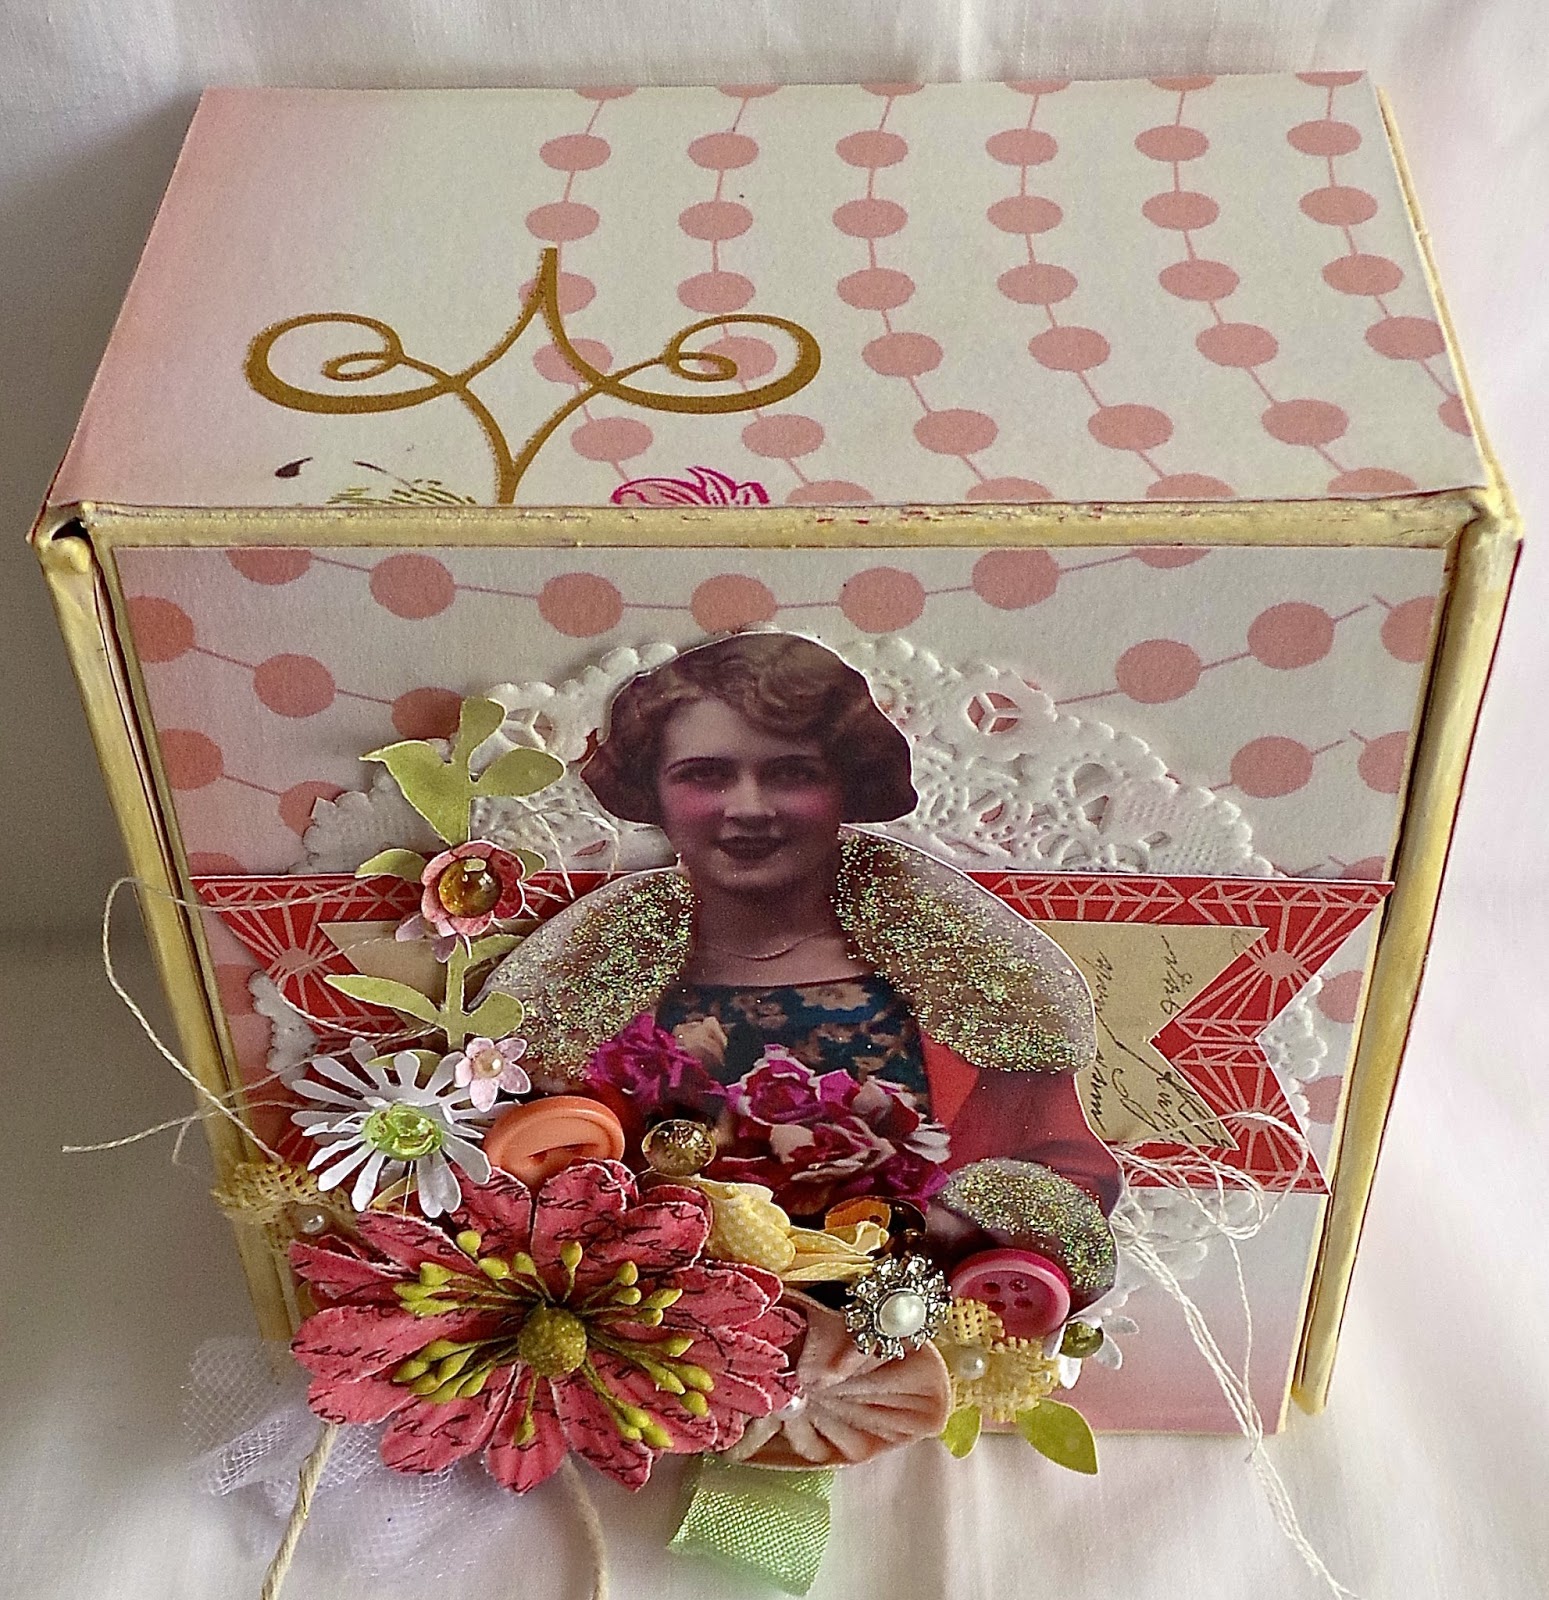
Hi everyone! Today over on the on i-crafter's blog I share how I created this quick and easy mini canvas! You can find the complete blog post HERE.

GRW6

Supplies

i-crafter: Carly Alphabet Diecuts
i-crafter: i-Stik Adhesive
Diecut Machine
Paper Cutter
Scissors
Beacon Adhesive: Zip Dry Adhesive
Sequin and Gem
Various Patterned Cardstocks
Diecuts
Mini Canvas
Acrylic Paint
Paint Brush
Chalk Ink
Lace
Cheese Cloth


(Products listed above are Affiliated Links for your convenience)

DISCLAIMERS

This blog is compensated to provide opinion on products, services, websites, and various other topics. Even though the owner(s) of this blog receives compensation for our posts or advertisements. I always give my honest opinions, findings, beliefs, or experiences on those topics or products. The views and opinions expressed on this blog are purely my own. Any product claim, statistic, quote or other representation about a product or service should be verified with each manufacturer, provider, or party in question.This blog contains affiliate links, clicking and shopping through these links helps to support and run Tonya Trantham Designs - Creative Addiction to Paper Blog at no additional cost to you. Today's features are i-crafter and Scrapbook.com Products. 

GRW1

Thanks for stopping by, hope your Wednesday is wonderful and enjoy creating!


Friday, December 30, 2016

Snowflake Egg Carton

Hi there! How was  everyone's Christmas? I had a nice time. My son and daughter in law came in and we exchanged presents on Christmas Eve. Then on Christmas Day we went to my mother in law's at 10:00AM did the gift exchange with her and my step daughters and their husbands and then at 12:30 ran to my parents to do the same thing again plus we had dinner. As I said it was nice but after two days of nonstop "partying" I was ready to get back into my normal routine and get back to crafting.                
Well, anyway, I wanted to share the second half of a project for a swap I was in. The first half of the swap I altered a paper bag and you can find that post HERE.


I painted a six count egg carton that I had purchased at Hobby Lobby in Folk Art Faded Jade acrylic paint and sealed with Antique Mod Podge. I cut a snowflake patterned cardstock from the Prima Sweet Peppermint collection which I adhered to the top of the lid. Next I cut a Snowflake Rosette from Merry & Bright Collection and put together according to the direction. I added a gold circle, a small snowflake ornament, sequin and Dew Drop to the center of the snowflake diecut. 


I adhered seam binding and ribbon above the "clasp" to dress it up.


 The inside I cut a piece of patterned cardstock to fit the inside of the lid and the fun part...filling it with GOODIES!!!


I added candy, handmade planner clips, bits and pieces of ribbons, buttons, etc. that my swap partner Lisa can eat while crafting. 😄


I also added a Santa pen that I found at the Target Dollar Spot to the package. Isn't it so adorable? As always if you have questions about this project please let me know.
Well, there you have it...my last post of 2016. For the 2017 year I have written down some goals of what I want to accomplish (fingers crossed) 😊. This past year was a very crazy, sad, topsy turvy year to say the least and my crafting mojo went on vacation. So here's to a better and more creative 2017!  


Thanks for stopping by, hope your Friday is awesome and enjoy creating!


Friday, July 29, 2016

Snowflake Noel Card

Hi everyone! I am back with another quick Christmas card. Like the last card I shared this past Monday I used the 6"x6" Lost and Found Christmas Pad from My Mind's Eye. I folded a piece of cardstock from the pad to create a 3"x6" base for my card.


I cut a diecut from the Scalloped Rectangle from Spellbinders, painted a wooden snowflake and once dry adhered all to the front of the card.


I finished off the card with sequins and tiny flat back pearls. Very quick and easy! If you have any questions about this card please let me know.


Thanks for stopping by, hope your Friday is wonderful and enjoy creating!


Thursday, January 7, 2016

Pretty in Pink Altered Cigar Box

Hi everyone! I hope everyone had a wonderful holiday. Ours was great even if we had massive amounts of rain it was still nice to be able to spend it with family. :-)
After taking a tiny break from social media I am back to share a project I created for a swap I was in with my sweet friend Lisa on Swap-bot.


For this swap we agreed to alter a small cigar box and fill it with planner goodies.


Since one of Lisa's favorite colors is pink I went with a dusty colored cardstock from My Mind's Eye for the outside of the box. The image I found on Tammy Tutterow's site. I sized it down, printed and fussy cut out. I used a combination of buttons, dew drops, store bought and handmade flowers to decorate the lid.


The inside of the box I used the rest of the My Mind''s Eye cardstock and the vintage print cardstock is from a discontinued line from Canvas Corp. Also I forgot to mention that I painted the edges of the box with a cream colored paint (no need to paint the whole box since you won't be seeing that :-) ) and used Antique Mod Podge to adhere all cardstock to the box. Once dry I applied a coat over the whole box to seal it.


The fun part was adding all the goodies. I added journaling cards, sticky notes, shaped paper clips, washi tape and a 4" book ring so she can add her favorite washi tapes to so she can keep those close at hand. :-)


There you have it my first project of the year! :-) If you have any questions please let me know.


Thanks for stopping by, hope your Thursday is wonderful and enjoy creating!


Wednesday, February 11, 2015

Welcome Little Star

Hi everyone!  I created this baby card for a magazine call but it wasn't selected so I thought why not share. :-) I folded a piece of mint green cardstock to create a 4"x5 1/2" card base. I added  some scraps of patterned scrapbook paper to the base.


The chipboard stars I painted in white, yellow and mint green. Let dry and then applied Mod Podge and sprinkled glitter to the each of those. The sentiment is from the Little Star set from Fancy Pants which I stamped onto a piece of patterned scrapbook paper. I finished off the card with two little pearl dew drops. Easy peasy card if I do say so myself. :-) If you have any questions please let me know.
Also I am submitting this card for the following challenge: Word Art Wednesday: Challenge #170.


Thanks for stopping by, hope your Wednesday is wonderful and enjoy creating!


Monday, December 15, 2014

What is in your stocking?

Hi everyone! I'm here to share an ornament I had actually started last Christmas but with all the craziness and such that normally goes on around this time of year I didn't finish it. Well I did get a complete of photos of me starting the process though. :-)


The stocking ornament is from SmoothFoam which I had received last year for a blog hop that the Robin's Nest and SmoothFoam was hosting together. 
I started by lightly sanding and applying a coat of gesso which once dry I painted the stocking with red acrylic paint. I cut the cuff of the stocking from White on White Classic Glitter Swirl Cardstock. I  applied antique Mod Podge to the stocking and then sprinkled glitter all over. Once dry I painted one of the packages, added some lace around the cuff and I put it away for the year.


I dug it out and this is how I finished it off. I used some Prima poinsettias and added a sequin and dew drop to the center for an elegant look.


I added a mini bottle brush tree, along with bells, pearl sprays and miniature Christmas lights.


I finished off with a little gold trim and a holly leaf.


Don't you think it looks lovely on my four foot tinsel tree I got for 66% off at Hobby Lobby last year. It was a floor model and pre-lit. It reminds me of my great grandmother's tinsel tree but hers had a color wheel with it. I remember sitting at her house at Christmas time watching the tree turn different colors…such great memories. :-)


If you have any questions about this project please let me know.


Thanks for stopping by, hope your Monday is awesome and enjoy creating!


Saturday, December 6, 2014

Christmas Time Snowman

Hi there! I'm here to share a quick little snowman that created using a 1" SmoothFoam ball. I love making these little guys. So much fun and easy too! All I had to do was sand a little of the rough edge off of the ball, gesso and once dry I painted with a combination of off white and white acrylic paint. Once that dried I painted two black dots for eyes, a pink dot for the mouth and I "pounced on" some pink paint for the cheeks.


I had baked up a nose from orange Sculpey clay which I followed the direction on the packaging. I adhered the nose to the snowman and then applied Antique Mod Podge all over and then sprinkled with glitter. A way to make applying the glue and glitter easier I stuck a pin in it.


I drawed out a hat on copy paper and then traced out on cardstock which I then cut out and rolled up to create a hat. I ran a small line of glue on the edge of the hat and held until it was dry. Also be sure to leave a tiny hole in the top of the hat so you can run a pipe cleaner through. I curled the top of the pipe cleaner and the end that is inside of the hat I glued to inside of the hat. I finished off with tinsel around the hat and a small felt snowflake for the base. This can be used as a table decoration or it can be hung on the tree. The choice is yours. :-)
If you have any questions please let me know.


Thanks for stopping by, hope your Saturday is awesome and enjoy creating!


Thursday, October 2, 2014

Altered Pages: Spooky Tag

Hi everyone! I"m here to share a tag I created for Smeared and Smudged 31 Days of Halloween. 


Also Art Anthology is this month's partner with Altered Pages which I am pretty excited about.


I want to share my tag I created. For more photos and information please go to the Altered Pages blog.


Thanks for stopping by, hope your Thursday is awesome and enjoy creating!


Thursday, August 14, 2014

Snowflake Snowman

Hi everyone! We are almost half way through August! Can you believe that??? Summer has sure flown for me. I have painted one of our bathroom and three coats of paint later I can say the walls are finished. Now all I need is to paint the trim and door, install the new light and flooring, vanity, mirror, faucet, make a curtain and I'm finished. :-)
I want to share a snowman decoration I created. I received a box full of Smooth Foam ornaments last year for a blog hop and this is one of the leftovers I didn't use in the hop.
First off I applied gesso to the ornament, let dry and then painted with white acrylic paint. While the ornament was drying I shaped a carrot nose from orange Sculpey Clay and baked according to the directions on the package. I also cut from a sheet of vintage sheet music a small hat. I rolled it into a cone and adhered together and glued silver tinsel along the bottom of the hat.


I adhered two black dew drops and carrot nose to the ornament shape, painted a dot for the mouth and then I applied Antique Mod Podge all over then covered in glitter.


I painted a chipboard snowflake white and once dry I applied antique Mod Podge and sprinkled glitter over the whole snowflake. I then adhered to the base of the ornament the snowflake, tied seam binding around the "neck" and finished off with dew drops to the bow and snowflake.


Lastly I glued the little hat to the snowman's head. Easy peasy decoration to set out at Christmas or a super cute gift to give. :-)


Supplies Used:

SmoothFoam: Ornament, Robin's Nest: Dew Drops, Seam Binding, Glitter, Sculpey Clay, Tinsel, Vintage Sheet Music, Chipboard Snowflake, Black and White Acrylic Paint, Gesso

If you have any questions please let me know. Thanks for stopping by, hope your Thursday is wonderful and enjoy creating!


Saturday, July 19, 2014

Altered Pages: Hope is the Thing with Feathers

Hi everyone! I'm here to share an art journal page I created using a junk mail envelope as a base for my page. I used some of the awesome collage images that are on the AlteredPages site and we are cross promoting  Leaky Shed's assortment of chipboard dies this month too.


For more details on how I created this art journal page stop over at the Altered Pages blog and check it out!
If you have any questions please let me know. Thanks for stopping by, hope your Saturday is wonderful and enjoy creating!


Monday, July 14, 2014

Red, White and Beautiful Snowman

Hi everyone! I'm here to share my project for Eileen Hull's Art with Heart Challenge and this month's theme is Red, White and Beautiful. I didn't do the traditional 4th of July summery project but I decided to "practice" making snowmen. I've been asked to participate in a craft show in September (which I'm still trying to decide do I really want to do it) and I had bought a 4 ft kinda of silvery/looks like it has turned (vintage looking)  tinsel tree I bought at Hobby Lobby for 66% off, after Christmas, and with lights too. The tree reminds me of when I was little and would go to my great grandmother's house for Christmas. She had a big silver tinsel tree with the color wheel and I would sit in front of it and watch it change different colors. So cool! :-) I plan on making snowmen to add to the tree along with some of my other ornaments I have collected through the years.
I decided to try out Eileen Hull's candy drawer on this project. I started by cutting out the candy drawer from mattboard and then cut out the drawer again with scrapbook paper. I inked and adhered the scrapbook paper to the drawer. I then assembled and adhered the drawer together and let dry. I used a combination of Zip Dry glue and Mod Podge and cloths pin to hold it together until it dried.


The snowman head I gessoed, painted with white acrylic paint and once dried I lightly drawed out the placing of its eyes, nose and mouth. The mouth I painted on with black acrylic paint and  added pink for the cheeks. I shaped and then baked the "carrot nose" according to the direction on the Sculpey Clay packaging. Then I glued two Black Dew Drops and the carrot nose to create his face.  


I applied Antique Mod Podge to all of the snowman's head…nose and eyes too…and then glittered him up. Also I painted two Snowflakes Chipboard Diecuts white and added glitter to them too. 


I have drawn out my own pattern to created the hat for my snowman. I roll it up first to determine where I'm going to glue it and to make sure the size is right. Once I've got that right I glue together and then adhere the tinsel twine around the brim and then glue to the snowman's head.


I also cut out a medallion diecut, assemble and glue to the top of the candy drawer along with a snowflake diecut. Then I adhered the head on top of the snowflake. I also added a snowflake and button to the drawer to top it off. Now all I have to do is fill it up with goodies when Christmas rolls around and give it to that someone special. :-)


Supplies Used:

Sizzix: Eileen Hull's: Candy Drawer Diecut, Medallion Diecut
Paper Studio Scrapbook Paper
Smooth Foam 1 1/2" Ball
Gesso
White, Pink and Black Acyclic Paint
Antique Mod Podge
Button
Glitter
Orange Sculpey Clay
Robin's Nest: Black Dew Drops
Tim Holtz: Tinsel Twine
Chalk Ink 

If you have any questions about this project let me know. Please be sure to stop by Eileen Hull's Art with Heart Challenge and check out what everyone else has created and there is also time to still play along!
Thanks for stopping by, hope your Monday is wonderful and enjoy creating!!!