Pages

Thursday, October 31, 2019

Spooky Pumpkin Treat Baggie


Hi everyone and Happy Halloween! I wanted to hop on and share a quick treat holder I created!


I started by cutting a bag using the Treat Bag Diecut and putting it together according the directions on the packaging.


I cut out three pieces of the madallion diecuts that I had purchased from Coco and Reno and put together. I added that and a scrap skull border to the top portion of the bag.


I fussy cut a jack-o-lantern and adhered that along with three circle punches and a spooky sticker on top of the medallion. I finished off by adding several loops of green metallic thread behind the circle punches. Just add some candy and a clothes pin and it is ready to give to your favorite trick or treater! As always if you have any questions please let me know.


Supplies

Sizzix/Tim Holtz: Treat Bag Diecut
Coco and Reno: Medallion Diecuts
Halloween  and scraps of Cardstock
Metallic Green Thread 
Clothes Pin
Beacon Adhesive: Zip Dry Adhesive 
Various Circle Punches

(Products listed above are Affiliated Links for your convenience)


DISCLAIMERS
This blog is compensated to provide opinion on products, services, websites, and various other topics. Even though the owner(s) of this blog receives compensation for our posts or advertisements. I always give my honest opinions, findings, beliefs, or experiences on those topics or products. The views and opinions expressed on this blog are purely my own. Any product claim, statistic, quote or other representation about a product or service should be verified with each manufacturer, provider, or party in question.This blog contains affiliate links, clicking and shopping through these links helps to support and run Tonya Trantham Designs - Creative Addiction to Paper Blog at no additional cost to you. Today's features are Scrapbook.com Products. 


Thanks for stopping by, hope your Thursday is wonderful and enjoy creating!


Wednesday, October 30, 2019

Hope You have a Purr-fect Day Card

Hi everyone! I'm back today to share a quick card I created using cardstock scraps that I had laying around from other projects and a leftover printable from Lisa's Altered Art and you can find the printable HERE. The base of the card is 6 1/4"x4" folded piece of patterned cardstock.


I placed the bits and pieces of all the different patterned cardstocks and doily that I had and adhered to the card base. The girl with the cats was a leftover printable that I thought would be a "purr-fect" addiction to the card. 😆


I used a flower and leaf sprig diecut from the Flowers and Leaves Journaling Cards Diecuts and added to the card along with a sequin and gem to the center of the flower. I added loops of thread behind the girl and cat image. And I finished by printing a sentiment from my computer. As always if you have any questions about this project please let me know.


Supplies

Cardstock Scraps
Lisa's Altered Art: Queen Series 4
Beacon Adhesive: Zip Dry Adhesive
Sequin
Gem
Thread

(Products listed above are Affiliated Links for your convenience)

DISCLAIMERS
This blog is compensated to provide opinion on products, services, websites, and various other topics. Even though the owner(s) of this blog receives compensation for our posts or advertisements. I always give my honest opinions, findings, beliefs, or experiences on those topics or products. The views and opinions expressed on this blog are purely my own. Any product claim, statistic, quote or other representation about a product or service should be verified with each manufacturer, provider, or party in question.This blog contains affiliate links, clicking and shopping through these links helps to support and run Tonya Trantham Designs - Creative Addiction to Paper Blog at no additional cost to you. Today's features are Sizzix, Eileen Hull and Scrapbook.com Products. 


Thanks for stopping by, hope your Wednesday is great and enjoy creating!


Tuesday, October 29, 2019

Before the Pen October Planner Pages Spread

Hi everyone! Today I am over on Blank Page Muse blog sharing my first blog post using stamps by Pam Bray! For all the details and more photos you can find the link to the blog post HERE. Also when ordering use my BPMuseTonya code for 15% off your whole purchase when shopping the Blank Page Muse Shop
Also if you need more inspiration click the following links below. 


Supplies

Blank Page Muse: Everyday Planner Stamps
The 1407 Planners: B6 Size Notebook
Watercolors/Inks
Beacon Adhesive: Zip Dry Adhesive 
Washi Tape
Circle, Mini Tag and Scalloped Circle Punches

(Products listed above are Affiliated Links for your convenience)

DISCLAIMERS
This blog is compensated to provide opinion on products, services, websites, and various other topics. Even though the owner(s) of this blog receives compensation for our posts or advertisements. I always give my honest opinions, findings, beliefs, or experiences on those topics or products. The views and opinions expressed on this blog are purely my own. Any product claim, statistic, quote or other representation about a product or service should be verified with each manufacturer, provider, or party in question.This blog contains affiliate links, clicking and shopping through these links helps to support and run Tonya Trantham Designs - Creative Addiction to Paper Blog at no additional cost to you. Today's features are Blank Page Muse and Scrapbook.com Products. 


Thanks for stopping by, hope your Tuesday is wonderful and enjoy creating!


Monday, October 28, 2019

Finding Happiness Pocket Notebook

Hi everyone! I want to share my other journal I created for Eileen Hull for her trip to the UK in September using her newest Pocket Notebook Diecut.


First I gathered up an assortment of Maggie Holmes cardstock Collections to create this journal. Then I applied Adhesive Sheets to the front and back of Matboard before placing cardstock on the front and back of the matboard.


I placed the Pocket Notebook Diecut on top of the matboard and run through the Diecut Machine. I cut two covers out.


I lined up the holes on the spine where only three holes showed both on the top and bottom and adhered together. I cut cardstock to fit both the inside and outside of the spine. I used a Crop A Dile to punch holes and set eyelets in the spine. I also added the elastic cording and tied off inside the spine.


I used the Nestled Borders Rectangles Diecut, stickers, pom pom trim, heart and gem and a couple of flowers and a leaf from Eileen's Flowers and Leaves Journaling Cards Diecuts to decorate the cover of the journal. If you haven't checked out the rest of the Inspiration Team's projects on Eileen's blog you can find those posts: HERE, HERE, HEREHERE and HERE. As always if you have any questions about this project please let me know.


Supplies

Sizzix/Eileen Hull: Pocket Notebook Diecut
Maggie Holmes: Cardstock Collections
Elastic Cording
Pom Pom Trim
Heart Gem
Eyelets
Beacon Adhesive: Zip Dry Adhesive 

(Products listed above are Affiliated Links for your convenience)

DISCLAIMERS
This blog is compensated to provide opinion on products, services, websites, and various other topics. Even though the owner(s) of this blog receives compensation for our posts or advertisements. I always give my honest opinions, findings, beliefs, or experiences on those topics or products. The views and opinions expressed on this blog are purely my own. Any product claim, statistic, quote or other representation about a product or service should be verified with each manufacturer, provider, or party in question.This blog contains affiliate links, clicking and shopping through these links helps to support and run Tonya Trantham Designs - Creative Addiction to Paper Blog at no additional cost to you. Today's features are Scrapbook.com, Sizzix and Eileen Hull Products. 


Thanks for stopping by, hope your Monday is wonderful and enjoy creating!


Tuesday, October 22, 2019

Genuine Vintage Pocket Notebook

Hi everyone! I want to share this Vintage Baseball Pocket Notebook I create for Eileen to take on her trip to the UK. Also I thought why not share since the World Series will be starting soon.


I applied Adhesive Sheets to both sides of the Mat Board, placed the cardstock on both sides, run through the Diecut Machine and I cut two covers out. 


Also the cardstock I used is from Authentique, it's retired and I can't find the package to tell you what the name of the collection is...sorry. 😔 I added a "one of a kind" journaling card from the same collection to the cover. And I fussy cut from another journaling card two baseball players which I adhered one player to the front corner of the cover and added three black gems to each corner of the one of the "one of a kind" journaling card .


The back of the journal I adhered the other baseball players and a couple of  banners to the lower corner.


I lined the last hole up on the spine and adhered together. For a more finished look I cut another piece of wood patterned cardstock and adhered to the spine and set Eyelets in each of the holes.


I ran the elastic cording through the button holes and the middle holes on the spine and tied off. I did add a little adhesive to the back of the button to keep it from sliding around.


I ran elastic cording through the holes on the spine and tied off inside the cover. There is eight elastic bands that can hold journals.


I forgot to add that I applied an adhesive sheet to the back of piece of cardstock and then I cut the word "journal" out from the Journaling Words Diecuts and placed it at the top of the journal cover. There you have it a completed journal cover and all that needs to be added is notebooks. Be sure to hop on over to Eileen Hull's blog to see what the rest of her Inspiration Team has created! You can find this month's posts: HERE, HERE and HERE. As always if you have any questions please let me know.


Supplies

Sizzix/Eileen Hull: Pocket Notebook Diecut
Sizzix/Eileen: Journaling Words Diecuts
Elastic Cording
Button
Gems
Cardstock

(Products listed above are Affiliated Links for your convenience)

DISCLAIMERS
This blog is compensated to provide opinion on products, services, websites, and various other topics. Even though the owner(s) of this blog receives compensation for our posts or advertisements. I always give my honest opinions, findings, beliefs, or experiences on those topics or products. The views and opinions expressed on this blog are purely my own. Any product claim, statistic, quote or other representation about a product or service should be verified with each manufacturer, provider, or party in question.This blog contains affiliate links, clicking and shopping through these links helps to support and run Tonya Trantham Designs - Creative Addiction to Paper Blog at no additional cost to you. Today's features are Sizzix and Eileen Hull Products. 


Thanks for stopping by, hope your Tuesday is great and enjoy creating!


Thursday, October 17, 2019

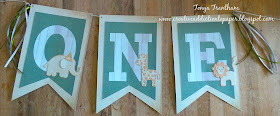
Oakland is One Birthday Banner

Hi everyone! I'm back this week with a banner I created for my grandson's first birthday using Momenta stickers and cardstock! My grandson actually turned one on the 3rd but with my son and daughter in law moving into a new house they postponed his party until the end of the month so they could have everyone see their house and celebrate Oakland's birthday.


I started by cutting a banner pattern from white paper. The larger banner is 8"x 5 1/8" and the smaller banner is 6"x 4 1/4". I cut a "v" in the bottom of each banner patten. 


I picked and off white and olive color cardstock from the 8"x8" Gemstones Paper Pad and cut a total of six banners, three of each size, and adhered the smaller on top of the larger banner.


I selected from the Wood Print Sans Serif 4 Inch Stickers and added the letters "O", "N", and "E" to each banner.


I used the rest of the off white and yellow cardstock to create the elephant, giraffe and lion diecut. Before cutting I added Adhesive Sheet to the back of the cardstock. Then I cut each of the diecuts with the Freestyle Die Cutting and Embossing Machine and put together before gluing to the banner.


I punched holes on each side of each banner and then strung cording through each hole and cut and tied several ribbons to each end of the banners. And there you have it! I can't wait to celebrate with my little nugget his first birthday! As always if you have questions about this project please let me know. 
Also if you aren't following Momenta on their social medias you can find them on Facebook, Instagram and Twitter


Supplies 

Beacon Adhesive: Zip Dry Adhesive 
Ribbon
Sizzix/Eileen Hull: Elephant and Giraffe Diecuts (retired)
Sizzix/Eileen Hull:  Lion and Monkey Diecuts (retired)

(Products listed above are Affiliated Links for your convenience)

DISCLAIMERS
This blog is compensated to provide opinion on products, services, websites, and various other topics. Even though the owner(s) of this blog receives compensation for our posts or advertisements. I always give my honest opinions, findings, beliefs, or experiences on those topics or products. The views and opinions expressed on this blog are purely my own. Any product claim, statistic, quote or other representation about a product or service should be verified with each manufacturer, provider, or party in question.This blog contains affiliate links, clicking and shopping through these links helps to support and run Tonya Trantham Designs - Creative Addiction to Paper Blog at no additional cost to you. Today's features are Momenta Products. 


Thanks for stopping by, hope your Thursday is wonderful and enjoy creating!


Thursday, October 10, 2019

Exciting Blank Page Muse Planner News!

Hi everyone! I have been sitting on this for over a month but I wanted to hop on my blog today and share some exciting news!!! I have been asked to be a part of the Blank Page Muse Planner Team!


I LOVE planners and LOVE these stamps! And the exciting part these stamps can be used for more than planners! To meet the rest of my team mates and how to purchase these stamps you can find the blog post HERE.

Also when making a purchase be sure to use my code: BPMuseTonya to receive 15% off your order and you can find the shop HERE.


Thanks for stopping by, hope your Thursday is awesome and enjoy creating!


Saturday, October 5, 2019

Chills and Thrills Momenta Tag

Hi everyone! I am back with a quick and easy Halloween tag I created for Momenta!


I started by cutting a tag from black cardstock from the Metallic Ink Paper Pad. I added a patterned doily and a scrap of an orange diecut from my own stash to the tag. Next I used a scrap of green cardstock (same paper pad) for the 3 and 1 from the Number Cutting Templates  and run through the Freestyle Die Cutting and Embossing Machine. I adhered a 2" Doily to the front of the tag before adhering the "31" on top of the doily. I cut a pumpkin from scraps of cardstock (same paper pad). But before cutting I added Adhesive Sheets to the back to make it easier to put together. I cut a "v" in the end of a scrap of white cardstock before adhering under the 31. Then I added a green mat around the chills and thrills sentiment before adhering to the tag along with the pumpkin.


To add the finishing touches to the tag I pried off the gem from a decorative metal piece from Momenta (retired) and applied clear embossing to the top of it. 


I added Black Magic Molten Dimensions Embossing Powder to the metal piece and set with the Heat Tool. Once it was cool to the touch I added a black gem to the center of the metal piece before adhering on top of the lace and pom pom trim at the bottom of tag. 


And there you have it! If you aren't following Momenta you can find them on Instagram, Twitter and Facebook. As always if you have any questions about this project please let me know.
I would also like to submit this project for the following challenges:

Emerald Creek: ECOCT2019


 Supplies

Momenta:  2" Doily
Beacon Adhesive: Zip Dry Adhesives 
Paper Cutter
Scissors
Heat Tool
Sizzix: Autumn Diecuts
Black Lace
Pom Pom Trim
Black Gems
Doily

(Products listed above are Affiliated Links for your convenience)

DISCLAIMERS
This blog is compensated to provide opinion on products, services, websites, and various other topics. Even though the owner(s) of this blog receives compensation for our posts or advertisements. I always give my honest opinions, findings, beliefs, or experiences on those topics or products. The views and opinions expressed on this blog are purely my own. Any product claim, statistic, quote or other representation about a product or service should be verified with each manufacturer, provider, or party in question.This blog contains affiliate links, clicking and shopping through these links helps to support and run Tonya Trantham Designs - Creative Addiction to Paper Blog at no additional cost to you. Today's features are Momenta Products. 


Thanks for stopping by, hope your Saturday is wonderful and enjoy creating!