Pages

Wednesday, December 20, 2017

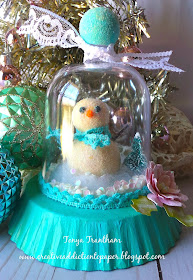
Little Birdie Crafts: Snowman Snow Globe

Hi everyone! Are you ready for Christmas??? Me? I am almost there...I still have some shopping to do, wrapping presents and crafting also...not enough hours in the day for everything!
I want to share a snow globe I created from a wine glass and paper tart pan. For more photos and the how to's you can find the blog post HERE.


If you have any questions about this project please let me know.

Thanks for stopping by, hope your day is awesome and enjoy creating!


Thursday, December 14, 2017

Christmas Time Disc Mini Album

Hi everyone! I am back to share the full reveal of my Christmas Time mini album using Eileen Hull's newest Book Club Diecut Collection! 


I used the Book and Pages, Trinket Book and Frame Diecut to cut the covers, from Mat Board and the inside pages from the Merry and Bright Cardstock Pad. Also I used four Happy Planner Mini Disc for the binding.


I used Moss Glimmer Mist on the outside and inside of the both covers and once dry I added patterned cardstock, a scalloped circle from the Bookplate, Hinges and Label Collection and the number 25 was cut from the Billboard diecut. I finished off with three square gems and fiber, ribbon and twine on one of the disc.


The inside cover I adhered a two of the corners of the pocket from the Bookmark, Tag and Pocket Collection to create another pocket to hold a label, which I folded, from the Bookplate, Hinges and Label Collection.


I created a belly band which I added a seal diecut to the band and added a label diecut as a tag which can be used as a journaling card or for mini photos. On the opposite page I added the word "moments" from the Floral Arch and Words Collection for a simple embellishment.


The top of the page I added a label and dress it up with a sentiment and sequin. I adhered a wooden joy frame to the bottom corner of the page as a pocket to hold a label diecut and a mini tag.


The opposite page I free handed a tree and inked and glued the star from the Bookplate, Hinges and Label Collection to the top of the tree.


The next two pages are simple I created another belly band which I used an old Christmas present label as a tag and a piece of ric rac and a button dressed up the other page.


I adhered a bookmark to the bottom corner of the page to create a pocket.


I added label diecuts and a Christmas present tag to the bookmark and the inside cover I finished off with patterned cardstock and a Santa from my stash.
For more inspiration hop on over to Eileen Hull's blog where to can see what the team has created with this awesome collection of diecuts! You can find those posts HERE, HERE and HERE.
As always if you have any questions about this project please let me know.


Also I would like to submit this project for the following challenges:
Word Art Wednesday: Challenge #312-#313
Mini Album Makers Challenge: December Challenge


Thanks for stopping by, hop your Thursday is awesome and enjoy creating!


Wednesday, November 29, 2017

Little Birdie Crafts: Altered Snowman Box

Hi everyone! I am super excited to share that I have been asked to be a part of the Little Birdie Crafts design team! I'm so in love with all the beautiful flowers, trims and paints the company has to offer...plus there is so much more! You can find the website HERE.


For my first project I decided to alter a cell phone box that I had lying around...actually I have several boxes laying around...and create a retro style Christmas themed gift box. For the full tutorial you can find my blog post HERE


 Thanks for stopping by hope your day is awesome and enjoy creating!


Tuesday, November 7, 2017

Floral Jewelry Box

Hi everyone! I am back with another project using Eileen Hull's newest diecut from the Book Club Diecut Collection. I created this jewelry box from the Book and Pages, Trinket Box and Frame Diecut.


I started by cutting all the pieces from Mat Board and the sides of the "drawer" I cut two pieces from patterned cardstock. I embossed the top and bottom of the box with the Rosebud Embossing Folder (retired Eileen Hull). Next I used the Hydrangea ColorBox Blends to add color to the box. I applied the ink to a piece of glass watered down and added a wash to each piece. Before putting together I adhered a piece of plastic on the back side of the oval opening.


The drawer I cut from mat board along with patterned cardstock to cover both the inside and outside of the drawer. I put together according to the directions. 


I added a drawer pull and added trim inside the drawer to finish it off.


I cut from white cardstock a vine and flower from the Floral Arch and Words Diecuts. I inked and adhered to the drawer. I also added a button and Dew Drop to the flower.


I added flatback pearls to the outside of the drawer to finish it off. Be sure to hop on over to Eileen's blog to check out the latest projects from the rest of the Inspiration Team! You can find Eileen's blog HERE. As always if you have any questions about this project please let me know.


I also would like to submit this project for the following challenge:
Word Art Wednesday Challenge: #306-#307 Anything Goes


Thanks for stopping by, hope your Tuesday is awesome and enjoy creating!


Wednesday, November 1, 2017

24-7-365 Mini Album and Album Holder

Hi everyone! I am here to share the full reveal of my 24-7-365 Mini Album and Album Holder created using Eileen Hull's newest Book Club Collection, Stamp and Photo Storage Diecut and Card Box, Planner Storage and Organizer Diecut. These diecuts along with five other sets of diecuts will out some time soon! Are you all as excited as I am? These diecuts are so versatile and can be used to create other projects than what they where originally intended for.


I am going to start off first with the holder. I cut it from Mat Board and then cut from cardstock two diecuts, one for the outside and one for the inside.


I inked the edges of the mat board and all the cardstock and then adhered to the mat board.


I put together according to the direction on the packaging.


I also added lace to around the bottom of the holder to finish it off.


Next I cut two of the Stamp & Photo Storage Dies from Mat Board but I decided I was going to be a little different and create a mini album out of this diecut. 😀


This is what the diecuts look like when they are cut out.


These are the edges I cut off to create the base for my mini album cover.


I inked the edges and covered the front and back with cardstock.


I also adhered cardstock inside along with a pocket to the inside cover.


I used a strong adhesive to glue the spine together and after it was dry I punched two holes so I could add pages.


I sewed four pieces of cardstock inside the journal and tied off on the inside.


I adhered lace to the spine after decorating the cover with a couple of fussy cut images and scraps of cardstock.


Next I added seam binding and a key charm to the spine.


Next comes the fun part...decorating the pages!


I used an assortment of leftover embellishments that I had laying around from past projects.


Where I tied off the pages inside and left the thread long I added four of the Stitchy Flower & Leaf Diecuts on the ends.


The pocket that holds the "key to" tag is actually from a iTune gift card. All I  had to do is add a butterfly printable and attach it with a little washi tape.


I also added used postage stamp, coin roller and printable images throughout the journal.


And there you have it! I absolutely LOVE this newest diecut collection that Eileen has designed! If you want to see more hop on over to Eileen's blog and see what the Inspiration Team has created with this newest collection! You can find the blog HERE.
As always if you have any questions please let me know.


Also I would like to submit this project for the following challenges:
Word Art Wednesday: Challenge #306-#307
Mini Album Makers Challenge: November Challenge


Thanks for stopping by, hope your Wednesday is awesome and enjoy creating!