Pages

Sunday, December 22, 2013

Winter Fairy Ornament

Hi everyone!!! It's me, Tonya!!! I'm here to share my design team project for the Robin's Nest this month. I used the Winter Collection (Russia) which is 20% off this month over at their website and we are also cross promoting with Ecstasy Crafts this month too.
A couple of months ago I ate a cheese soufflĂ© at Panara Bread. It was served in this cute little paper container that looked like a tart tin. Well I knew that I could alter it into something cute. 
Once I got it home I cleaned it, added a coat of gesso, let dry, painted with navy blue paint, let that dry and finally mod podge to seal. 


Next I used the 3D Precut Fairy Children sheet and punched out all the pieces which are numbered in the order they should be added to the main photo. Instead of using pop up dots I used the "extra leftovers" from the rubber stamps I cut out. It works perfectly, great way to recycle and, of course, save money too!!! Once I pieced the little fairy together I added a little bit of glitter to her wings and then I let dry.


Next I adhered a four inch doilie to the inside and back of the "tin" and glued the fairy child, which I rounded the top to fit inside the "tin", on top of the doilie. I sewed a ruffle from lace and tulle. I didn't measure either when sewing. I "eyeballed" until it looked right and then I adhered it to the inside corner. I then added gesso as snow here and there on the lace and tulle and then sprinkled glitter on top of that to give it a snowy look. I also added a little bird's nest and some pearly sprigs. 


Next I punched out a bunch of flowers from Snow Angels Glitter Cardstock and Boy Polka Dot Stamp Cardstock scraps I had left over from other projects I had created. I inked some of the flowers in Ocean Depth Chalk Ink. While those dried I misted the other flowers with water and then shaped with a stylus. Once they have dried completely, adhered two together and add a pearl dew drop in the center. Next, the blue flowers I glue a Lakeside Dew Drop in the center of each. One of those blue flowers I added snowflake stickers to give it a wintery feel. Now the fun part...adhere them in and around the nest and fairy child and them add gesso on the doilie, flowers and edges of the photo and while still wet sprinkle glitter on everything. Once it is completely dry you can use a dry paint brush to remove the loose glitter.


I used one of the Winter Glitter Chipboard Snowflake, Silver Snowflake sticker from Ecstasy Crafts, Lakeside Dew Drop and snowflake die cut from White Snow Glitter Vellum. I adhered all together and then glued to the side of "tin".


Also I punch two small holes in the center and threaded silver ribbon through the holes and tied off. This is what the front of my ornament looks like. 


The backside of the ornament I cut from the Circle, Scallop #2 die using the Winter Glitter Snowflakes Cardstock, White Snow Glitter Vellum, White Snow Glitter Cardstock, Glitter Chipboard and sticker Snowflakes, Lakeside Dew Drop and a sequin which I adhered to the back. Simply adorable!!! 


Supplies Used:

Ecstasy Crafts: Snowflake Stickers and 3D Precut Fairy Children
Gesso
Ceramcoat Navy Blue Acrylic Paint 
Two 4" doilies
Mod Podge
Silver ribbon
Extra Fine Glitter
Cuttlebug Snowflake Diecut
Lace
Light Blue Tulle
Needle and Thread
Small Flower Punch
Small Bird's Nest
Sizzix: Circle, Scallop #2

Be sure to stop by the Robin's Nest and check out this month's sale. If you have any questions please let me know. Thanks for stopping by and wishing you and your family the Merriest of Christmases and a very Happy New Year!!!


Friday, December 20, 2013

Design Team Reveal and Christmas Junk Journal

Hi everyone!!! I'm back to share the new design team reveal over at the Robin's Nest and the best part I am still apart of this awesome company. When you get a chance go over to their blog and see who else is apart of this awesome team!!!
The Robin's Nest
Also I would like to share a few photos of a Christmas Junk Journal I created for a swap I was in over on Facebook for my sweet swap partner Rachel. Here is a few photos of the front, back and semi chunky charms I added to the spine. I kept the front cover pretty simple. I figured the banner Rachel could put either a date or her own verbiage on it. The inside I added 30 pages which totaled 60 pages front and back and I used two paper lines from Crate Paper and K & Company, Snow Day and Mod Holiday Speciality Paper Pads respectively. I added bits and pieces of found items to the inside too. 


Thanks for stopping by, hope your Friday is awesome and enjoy creating!!!


Thursday, December 19, 2013

Snowman Treat Tin

Hi everyone! I have another quick project I created out of an empty little 4 oz. tin of peppers. It's the prefect size to add some sweet treats for a friend or family member. I used cardstock  and embellishments from the Winter Collection (Russia) from the Robin's Nest. 


I used the Snowflake and Snowman die cuts from Cuttlebug and the Medallion diecut from Sizzix. Along with snowflake stickers from Ecstasy Crafts and Dew Drops and there you have it...done!!!


Another idea use a bigger tin can, decorate and use it in place of a stocking. :-) 


If you have any question let me know. Thanks for stopping by, hope your Thursday is wonderful and enjoy creating!!!! 


Wednesday, December 18, 2013

Snowflake Paperbag Card

Hi everyone!!! It's me Tonya!!! Can you believe it is only a week and a day and it will be Christmas!?!!?!? Are you ready??? Me? I finished my shopping today so all I need to do is wrap presents and if possible knock out a few handmade projects for some extra special people on my list.
Well, I'm here to share a card I created using a mini paperbag. All you have to do is fold the end of the bag to were it fits under the flat of the "bottom" of the bag. Next cut cardstock to fit each fold/flap of your card. I inked all edges of the cardstock before adhering to the card.


I used my Cuttlebug snowflake diecut and cut one snowflake from velum and the other one from cardstock which all the cardstock and chipboard snowflake is from the Winter Collection(Russia) from the Robin's Nest and the Deco Snowflake sticker are from Ecstasy Crafts.


Now if you want to you can add a sweet little goodie inside the bag. Won't that be a sweet surprise???


Supplies Used:
Deco Snowflake sticker 
Versa Magic Ocean Depth Chalk Ink
Cuttlebug Snowflake Diecut
Mini Paperbag

If you have any questions let me know. Thanks for stopping by, hope your Wednesday is wonderful and enjoy creating!!!


Tuesday, December 17, 2013

Santa is in the House Gift Card Holder

Hi everyone! I'm back to share a quick gift card holder I created using house gift card diecut from Sizzix. It was super quick to cut out and decorate. 


Now all I have to do is add a gift card. Easy peasy!!!


Supplies Used:
Sizzix:Gift Card Holder House, Tasteful Trim, Christmas Tree Mini Album Diecuts
Stampin Up Scallop Oval Punch
Stampin Up Tiny Tag Rubber Stamps
Santa image
Ribbon
Prima Flower
Button
Sequins
Red and Green Chalk Ink

If you have any questions let me know. Thanks for stopping by, hope your Tuesday is wonderful and enjoy creating!!!


Monday, December 16, 2013

Snowman Love

Hi everyone! Can you believe Christmas is only nine days away?!!?!? YIKES!!! I have been shopping, wrapping presents and crafting up a storm and I'm still not finished. I decided to take a break and share a snowman I created using a Smooth Foam ball I had received in package of ornaments a month or so ago.
I started out by applying two coats of gesso to the ball and then painting with some white acrylic paint. I lightly penciled in the eyes and mouth. Painted the mouth with black and "pounced" the cheeks with a light pink acrylic paint, adhered two black Dew Drops to the ball for the eyes and shaped a carrot nose from Sculpey clay and then baked it.


The chipboard snowflake cut out I painted with white paint and then added a fine glitter to it. I gessoed a bottle cap which I used as the "neck" of my snowman.


I used an old sheet of music to make a cone hat for my little snowman fellow. Added some silver tinsel, button, mini snowflake and a white Dew Drop to it. I set the hat aside and then covered the whole snowman head and scarf with fine glitter. Let dry and then glue the cone hat to the snowman. 


I plan on adding this little fellow to my collections of other snowmen that I have on the  fireplace mantle.


Supplies Used:
Chipboard Snowflake Shape
Bottle Cap
Fine Glitter
Vintage Sheet of Music
Tinsel
Round and Snowflake Buttons
Orange Sculpey Clay 
Gesso
Antique Mod Podge
Black and Pink Acrylic Paint


If you have any questions please let me know and I'll do my best to answer them. Hope you can stop by tomorrow...Tuesday...cause I have another quick project to share. :-) Thanks for stopping by today, hope your Monday is wonderful and enjoy creating!!!


Monday, December 2, 2013

Merry and Bright Christmas Card

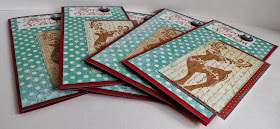
Hi everyone! I'm here to share a really quick project for a swap I was in on Facebook. I found this super cute reindeer rubber stamp at Michael's when I was out one day. The cards were easy peasy to make. 6"x6" cardstock folded in half to make a 3"x6" card base, stamping and add scrapbook paper, button, sequin and dew drop. See it really is a simple card to make. :-)


If you have any questions let me know. Thanks for stopping by, have an awesome Monday and enjoy creating!!!


Sunday, December 1, 2013

Postage Stamp Snowflake Rolodex Card

Hi everyone! Can you believe this is the first day of December and Christmas is only 24 days away??? YIKES!!! I did get out for about two and a half hours on Friday and did a little  Christmas shopping. There was just no way I could force myself to go out on Thursday and shop. For one thing it is just not right that people has to work on a holiday when they should be home eating and spending time with their family. I'm afraid next year retail stores will be open all day on Thanksgiving. Sigh... :-(
I'm here to share a couple of rolodex cards I created for a swap I was in over at Swap-bot.  One is for my swap partner and the other is for me. :-) The theme was holiday with a postage stamp used in some way on the rolodex.
I hope you enjoy them!


Thanks for stopping by! If you have any questions let me know, hope your Sunday is wonderful and enjoy creating!!!