Saturday, December 29, 2018

ClearSnap: Pink Holly Memo Holder

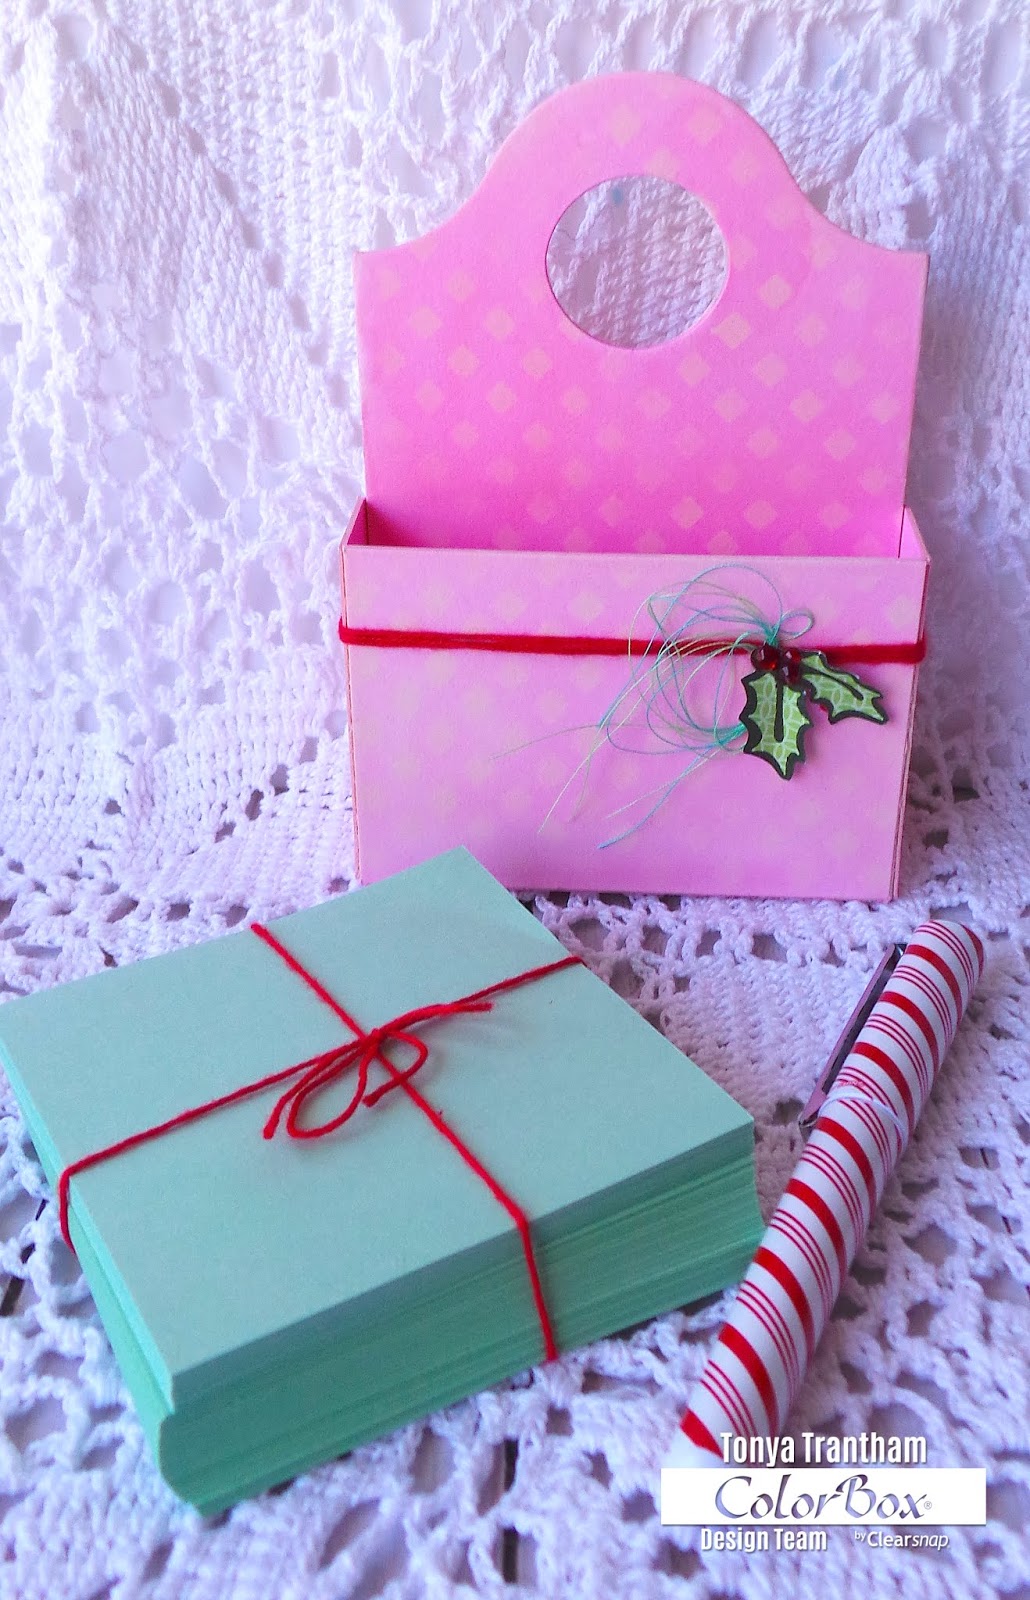
Hi everyone! I hope you had a wonderful Christmas! I have been extremely busy and didn't get to share this memo holder I created as a gift idea for Christmas. You could change the colors and embellishments for a birthday or as an office anniversary gift.


I started by placing Mat Board on top of Bag, Caddy Diecut and put between the two plates and run through the Diecut MachineI inked a glass tray with Fruit Punch Dyestress Blendable Dye Ink, add water and watercolored the front and back of the box and backing of the diecuts and let dry.


I inked a Color Blender with Alabaster Chalk Ink from the Mercantile Paintbox Chalk Ink Set and placed the Lattice Art Screen on top of the backing diecut and apply the Alabaster Chalk Ink. I again applied Alabaster Chalk Ink to the Color Blender and place the Lattice Art Screen on top of the box diecut and applied to the art screen. I put the Bag/Caddy together according to directions on the packaging and cut one backing from patterned cardstock using the Bag/Caddy Diecut and adhere to the back of the completed Bag/Caddy.


I placed a holly stamp from the Cookies Clear Stamps Set onto an Acrylic Block and inked with Wicked Black Archival Ink and stamp onto a piece of patterned green cardstock. I fussy cut the holly image out and shaped.


I wrapped red twine around the Bag/Caddy three times and adhered into place. Next I looped several mint and aqua threads together and adhere to the back of the holly before adding to the Bag/Caddy. I added three red gems to the holly. I tied red twine around 3"x3" notepad or a set of sticky notes would work too. I finished off by adding a ink pen along with the notepad to the Bag/Caddy.


As always if you have any questions about this project please let me know.


Thanks for stopping by, hope your Saturday is wonderful and enjoy creating!


Friday, December 21, 2018

My Favorite Top 5 Eileen Hull Projects

Hi everyone! I'm back today to share my favorite top five projects that I have created using Eileen Hull's Diecuts! Under each photo I have linked the blog post that goes with each project. Also you can find this month's blog post from Eileen's Inspiration Team HERE.


Thanks for stopping by, hope your Friday is awesome and enjoy creating! 

Thursday, December 20, 2018

Santa Pockets

Hi everyone! I'm back with some quick projects I created for a swap I was in on Instagram. Florence aka LiveLifeandCreate hosted this swap and we were supposed to send a Christmas card, something flat worth around $3 and decorate the envelope for three partners. Well, I didn't make anything flat as you can see.😁


I decided I would make these Flower Pockets by Eileen Hull. Instead of using Mat Board (which I am running low on) I used chipboard which I covered with Adhesive Sheets before adding the cardstock and running through the Diecut Machine.


I used The Paper Studio Jingle all the Way Paper Pad to cover the pockets. I cut the Heart and Soul Flower Dies from Crinoline, layered and added a button and brad before adhering to the to the corner of the pocket. I added gold cording, a mini pinecone and Holiday Greens Dies (pine needles and holly) underneath the flower.


The second pocket I created as the first one but I used a store bought paper flower, a gem with button and a couple of berries from a greenery spray. For both pockets I added packages washi tape, a mini Christmas ornament and a Christmas card.


If you have any questions about these projects please let me know and I would like to also submit these for the following challenge:

Word Art Wednesday Anything Goes: #366-#367


Thanks for stopping by, hope your Thursday is wonderful and enjoy creating!


Tuesday, December 18, 2018

Mom's Little Book of Recipes

Hi everyone! Can you believe Christmas Day is only a week away? If you are still searching for gift ideas I would like to share a recipe book I created!


I started by placing  Mat Board on top of the Passport Diecut and place between two plate and run through Diecut Machine. I cut the front/back cover twice and cut a total of four covers from patterned cardstock and adhered those to the front and inside covers. Next I loaded an Art Dauber with Cattail Dyestress Blendable Dye Ink and inked the spine of recipe book and let dry. I adhered the front and back covers to the spine.


I placed the following stamps from the Cookies Clear Stamp Set onto an acrylic block: Mixing Bowl (stamp twice), Wooden Spoon (stamp twice) and ink with Wicked Black Archival Dye Ink, stamped onto various patterned cardstock and fussy cut all  images out. I placed the"Merry", Cookies, and Swirl Cookie onto an acrylic block. Ink the "M" (stamp twice), "S" (stamp once) and Swirl Cookie with Wicked Black Archival Dye Ink onto patterned cardstock and fussy cut both "M"s, "S" and Swirl Cookie out.


I printed from the computer "Little Book of Recipes" and cut each word and ink edges with Scuba Dyestress Blendable Dye Ink along with two scraps of patterned cardstock. I adhered the scraps of cardstock, the letters and swirl cookie to spell out Mom's Little Book of Recipes and Mixing Bowl and Wooden Spoon image on the cover. Next I embellished the "M"'s and "S" and Swirl Cookie with Clear Glitter Glue.


I strung and tie off elastic cording in the spine.


I cut patterned cardstock to fit the fronts and backs of three notebooks and adhered. I placed the doily stamp from the Cookie Clear Stamp Set onto an acrylic block and ink with Wicked Black Archival Dye Ink and stamped onto a piece of patterned cardstock. I stamped the doily three times and fussy cut each doily out and adhered to the front of each notebook. I placed the Cookies stamp onto an acrylic block, inked with Wicked Black Archival Dye Ink and stamp onto a piece of patterned cardstock and cut out.  


I also stamped the heart and gingerbread man stamps onto a piece of kraft cardstock with Leather Archival Dye Ink and fussy cut both images out. I adhered the gingerbread man to the front of the "Cookies" notebook. I forgot to mention that before adhering one of the doily to the cover I stamped the "Baked with Love" sentiment onto the doily. I adhered the heart to the corner of the sentiment and embellished both the gingerbread and heart with clear glitter glue. I adhered one mixing bowl and wooden spoon images to the center of the doily of the last notebook.


I placed each recipe book underneath elastics cording and if I wanted to I could add a couple of my favorite recipes and a few cookies cutters before giving as a gift. 


If you do have any questions about this project please let me know.


Thanks for stopping by, hope your Tuesday is wonderful and enjoy creating!


Thursday, December 13, 2018

Vintage Christmas Angel Gift Bag

Hi everyone! I'm back again with another idea for Christmas! This time I creating a gift bag to hold either candy or small gift.


I started by inking the Christmas angel stamp from Character Constructions: Vintage Christmas No. 4 with Wicked Black Ink onto a piece of Watercolor PaperPush the lid in of each of the following Dyestress Blendable Dye Inks: Palomino, Salmon, Posy, Graphite, Moonstone and Scuba. I removed the lid from each ink and add a little water and painted directly from each lid.


I watercolored the angel's face and hands with Palomino ink and let dry. Next I shaded the face with Salmon ink and painted the outfit with Scuba ink and shade with Graphite ink. The head scarf and belt I painted with Moonstone ink. I painted the candle with Posy ink.
Once dry I fussy cut the angel image out, applied Clear Glitter to wings and outfit and added four flat back pearls to angel.


I cut the following pieces of patterned cardstock: 3"x6" and 1 7/8"x3 1/2" and adhered both to the front of the bag. I also cut two strips of patterned cardstock slightly smaller than the bag. I cut a "V" into the end of the strips to create a banner and adhere to the bag.


Next I spritzed a wooden snowflake with Vanilla Shimmer Smooch Spritz and once dry adhered to the bag. 


I added sequins, buttons and flat back pearls to the snowflake.


I stamped the "Peace on Earth" sentiment from the Vintage Christmas No. 4 Stamp Set with Wicked Black Ink onto a strip of white cardstock and cut a "V" in the end to create a banner and added onto the top of the snowflake.


I applied Pop Dots to the back of the angel and add to the bag. To keep the bag closed I clipped a Mini Clothes Pin to the top of the bag. There you have it another DIY Christmas project that will save you time...as in getting out in all the shopping craziness and it will save you a little money too. 😊
I would like to submit this project for the following challenge: 

Word Art Wednesday Anything Goes: Weeks #364-#365


Thanks for stopping by, hope your Thursday is wonderful and enjoy creating!


Monday, December 10, 2018

Snowflake Gift Card Holder

Hi everyone! I'm back today a quick gift card holder project for Christmas! If you are into all things glitter but don't like the mess. I am going to show you how to use embossing powder over a piece of cardstock to give it that sparkly effect.


I started by punching a snowflake from mint green cardstock. I covered the snowflake completely with Clear Top Boss Embossing Stamp Pad and applied Opalescent  Embossing Powder to the snowflake and set with the Heat Tool.


I inked a snowflake stamp from the Home for Christmas Clear Stamps with Wicked Black Ink and stamp onto a piece of White Cardstock. I punched the snowflake out with a Circle Punch and applied adhesive to the center of the stamped snowflake and sprinkled Winter Frost Glitter onto the image and gently shook off the excess. 


I cut from patterned cardstock the following cardstock strips: 1 7/8"x2 1/2", 1/2"x2 1/2" and 1/8"x2 1/2"  and adhered all cardstock strips to the front of the Mini Bag.


I adhered the snowflake circle to the center of the larger snowflake, added sequins, a flat back pearl to the center of the snowflake and glued the larger snowflake to the bag. I folded the flap over and add a mini clothes pin to the top of the bag. This will keep the gift card safely in place until  it is ready to be given as a gift. As always if you have any questions about this project please let me know.

    Thanks for stopping by, hope your Monday is wonderful and enjoy creating! 


    Saturday, December 8, 2018

    Canvas Corp: Farmhouse Snowflake Christmas Cards

    Hi everyone! Can you believe that Christmas right around the corner? I can't! Today over on Canvas Corp's blog I show how to created three Wintery Christmas cards with an assortment of cardstock, glimmer mist and glimmer glaze! For all the how to's and more photos you can find the blog post HERE.


    For more inspiration be sure to stop by Canvas Corp's blog daily. You can find their blog HERE. Also if you have any questions about these cards please let me know. Or if you would like to leave a comment that would be more than appreciated. 😊


    Thanks for stopping by, hope your Saturday is awesome and enjoy creating!


    Thursday, December 6, 2018

    I'll be Home for Christmas Tag

    Hi everyone! I'm back today with a quick tag I created for Christmas!


    I started by inking a glass tray with Ebony and Coconut Blends and adding water to each ink. I placed the Tag into each ink mixture until the tag was completely covered with ink and once dry I inked a  Damask Cling Stamp with Pewter Ink and stamp onto the tag.


    I inked a glass tray with Coconut Blends and add water and loaded a paint brush with the ink mixture, splattered the tag and let dry.


    I cut the "I'll be Home for Christmas" sentiment and fussy cut the truck with tree from the Farmhouse Christmas Stripe on Ivory Cardstock. A side note...push lid in onto the ink pads there will be ink transferred to the inside of the lid. You can paint from what is transferred onto the inside of the lid instead of loading a glass tray with ink. I painted the bed of the truck with Cattail Ink, the cab of the truck with Fruit Punch Ink, the wheel with Graphite Ink and the pine tree with a combination of Shamrock and Citronella Inks.


    I inked the edges of the sentiment with Fruit Punch Ink and adhere to tag. I also cut one piece of patterned cardstock to cover the back of the tag, adhered and punch a hole in the top of the tag. Next I placed a piece of glitter cardstock on top of a Tear Drop Circle Diecut and sandwich between cutting pads and run through a diecut machine and adhered to the tag along with the truck. I added clear glitter glue to the pine tree tips in the truck. 


    I tied off a 8" piece of seam binding and 8" piece of lace to the top of the tag and finished by adding a button on top of the lace and seam binding. As always if you have any questions about this project please let me know.


     Also I would like to submit this project for the following challenges:

    Crafter's Castle: Challenge #12
    Simon Says: Wrap it Up 


    Thanks for stopping by, hope your Thursday is awesome and enjoy creating!